

How to Take Christmas Family Photos at Home (DIY Tips)
A step-by-step tutorial for creating a DIY Christmas family photoshoot by yourself that look dreamy and professional in front of your Christmas tree.
Christmas portraits sneak up on us every single year. Before I know it I am scrambling trying to find a photographer, a date we miraculously have free for a photo session in our busy schedules, and keep everyone in the family in a good mood / healthy long enough in cold/flu season to say “cheese” for the camera.
Spoiler alert: I drop the ball at scheduling a “pro” photoshoot basically every Christmas. And I never get around to sending out Christmas cards. Is this familiar to you?

I don’t mention it often, but for several years in college, I was a family studio portrait photographer. Once Thanksgiving hit, I was cranking out 15-20 Christmas portrait sessions daily.
It was hard. But it taught me a lot of great tricks for getting great angles and sweet kids’ expressions (no matter their mood) using any camera, even a mobile phone.
How to Take DIY Christmas Family Photos at Home
You don’t need a professional photographer or an expensive camera to take beautiful Christmas family pictures! Here are my favorite tricks from my years working as a portrait photographer.
- Choose a spot near your Christmas tree. Position your family in front of the tree with a window or open door providing soft natural light on their faces.
- Turn off overhead lights. Leave the Christmas tree lights on for that dreamy holiday glow.
- Set up your phone or camera. Use a tripod or sturdy surface and set a timer so everyone can be in the picture.
- Keep poses natural. Sit together on the floor, snuggle up in Christmas pajamas, or let the kids play with a wrapped present.
- Take lots of pictures! The candid moments between the posed smiles are usually my favorites anyway.
Now let me show you exactly how to get the lighting, camera settings, and angles just right.
Why Taking Your Own Christmas Family Portraits Is Worth It
Having family photos taken by a real professional photographer is really important to support local artists in your area, but if it’s just not in the cards for you this season, here is why doing a DIY session instead is worth it.
Location
Usually, the perfect portrait backdrop is already set up right in your living room anyway so why not go for it! I think taking photos in front of your own tree is even more special than a professionally styled setup because it’s YOUR tree.
Kids especially can feel more comfortable in their own home, especially those with special needs who need a little extra comfort.
Timing
Every year, I use our tree as an opportunity to get a pretty shot of our girls, but the best part is I can sneak it in when they’re in a good mood or not sick with a cold.
We can work a DIY photoshoot into our super busy schedule. And if we try to get photos but a complete toddler meltdown happens, it’s no harm done because we can just try again the next day.
Budget
Professional family photos are usually several hundred dollars, so DIYing them allows you to save your holiday budget for travel, gifts, etc.
For this year’s, Robert and I wrangled the kids into their Christmas jammies right after church on Sunday to get the job done in 5 minutes using my iPhone. It’s not as striking as when I use my Canon 6D DSLR camera, but it’s pretty darn awesome.

DIY Christmas Family Photoshoot In Front of Your Tree
If you’re in a pinch, these tips for a DIY Christmas family photoshoot are the BEST for wrangling the kids for a sweet Christmas card pic right in your living room.
You can make your kids’ photos as laid back and candid as you’d like. (See that cookie in little Regan’s hand in the photo below? Bribery doesn’t hurt, ya know? ?)
If at some point this season you’re gathered around your tree with loved ones, maybe these tips can help you capture the moment during your festivities.

I rounded up Regan and Olivia for a quick DIY Christmas photo shoot a few years ago, and (even though Regan was not having it) while I was at it, I took a picture of my setup to hopefully help show the process.
Whether you have a DSLR camera or a cell phone, this works!
How to Take Your Own Christmas Family Photos at Home
(Some affiliate links are provided in this post for convenience. Full disclosure here.)
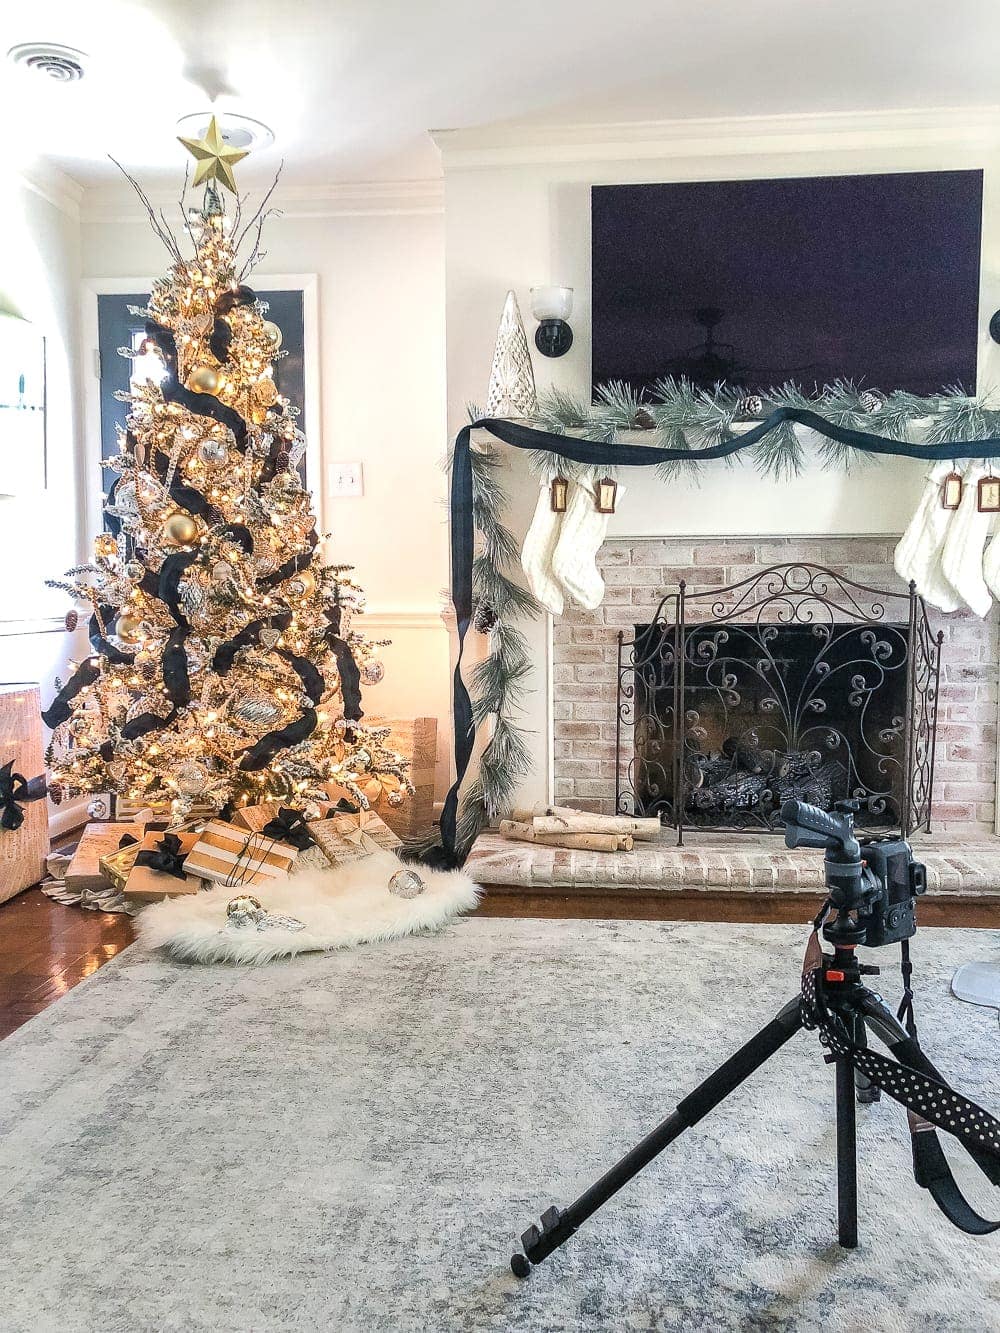
Position Yourself for Good Lighting
Aim for Midday
It’s best to avoid photographing people if there is harsh sunlight streaming directly through any windows (at sunrise or sunset). You want natural light to be soft not glaring.
I shoot only in natural light 99% of the time, but those soft glowing night shots are great to capture with candid moments of kids facing the Christmas tree.

Turn Off the Lights
I rely on only sunlight 99% of the time, so to avoid any weird hues on peoples’ faces in the photo, turn off all of the lights in the room except for the lights on the Christmas tree and sunlight streaming in from a window or open door.
Position Subjects to Face a Light Source
Place the people in the photo between the Christmas tree and your natural light source (like a window or open door) so they will be lit from behind and in front.
Check out this super professional diagram I made so you see what I mean. Haha!

Important: NEVER use a flash… it will destroy that dreamy glow from the tree.
If your Christmas tree is in a room that doesn’t get any natural light, you can opt to shoot using just the tree lights and a small lamp opposite from the people in your picture to get just enough light on their faces to make them show up in the photo without being too bright.
But overhead lighting is a definite no-no.
Posing
A great trick to get good lighting on faces, especially with kids, is to have your subjects lie down facing up under the tree and shooting over top of them allowing the glow of the Christmas lights to illuminate them evenly.
Tip: When posing kids, it helps to have some Christmas photo props. Add a pretty wrapped gift box or some ornaments that they can interact with to get some candid shots. If your kids aren’t in the mood to sit and smile at the camera, a prop can be a good distraction to get some sweet expressions.

Keep your poses as natural as possible and let your subject lead the way. People look their best in photos when they feel comfortable.
Try sitting in front of the tree, standing in front of the tree, interacting with ornaments on the tree or presents underneath; throw in dancing and silly faces and have fun with it.
Shooting kids overhead to get a birds eye view is an easy Christmas photo idea for young family members, especially babies who can’t sit up yet.

Frame Your Subject
Always try to shoot at eye level with your subject. So if you’re shooting kids, squat or sit down so that their faces are the same height as your camera lens.
For adults, photograph them from just slightly above eye level to decrease the look of double chins.

Camera Settings
For Mobile
How to Take Christmas Tree Photos With an iPhone
You can get beautiful Christmas family photos with just your iPhone! Here are a few extra tricks to make your pictures look even better.
- Try Portrait mode. It can create a softly blurred background so your Christmas tree lights look dreamy. For larger family groups, regular Photo mode may work better to keep everyone in focus.
- Tap on a face to focus. This tells your phone what should be sharpest in the photo. If the image looks too bright, drag the exposure adjustment down slightly.
- Avoid zooming in. Use your phone’s main camera at its normal setting whenever possible, especially in lower light.
- Use a tripod and timer. A 10-second timer gives you enough time to jump into the picture with everyone else. If you have an Apple Watch, you can also use its Camera Remote feature.
- Keep everyone fairly still. Christmas tree lights are beautiful, but dim lighting can cause blurry photos when kids are moving around. Taking pictures during daylight makes this much easier.
And don’t forget to wipe off your camera lens first! You’d be amazed how often a smudged lens is the reason photos look hazy.

For DSLR Cameras
If you are shooting with a DSLR, be sure to switch your dial to manual mode.
Aperture
When photographing a single subject, set your aperture (f/) to the lowest setting your lens will allow for that dreamy, blurry effect. I set my lens at f/2.0, but if your lens doesn’t go that low, just opt for the smallest number it will allow. Set it at f/4–f/5.6 for groups arranged at similar distances from the camera, adjusting for available light.
Shutter Speed
Next, set your shutter speed to 1/200 or higher. Any less than that (especially with kids) will make the people in your photo look blurry, if they move.
ISO
Now that you have those two settings, you can adjust your ISO depending on how much light you need. The higher you crank your ISO number, the more grainy your photo will look, but a higher ISO will let in more light and create a brighter photo.
White Balance
For white balance, set it to auto since it will give you a “best guess” for your photo’s coloring.
(If you only have a cell phone, you can get the Adobe Lightroom App to use these settings on an iPhone or an Android too. It’s totally free!)

Focus
Because you’re shooting at a wide (low number) aperture, it will cause a blurry effect in your background and Christmas lights will have that dreamy, soft look. But that makes it even more important to make sure you’re focusing on your subjects’ faces so they appear sharp.
If you’re shooting on a DSLR, you can set your focus point to do this.
If you’re shooting on a cell phone, tap on the person’s face you’re shooting on your screen to set the focus.

Editing
I use Adobe Lightroom for editing my photos from my DSLR on my Macbook, but if you’re using a cell phone, you can use the Adobe Lightroom mobile app again for adjusting.
The main thing I do to adjust my photos in editing is…
- Increase exposure
- Increase whites
- Decrease highlights
- Increase shadows
- Decrease blacks…
…to create a more evenly lit photo. But even without editing, your photos will likely have a soft, natural glow.
Like this…

My Photography Gear
If you want to know about any of the photography gear I use, I have a Canon 6D and a Canon 50mm f/1.8 lens for portraits, but really any basic DSLR can handle this and a mobile phone can manage in a pinch (I have the iPhone 13 Max Pro).
I hope that helps! And I hope it allows you to capture precious moments with family and loved ones this season.
Think you’ll try your own Christmas photoshoot this holiday season? Even if you don’t do Christmas card photos, having some sweet holiday portraits each year to treasure forever is so worth it.
Frequently Asked Questions About DIY Christmas Family Photos
Set your phone or camera on a tripod and use the self-timer or a wireless remote. Position everyone in front of the Christmas tree, leaving enough room for yourself to jump into the photo. Take several pictures so you have plenty of expressions to choose from.
Keep your camera steady using a tripod or sturdy surface, and tap on your subject’s face to set the focus. If you’re photographing people, make sure there’s enough light on their faces so your camera can use a faster shutter speed. A softly blurred Christmas tree background can actually look beautiful, but you want the people in your picture to be sharp!
I prefer taking Christmas family photos during the day when soft natural light is coming through the windows. Avoid harsh direct sunlight that creates strong shadows across faces. You can leave the Christmas tree lights on to capture that cozy glow without making your pictures too dark.
Position your family between the Christmas tree and a window, turn off overhead lights, and tap on a face to focus. Try Portrait mode for a softly blurred background, or regular Photo mode for larger groups. A phone tripod and timer make it easy to include the entire family.
Coordinating colors usually look better than perfectly matching outfits. Choose two or three colors that complement your Christmas tree decorations. Cozy sweaters, neutral outfits, and matching Christmas pajamas are all great options. Most importantly, wear something comfortable so everyone can relax and enjoy the photoshoot.
More Photography Tips





Precious little ladies.
Merry Christmas.
Great tips, Lauren! Hope you guys have a wonderful Christmas! Much love, Jane ❤️
Absolutely love the pics you’ve shared with us of your children, they are beautiful. Thank you SO much for the photography tips, I feel sure they will help a lot.
Best wishes for a wonderful Christmas
from
Judi in the UK
They look adorable. Thanks for sharing ! Merry Christmas !
Beautiful children and beautiful photos, thanks for the tips! Merry Christmas to you and yours!