
DIY Candles from Repurposed Candy Dishes
A basic, beginner’s step-by-step tutorial for making soy wax candles from repurposed secondhand candy dishes, tea cups, bowls, and jars.
It was a balmy, crisp 94 degrees in the Charlotte area yesterday, so naturally, I’m over here making DIY candles in my cozy sweater, right?
The life of a blogger is super weird, if you didn’t know that already. 😉
While out antiquing during our “day date” though, Robert and I found this set of vintage amber glass candy dishes. I remember my great-grandmother had some JUST like these at her house when I was growing up, and they were always filled with orange candies.
The second I saw them I thought, “Ooh! Fall project!”

And then ta da! This one came along just in time for this month’s Trash to Treasure Transformation Tuesday.

(You can see the other bloggers’ thrifty transformations at the end of this post, if you’re a T2T newbie.)
I have always wanted to try my hand at DIY candle-making, and I know there are all kinds of methods using all kinds of materials with all sorts of ways to use various natural fragrances, so this is a very basic, beginner-level tutorial.
And full disclosure, you’re talking to a very basic, beginner-level candle making gal so… in a nutshell, if I can do it, anyone can.

(Affiliate links are provided below. Full disclosure here.)
Supplies Used:
- Soy wax flakes (I like that this was really easy to melt in the microwave.)
- Medium sized candle wicks
- Candle fragrance oil (There are way more natural ways to add scents to candles with essential oils and the like, but I was fresh out of the oils I wanted to use for candles, so keep that in mind. If I had thought about it ahead of time, Clove and Cinnamon essential oils would have made a great fall candle scent.)
- Chopsticks (pencils, pens or straws work too)
- A microwave or double boiler
- A dish towel or newspapers (to protect your work surface)
- Metal butter knife (to stir with)
- Candle vessel of your choice – in this case amber candy dishes (tea cups, vintage bowls, jars, antique coffee tins, and the like would all be pretty too)
- Scissors
The Steps:
1. Start with your clean, dry candy dishes (or whatever vessel you choose) and microwave the soy wax flakes in the provided microwave safe container at 50% power for 2 minutes per 8 oz of wax. Stir and then continue to microwave at 30 second intervals, stirring in between until completely melted.

2. Be sure your wick is straight and dip the metal end into a little melted wax and place in the center of the bottom of the candy dish.
3. Using a dropper, add the fragrance (about 1/4 oz of fragrance per 8 oz of wax) to your melted wax and stir.
4. Pour the melted wax into your candy dishes.
5. Keep your wick upright by wrapping it around a chopstick or propping it between two chopsticks or pencils.
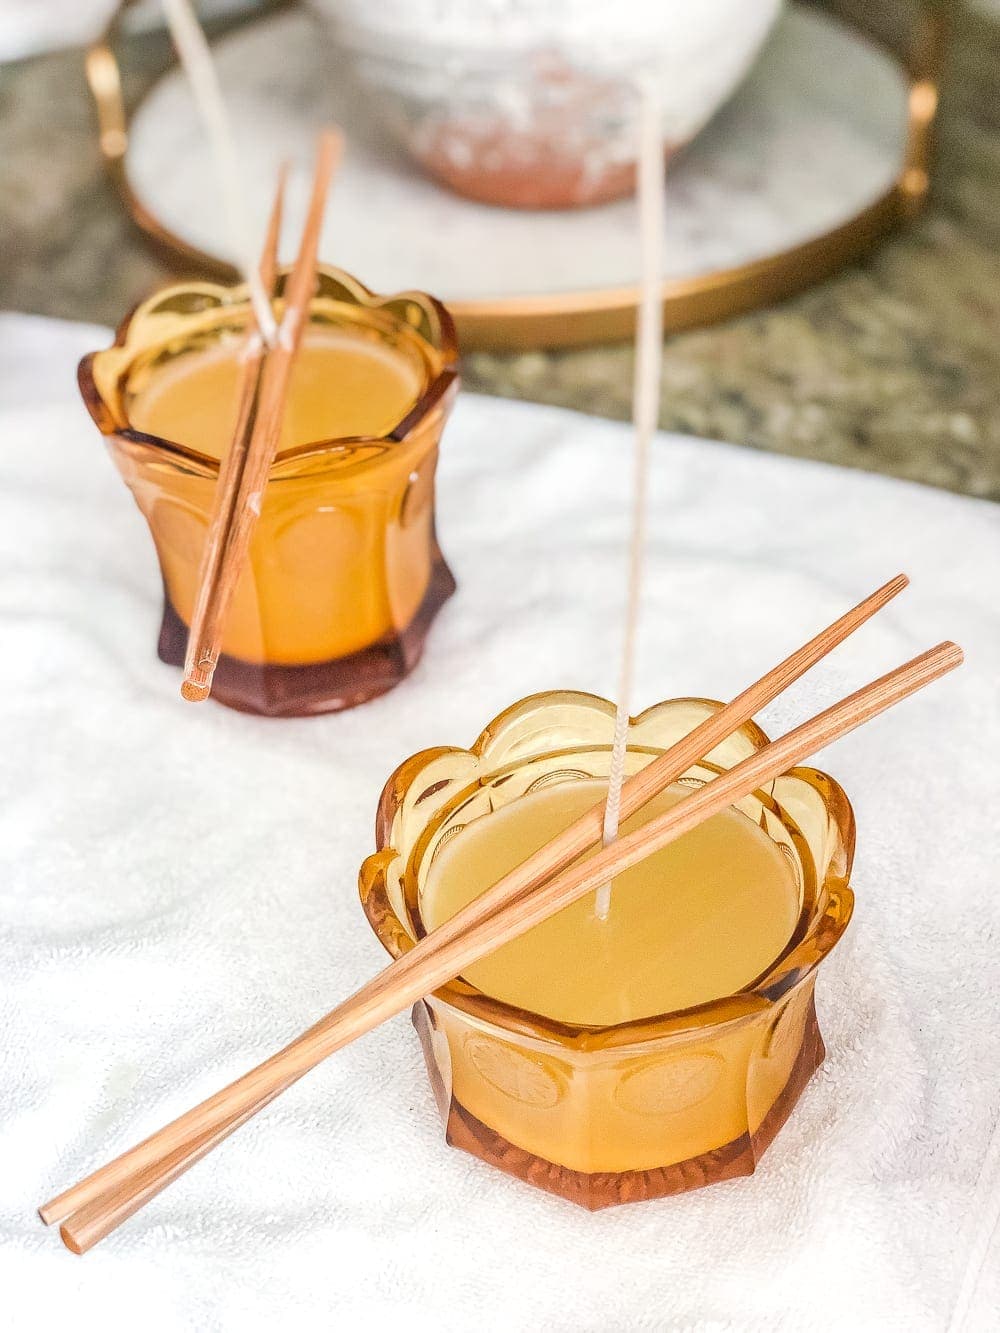
6. Let the wax cool and harden for a couple of hours, cut the wick to half an inch above the wax, and then enjoy!

And since these came with candy dish lids, I can put those on top when we’re not using them.

I ended up decorating these shelves in our kitchen over the weekend, and they’ve been the best little dose of fall happiness in here. I just pulled out a couple of copper pitchers, used the faux greenery I already had from spring/summer, and done!
The leaves are nowhere close to changing outside here yet, so maybe when they do toward the end of October I’ll bring in a branch or two for totally free fall foliage. But gotta say, I’m still lovin’ the green.

I think I’ve just found a new favorite DIY gift idea with these candles for when Christmas rolls around though. Adding candy dishes and pretty cups to my thrift store shopping list from now on just so I can do this again!

So where are my candle-making gurus? What fragrances have you whipped up that you loved? Any essential oil fanatics out there who know a thing or two about adding them to candles?
I’m seriously so excited to try making more like… tomorrow.
If you want to see more of my past Trash to Treasure Transformations, you can find them all here.
And you can see more thrifty ideas from my T2T buddies’ blogs here:

Clockwise from top left:
Confessions of a Serial DIYer | Prodigal Pieces | Artsy Chicks Rule | Girl in the Garage


Love these!
Thanks!
Question for you—-do you think you could use the “yankee” wax melts since they are already scented (like the cube shaped ones?) because I have a lot…
I think you can! I’ve never tried it though.
LOVE these! I once bought a candle ‘scent’ of coffee that I’ll never forget. The company quit making this rich and yummy fragrance years ago and I still remember the sweet coffee aroma. Does anyone know how to make the sweetened coffee smell for a candle?
what a great idea! It looked like fun to do and so pretty, too!
You are a gal after my own heart, Lauren. I make beeswax candles out of most anything too! Those candy dishes are perfect for autumn. ??