Bless'er House

  • Home
  • About
    • Contact
    • Advertise / Privacy Policy
  • Projects
    • Room Reveals
    • Budget Decor
    • Home Improvement
    • Organizing
    • Furniture Makeovers
    • Seasonal
  • Tour Our Home
    • Our Current House
    • Our First House
  • Shop Our House
    • Shop Our Current House
    • Shop Our First House
  • Shop Blessโ€™er House
    • Shop Our Instagram
    • Shop BH Style
    • How to Install Lightroom Presets
  • Blog
    • Facebook
    • Instagram
    • Pinterest
    • Twitter

DIY Sage and Blush Spring Wreath

March 20, 2019 ~ 38 Comments

Sharing is caring!

8588shares
  • Share
  • Tweet

A step-by-step tutorial for making a spring wreath from scratch using artificial sage greenery and blush flowers for soft, romantic style.

I hope you won’t judge me for this and it’s taken me a while to come to terms with this trait in my personality, but I can’t help it. I’ve realized…

I’m kind of a wreath snob.

I know. I’m totally ashamed. I’ll decorate our house with recycled bottles bound for the trash. I’ll swoop in for a piece of furniture that would get passed up at any yard sale. I will fill our house with IKEA everything and pretend it’s designer in a heartbeat.

DIY Sage and Blush Spring Wreath | A step-by-step tutorial for making a spring wreath from scratch using artificial sage greenery and blush flowers for soft, romantic style.

But I’m the pickiest person alive about the wreaths we hang on our front door.

While I was cruising through the aisles at Michael’s last week, I noticed all of their faux florals were 50% off and I couldn’t help myself. I scooped up every bashful and blush flower that crossed my path because apparently pink is my signature color this spring. (Steel Magnolias, anyone?)

So I thought I’d share how you can make your own DIY spring wreath, if you’re kind of a snob about it like I am.

You can find a bunch more inspiration at the end of this post for The Happy Housie’s Seasonal Simplicity Wreath Bloghop, if “bashful and blush” isn’t your thing.

DIY Sage and Blush Spring Wreath | A step-by-step tutorial for making a spring wreath from scratch using artificial sage greenery and blush flowers for soft, romantic style.

(Some affiliate links are provided below. Full disclosure here.)

Supplies Used:

  • Wire wreath form (I used a 24″)
  • Floral wire
  • Floral tape
  • Floral cutters (This little kit does the job for all of it.)
  • Artificial lamb’s ear stem
  • Artificial lamb’s ear bush
  • Artificial white berry bush
  • Artificial peony stem
  • Artificial dahlia stem (similar)
  • Artificial ranunculus stem
  • Artificial garden rose bush

DIY Sage and Blush Spring Wreath | A step-by-step tutorial for making a spring wreath from scratch using artificial sage greenery and blush flowers for soft, romantic style.

The Steps:

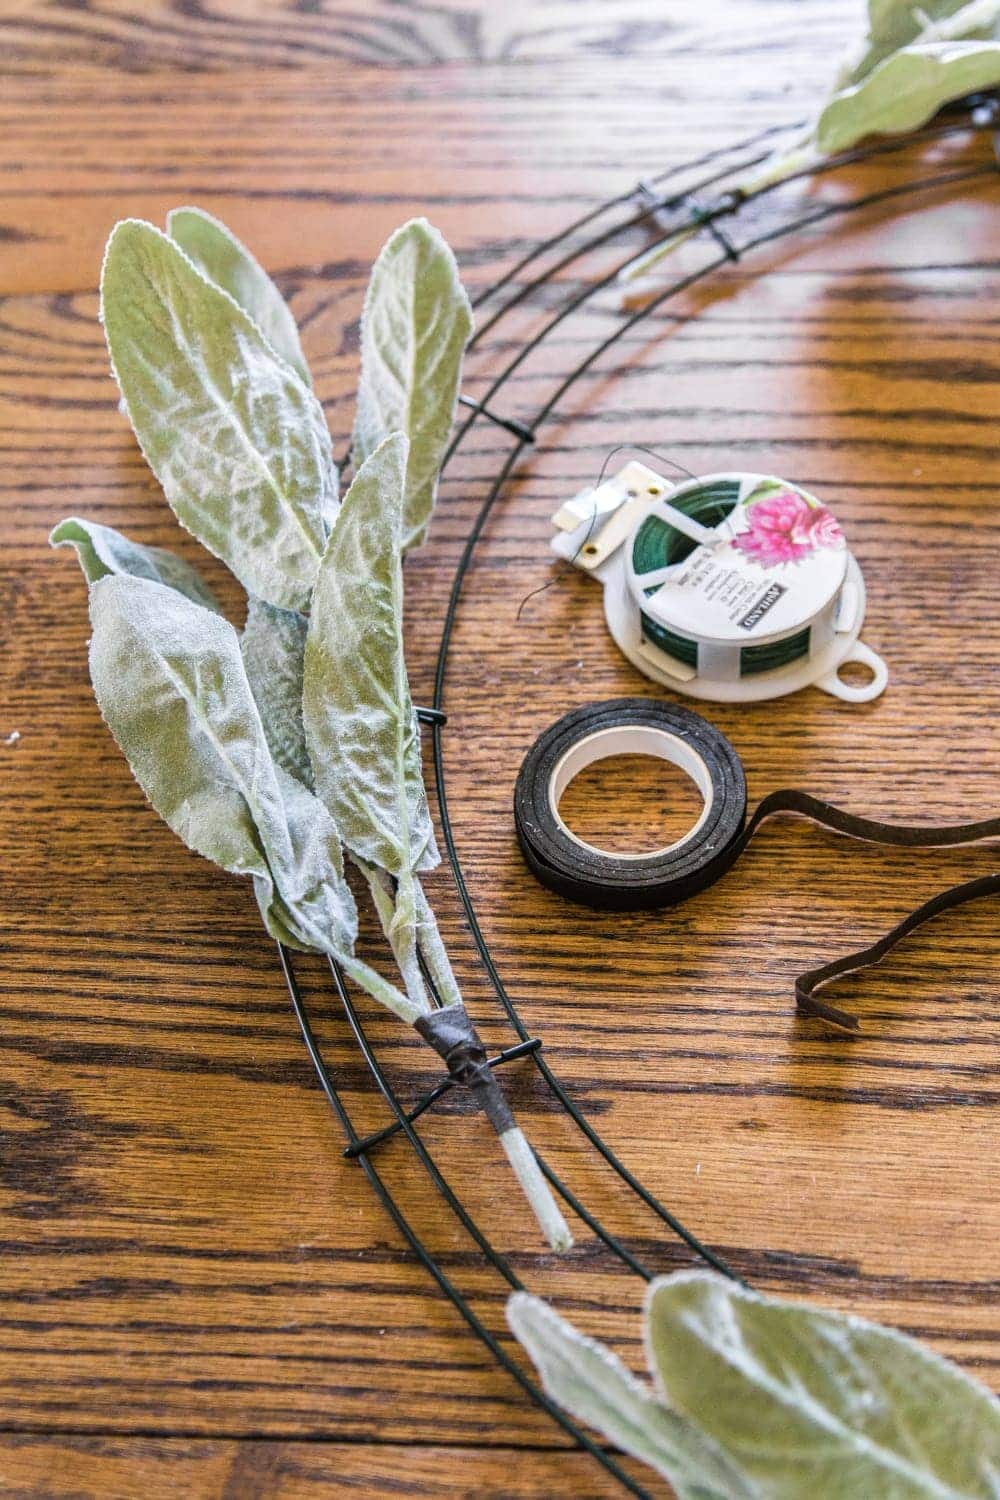
1. I started with the lamb’s ear first by snipping them into individual stems and placing them evenly around the wreath frame. And then attached them with florist wire and tape.

DIY Sage and Blush Spring Wreath | A step-by-step tutorial for making a spring wreath from scratch using artificial sage greenery and blush flowers for soft, romantic style.

2. Once the lamb’s ear was in place, I took apart the white berry bushes by snipping individual stems and attaching them with more wire and tape between the lamb’s ear stems on the wreath form.

DIY Sage and Blush Spring Wreath | A step-by-step tutorial for making a spring wreath from scratch using artificial sage greenery and blush flowers for soft, romantic style.

3. Then, I placed the blush flowers where I wanted them, pulled the stems through the wire form and attached them with more wire on the backside of the wreath.

DIY Sage and Blush Spring Wreath | A step-by-step tutorial for making a spring wreath from scratch using artificial sage greenery and blush flowers for soft, romantic style.

Easy and done in under an hour!

DIY Sage and Blush Spring Wreath | A step-by-step tutorial for making a spring wreath from scratch using artificial sage greenery and blush flowers for soft, romantic style.

And now our wreath is hanging out on our front door hoping spring will show up soon.

DIY Sage and Blush Spring Wreath | A step-by-step tutorial for making a spring wreath from scratch using artificial sage greenery and blush flowers for soft, romantic style.

This is actually the first wreath I’ve ever made totally from scratch, and I think I’m ready to make more because this one was WAY more fun than I thought it would be. I’m not exactly the crafty type (more of the furniture painting / home improving type), but I can get on board with this new little hobby.

DIY Sage and Blush Spring Wreath | A step-by-step tutorial for making a spring wreath from scratch using artificial sage greenery and blush flowers for soft, romantic style.

DIY Sage and Blush Spring Wreath | A step-by-step tutorial for making a spring wreath from scratch using artificial sage greenery and blush flowers for soft, romantic style.

Really sage and blush (and “bashful”) anything has my heart to begin with.

DIY Sage and Blush Spring Wreath | A step-by-step tutorial for making a spring wreath from scratch using artificial sage greenery and blush flowers for soft, romantic style.

Now to get the front porch swept and the rest of this little stoop in spring shape and we’ll be in business.

DIY Sage and Blush Spring Wreath | A step-by-step tutorial for making a spring wreath from scratch using artificial sage greenery and blush flowers for soft, romantic style.

If you want more DIY spring wreath ideas, you can check out all of them on the tour below:

Succulent & Peony Simple DIY Spring Wreath at The Happy Housie
Dollar Store Spring Wreath at Craftberry Bush
Lambs Ear & Blush Spring Wreath at Bless’er House
Elegant Peony & Eucalyptus Spring Wreath at Inspiration for Moms

Spring Fern & Eucalyptus Wreath at Zevy Joy
Boxwood and Bicycle Spring Wreath at The Turquoise Home
DIY Modern Floral Wreath at Lolly Jane
Oversized Spring Succulent Wreath at My Sweet Savannah

Five Minute Eucalyptus Wreath at Amber Tysl
Earthy & Elegant Spring Wreath at Willow Street Interiors
Mini Rosemary Wreaths for a Spring Table at Satori Design for Living
Spring Hydrangea Wreath at Confessions of a Serial DIYer

Branch and Vine Spring Wreath at Town and Country Living
Spring Hoop Wreath with Lemons at Modern Glam Home
Spring Wreath Ideas at Hallstrom Home
Spring Woodland Wreath at Deeply Southern Home

Dollar Store Easter Egg Wreath at The DIY Mommy
Spring Moss Covered Wreath at Tauni Everett
Easy 15 Minute Marshmallow Peeps Wreath at Heathered Nest
Pastel Colours M&M Wreath at Paint Me Pink

How to Make a Paper Flower Wreath at Happy Happy Nester
Spring Floral Hoop Wreath at My Uncommon Slice of Suburbia
Hanging State Sign at Taryn Whiteaker Designs
Book Page Butterfly Wreath at Life is a Party

Spring Basket Wreath at Clean & Scentsible
Simple Succulent Wreath at A Pretty Life
DIY Paper Flower Wreath at My 100 Year Old Home
Spring Plaid Carrot Layered Wreath at Tatertots and Jello


If you want to save this post for later, you can pin it here:

DIY Sage and Blush Spring Wreath | A step-by-step tutorial for making a spring wreath from scratch using artificial sage greenery and blush flowers for soft, romantic style.

Related

Filed Under: Crafts, Spring
Tagged With: Crafts, Spring

« Vintage Amber Bottle Label Printable
How to Disguise the Ugly Stuff in Your Home »

Comments

  1. mommo6 says

    March 20, 2019 at 7:25 am

    So pretty! Love the soft, spring-y colours.

    Reply
  2. Ellen | Ask Away Blog says

    March 20, 2019 at 7:47 am

    Wow, all that in under an hour? I’m impressed!

    Reply
  3. Kathleen Potvin says

    March 20, 2019 at 9:56 am

    So pretty! What do you use to hang it on the door?

    Reply
    • Lauren says

      March 20, 2019 at 11:48 am

      Our door has a peg already on it, so we just hang it from there. It was there when we moved in and we just never removed it because it comes in handy. ๐Ÿ™‚

      Reply
  4. Lucy AKINS says

    March 20, 2019 at 10:43 am

    This is so pretty and definitely from scratch. Worth it. xo

    Reply
  5. Elaine Gentry says

    March 20, 2019 at 10:48 am

    Ha ha! When I saw the word “Blush” in the title I knew there was a “Steal Magnolias” reference coming. Nicely done! Oh, and the wreath is pretty awesome or awesomely pretty, too! ๐Ÿ™‚

    Reply
    • Lauren says

      March 20, 2019 at 11:47 am

      I learned from the best. Haha! One of those Mom-isms.

      Reply
  6. Laura says

    March 20, 2019 at 10:51 am

    It turned out amazing, Lauren! I’m obsessed with the blushes and the lambs ear combo!

    Reply
  7. Michelle Lebeda says

    March 20, 2019 at 10:54 am

    Wreath is beautiful! I was looking thru the items linked and you might want to take a look. Unless this wreath cost you over 500.00 to make. ? Im thinking is was very budget friendly.

    Reply
    • Lauren says

      March 20, 2019 at 11:45 am

      Haha! So about that… Michael’s only allows you to order online in bulk which is a major bummer. But I wanted to link the exact items I used so that when people shop in stores in person, they’ll know what to get. I definitely don’t recommend spending that much money unless you plan on making 10 wreaths. Haha! Big ol’ nope!

      Reply
      • Lauren says

        March 20, 2019 at 11:46 am

        And yes, it’s still more budget friendly than buying one already made from a florist/artist.

        Reply
  8. christykjames says

    March 20, 2019 at 10:56 am

    This is absolutely dreamy for Spring, Lauren! XO

    Reply
  9. Vicki Bray says

    March 20, 2019 at 10:58 am

    Wonderful! Looks easy when you do it – might give this a go! Thanks for the inspiration.

    Reply
  10. Lori Davis says

    March 20, 2019 at 11:05 am

    Absolutely beautiful, Lauren! Hard to believe you havenโ€™t been making wreaths forever. Love the colors and the way you placed the flowers. Iโ€™m inspiredโ€”off to Michaelโ€™s and hoping they still have some blush floral stems left!

    Reply
  11. Shauna says

    March 20, 2019 at 11:13 am

    Love the blush colour you used. Looks so pretty against your dark door. Happy spring ๐Ÿ™‚

    Reply
  12. Rhonda Hallstrom says

    March 20, 2019 at 11:28 am

    This is so stunning. Love all of the colors you used. Happy Spring!

    Reply
  13. joroopcoop says

    March 20, 2019 at 11:43 am

    I, too am a wreath snob. Yours looks high-end florist worthy. Thank you for the tutorial!!! this is gorgeous.

    Reply
  14. Kristin salazar says

    March 20, 2019 at 11:44 am

    This is so pretty! I love the soft blush colors, perfect for spring!

    Reply
  15. Jo-Anna says

    March 20, 2019 at 12:29 pm

    So pretty Lauren! I love the blush with the silver foliage…gorgeous!

    Reply
  16. Ashley Stringfellow says

    March 20, 2019 at 1:05 pm

    Love this pretty wreath! Lambs ears and peonies are the perfect combo!

    Reply
    • Lauren says

      March 20, 2019 at 9:09 pm

      Thank you!!

      Reply
  17. Laurie says

    March 20, 2019 at 2:07 pm

    Love the wreath! But especially like the Steel Magnolia reference?

    Reply
    • Lauren says

      March 20, 2019 at 9:09 pm

      ๐Ÿ˜€

      Reply
  18. Karen says

    March 20, 2019 at 4:02 pm

    Thanks for sharing! I love your wreath – it’s so beautiful and I love the soft colors. It really reminds me of a wedding. ๐Ÿ˜€ You made this project look so easy and now I want to make one. Artificial flowers have come a long way!

    Reply
    • Lauren says

      March 20, 2019 at 9:08 pm

      Thank you, Karen. You should totally make one. ๐Ÿ™‚

      Reply
  19. Jeanne says

    March 20, 2019 at 5:45 pm

    Your wreath is so pretty! Love the blush flowers- they almost look vintage. And the way you put the larger flowers off center is charming. Youโ€™ve inspired me to try my hand at wreath making!

    Reply
  20. Pat says

    March 20, 2019 at 6:41 pm

    Lauren,
    This is stunning!
    Love all the ‘blush’ hues!
    Lambs ear and ranunculus. . .now you’re speaking my language!
    (wink! wink!)
    Thank you for inspiring with this lovely sage and blush Spring wreath!
    Pat

    Reply
  21. Krista says

    March 20, 2019 at 9:07 pm

    Stunning as always Lauren! I hope Spring shows up soon too. Looks like you got a great new hobby! I can’t believe you haven’t made a wreath from scratch. Amazing first try.

    Reply
  22. cleanandscentsible says

    March 20, 2019 at 10:11 pm

    Beautiful! I love the soft blush! It’s definitely fun to create your own custom wreath. ๐Ÿ™‚

    Reply
  23. Laura @ Inspiration for Moms says

    March 20, 2019 at 11:30 pm

    Such a pretty wreath Lauren! Love the soft pink color!

    Reply
  24. Lolly Jane says

    March 21, 2019 at 12:42 am

    Such a pretty wreath! You know we love us some blush! xo

    Reply
  25. Tauni says

    March 21, 2019 at 1:44 pm

    Oh Lauren, I am a TOTAL wreath snob! I think it’s why I always make my own wreath – I don’t love cutesy, but I do love a little something extra! Fun to participate in these hops with you. I love your blush wreath and have pinned it to my wreaths board!

    Reply
  26. Lisa says

    April 10, 2019 at 5:14 pm

    Just stunning! You did a fabulous job. How many stems of the lambs ear did you use?

    Reply
    • Lauren says

      April 10, 2019 at 9:01 pm

      Hi, Lisa! Great question. I used about 6 stems.

      Reply
  27. Mandy says

    April 13, 2019 at 2:36 pm

    The wreath is beautiful, but my question is regarding your front door. If you donโ€™t mind me asking, is that a vintage-inspired storm door or your actual front door?

    Reply
    • Lauren says

      April 15, 2019 at 8:31 pm

      Hi, Mandy!! I love questions. Ask away!! The doors were a part of the house when we moved in. I get asked about the front door A LOT! ๐Ÿ™‚

      Reply
  28. Kim Karpowitz says

    February 22, 2020 at 8:16 pm

    I love this! How many of each type of flower and bush did you need for the 24″ wreath?

    Reply
    • Lauren says

      March 12, 2020 at 11:21 am

      Ack! I can’t remember exactly, but I want to say I just used 1 of each greenery bush/stem and cut them apart to divide and attach around the wreath frame. For the flowers, I used 1 peony, two dahlias, and two ranunculus. And 2 rose bushes.

      Reply

Tell me what ya think! I read every comment I receive. Cancel reply

This site uses Akismet to reduce spam. Learn how your comment data is processed.

We’re Robert and Lauren, a DIY-loving duo just fighting the good fight in making our house a home one renovation and thrifted decorating adventure at a time. Home wasn’t built in a day, but the journey is half the fun. We’re so glad to have you here, and we hope you feel inspired to love the home you have.

Subscribe

Pin With Me

  • Home Office Ideas
  • A round-up of 20 of the best DIY wall decor ideas plus tutorials and tips to pull off the look easily and get the designer look for less.
  • How to paint a sink, countertop, tub, and shower for $100 and how to make it last using Rustoleum Tub & Tile Refinishing Kit #bathroom #bathroommakeover #diyproject #homeimprovement #paintedsink #paintedcountertop #paintedtub #paintedshower
  • A guide for the best sizes of rugs for different rooms, the best rug materials for different uses, and ways to pair them in open floor plans.
  • Learn to how to make hobnail Easter eggs inspired by vintage McCoy Pottery and hobnail art glass and milk glass. Paint the eggs in pastel colors and display them alongside your favorite vintage collections.
  • A round-up of over 50 beautiful coffee table books filled with inspiration from art, travel, design, music, history, fashion, and more.

Privacy Policy & Disclosures

We are a participant in the Amazon Services LLC Associates Program, an affiliate advertising program designed to provide a means for us to earn fees by linking to Amazon.com and affiliated sites.

Read our privacy policy and disclosures โ†’

Privacy Policy

browse by category

browse by date

Copyright © 2021 Bless'er House. Web Design by Viva la Violet.