
The Good, Bad and Ugly of Concrete Countertops
What to know before installing concrete countertops – the pros and cons, how they hold up over time, and how to install them for an inexpensive update.
Since the past couple of weeks have been fall-decorate-all-the-things around here and we’re diving into a huge room overhaul starting tomorrow for the One Room Challenge, it feels nice to take a second to breathe and give y’all an update for something I get asked about quite a bit: our concrete countertops.
It’s the good, the bad, and the ugly, y’all. I mean… not that I would call them ugly. They might hear me and resent me forever. (You can read about the full tutorial about how we installed them ourselves here.)
Here’s what our concrete countertops looked like when we first revealed our kitchen makeover 5 months ago:
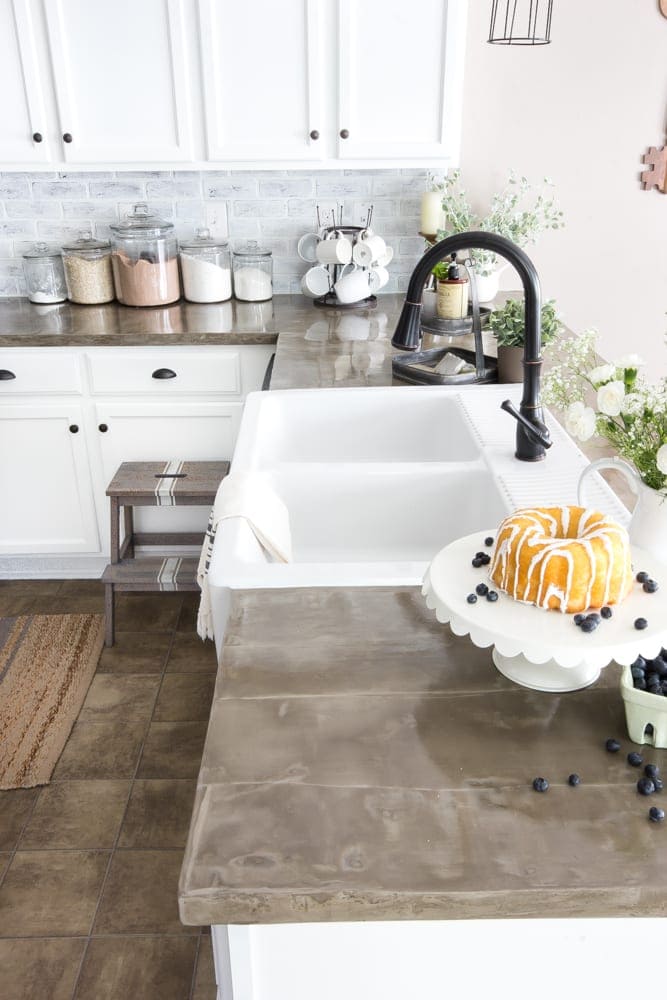
Shiny and pretty and flawless. Oooh ahhh!
But we’re not exactly easy on these things. They take a beating with regular wear and tear for as much cooking as we do. (Doing Whole30 especially put them through the ringer.)
After 5 months, here’s my general consensus…
- The good.
Pro: These babies are suuuuper cost effective. We managed to change all of our countertops for less than $300, which is a steal considering we have a fairly large kitchen.
Pro: They’re very easy to do yourself. Yes, they make a mess and yes, they’re time consuming, but you don’t have to use a single power tool to do it. (Unless you count a sander, but that’s easy peasy.)

Pro: They have lots of character and work beautifully for a farmhouse/industrial/modern vibe. Although, if you’re a perfectionist you might called its character just flaws.
To keep them clean, I use this Granite Cleaner and it does the job really well.

2. But then for the bad…
Con: They scratch easily.
Maybe it was the type of sealer we used, but I did as much research as I possibly could before choosing a sealing method, and the one we ended up doing was the one with the highest reviews.
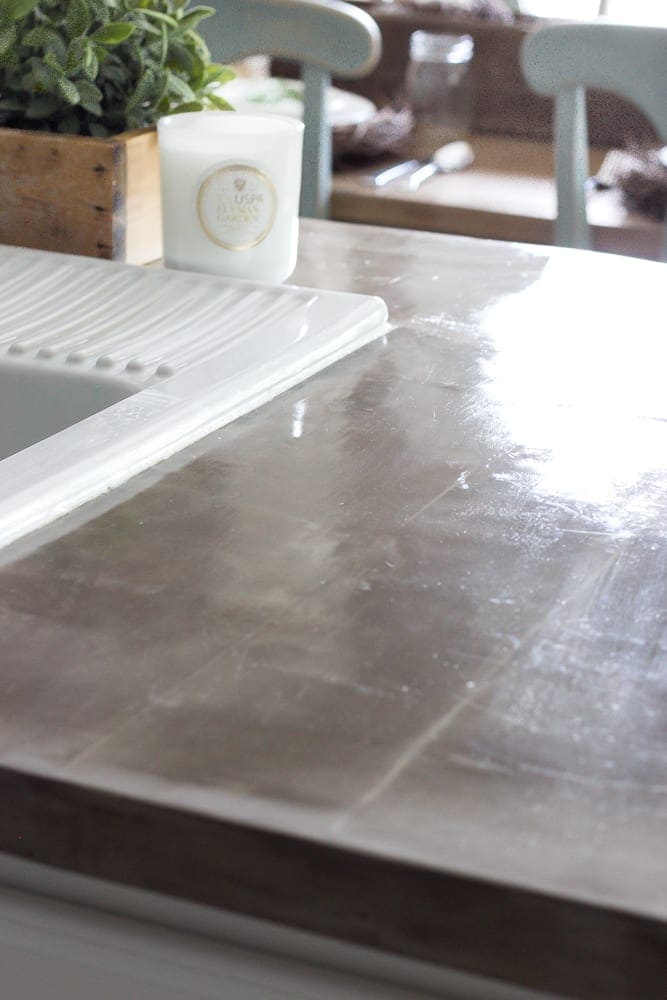
Like I said, we’re definitely not easy on them, but we try to be careful as much as we can moving dishes around on them. Although, in this spot beside our sink, it looks like we were scratching lotto tickets with car keys or something.
The good news is though, I can reapply a coat of sealer when I need to, and that scratched finish is patched right up.

3. The ugly…
Con: Cooking grease stains everywhere!
Okay, I exaggerate. Stains aren’t everywhere. But on either side of our stove, we have definite grease splotches.

I cook with olive oil quite a bit and Robert is Mr. Baconator all the time, so we’ve learned we always have to put down a dish towel on either side of our stove to protect our counters from anymore staining.
This is the worst spot:

All of those little black splotches aren’t so fabulous. Pretty soon, we’ll probably have to give this section another skim coat of concrete and reseal now that we know they need to be handled with love and care.
Besides fighting grease stains though, we’ve had no other issues. Water beads right up on the surface, and we’ve been able to wipe up any food spills and drips, even ones we missed and let sit around for a little while.

In hindsight, despite the scratching/staining issues, I’d still do these countertops all over again. I love the look of them and the fact that they cost so little. I don’t think they are a long-term permanent solution that will last you 20+ years like granite or marble, but they’re still very much worth it.
If you want to see how our IKEA farmhouse sink has been fairing, you can see the full update about it here too.
Have you thought about installing concrete countertops in your kitchen? Or bathroom? Or had some good, bad, ugly experiences with your own past DIY projects? Feel free to share!
If you want to save this post for later, you can pin it here:


I’m about to try my own and plan to stain using a dripping bottle to make blotchy black and grey spots, so I not that I read this I think that may cover the grease splatters somewhat..
They look so good! Which products did you use?
Hi Jessica,
The links are in the post. If you mean what did we use to originally make the countertops, you can read about it here: https://www.blesserhouse.com/diy-feather-finish-concrete-countertops/
What type of seal did you use? I have concrete and the seal I have seems not to want to harden completely. Bowls etc leave indentions
We did a couple of steps to seal ours. Here’s the post about it: https://www.blesserhouse.com/2016/05/diy-feather-finish-concrete-countertops.html
Hello, just found your blog via a Pinterest pin! We have concrete counters in our vacation home, installed about 6 years ago, holding up beautifully. We also just did concrete counters in our home kitchen remodel. My husband is a contractor so we formed up and poured in place. We also used a grinder to expose the aggregate and smooth the surface before sealing, which was quite an undertaking. The grinder requires water, so we had to set up a gutter system. We used V Seal Stonelock sealer. But we are happy with them. We used different types of aggregate for them, and some glass pieces in all of them. (We did the kitchen and bathroom counters in the vaca house).
That’s awesome! Poured is definitely the way to go. Ours was just a feather finish skim coat, and I definitely think the poured concrete would be a better long term solution, given the wear and tear we saw with ours in the course of a few months.
We did some beautiful concrete countertops right over our old laminate but we didn’t do the skim coat we built forms and poured a thick batch they looked great except my sealer started to flake and my sweet husband then used a chemical to remove it. Totally exposed all the rock underneath. I just spent the last two days sanding and sanding and sanding and they are gorgeous again. All the rock is exposed or sandy look and It looks more like granite now than the rustic I was going for but very beautiful! Going with your sealer recommendations this time to see if that helps