DIY Faux Planked Card Catalog Coffee Table
Reader Question: Where did you buy your coffee table?! I need one just like it!
Well, see…here’s the thing. That’s sort of the down side of bargain shopping. Craigslist and thrift store finds are often one-of-a-kind deals. It’s a hard knock life, right?
This month, my Trash To Treasure blogger friends and I are digging through our archives to some of our favorite projects, and my coffee table is most definitely one I get asked about all the time.
I found it for $50 on Craigslist! And it is a BEAST at keeping our living room organized.
This table was really one of my first furniture makeovers ever, and it’s definitely not perfect. I love that Olivia can scuff it up, and I’m totally okay with it.
Supplies used: (Affiliate links are provided below for convenience. For more information, see my full disclosure here.)
- Annie Sloan Duck Egg
- Annie Sloan Pure White
- Minwax Clear Paste Finish Wax
- Annie Sloan Dark Wax
- Purdy 1.5″ angle brush (my fave!)
- Wax brush
- Tape measure
- Chalk line
- Circular saw
- Medium and fine grit sandpaper
- Wood grain tool
- Valspar sample pot in Woodrow Wilson Putty
- Valspar sample pot in Arid Plains
- Valspar sample pot in Asiago
- Valspar clear mixing glaze
- General Finishes Gel Stain in Antique Walnut
- Dry paint brush
- Paper towels and/or clean, dry rags
- Matte polyurethane
- Card catalog label pulls
The Base:
I first mixed one part Duck Egg paint with one part Pure White paint and painted 2 coats on the entire base of the coffee table with my Purdy brush.
After the paint was dry, I waxed the base all over with the clear paste wax. And I finished it with a coat of dark wax. (Putting the clear wax on the painted piece before the dark wax helps make the dark wax much more subtle.)
The “Planked” Top:
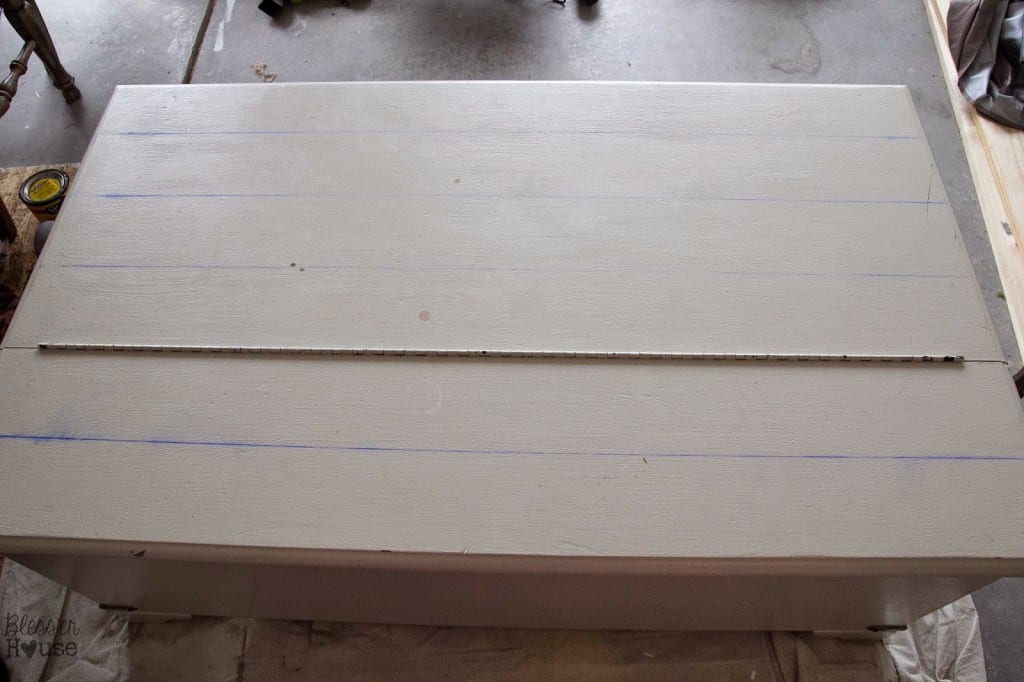
I measured the width of the top and decided on how many planks I wanted to create. The hinge, thankfully, was exactly at the 1/3 of the table. It was 30 inches wide, so I marked my faux planks at every 5 inches.
Then chalk lined where I wanted to make my cuts.
Using a circular saw set at 1/8 of an inch deep, my super sweet hubby cut the lines on the top and sides.
To give the cut lines more definition and to make them look more aged, I worked Annie Sloan Dark Wax into the grooves and wiped away the excess.
The Faux Wood Finish:
For the wood grain finish, this is where things got tricky.
In hindsight, I realized I should have sanded the entire top first for an extra smooth surface. There were dents and dings in the old paint job that really could have used some love.
To provide a nice base for the grain, I painted on a base coat. After the base was dry, I used a mixture of glaze and a slightly darker paint to brush a light coat on top, leaving some of the base coat showing.
Would you like to save this?
Here’s where the fun begins! After the medium glaze is dry, brush on the glaze/darker paint mixture. I did one plank at a time.
And use a wood graining tool to drag and rock through the paint glaze to create a grain effect. You might want to try it out on a tester piece of poster board of a piece of wood until you get the hang of it.
Use a smaller wood graining tool for the sides too.
Once the darker paint glaze is dry, brush on a light glaze randomly on top of the grain.
When the top was dry, I applied the gel stain. If you’ve never used it before, it has almost a pudding-like texture, so it’s really easy to work with and doesn’t drip easily. I just swiped it on one plank at a time, wiped it up with a rag, and that was it.
There ya go. A faux reclaimed wood table top. There were a lot of steps, I’ll admit, but the end result was well worth it.
To make it even more handy for organization, I added card catalog pulls to the drawers, so that I could put in labels for DVD storage.
We’ve had this baby in our living room a year and a half and still LURV how much it saves our sanity. And it gives the neutral space a little bit of color. Several more DIYs have gone into this room since then.
By the way, you see our kitchen in the top left of that picture? I’m so ready to paint those cabinets bright white.
Do you see this magnificent DVD storage? Hello, beautiful!
And THIS is the toy drama hidden inside. I wish I could tell you our living room is clean 24/7 but HA! No. Olivia climbs all over this table and dumps everything out of it, and you’d think it’s Toymageddon in here.
So now you know the story of the little coffee table that could. It had potential all along, it just needed some lovin’.
You can pop over to see my other blogger friends’ Best of the Archives projects too:
(Clockwise from top left): Confessions of a Serial DIYer | Prodigal Pieces | Girl in the Garage | Artsy Chicks Rule


