Bless'er House

  • Home
  • About
    • Contact
    • Advertise / Privacy Policy
  • Projects
    • Room Reveals
    • Budget Decor
    • Home Improvement
    • Organizing
    • Furniture Makeovers
    • Seasonal
  • Tour Our Home
    • Our Current House
    • Our First House
  • Shop Our House
    • Shop Our Current House
    • Shop Our First House
  • Shop Bless’er House
    • Shop Our Instagram
    • Shop BH Style
    • How to Install Lightroom Presets
  • Blog
    • Facebook
    • Instagram
    • Pinterest
    • Twitter

DIY Industrial Factory Window Shower Door

March 17, 2015 ~ 39 Comments

Sharing is caring!

2615shares
  • Share
  • Tweet

How to turn a builder basic glass shower door into an industrial style factory window shower door under $60.

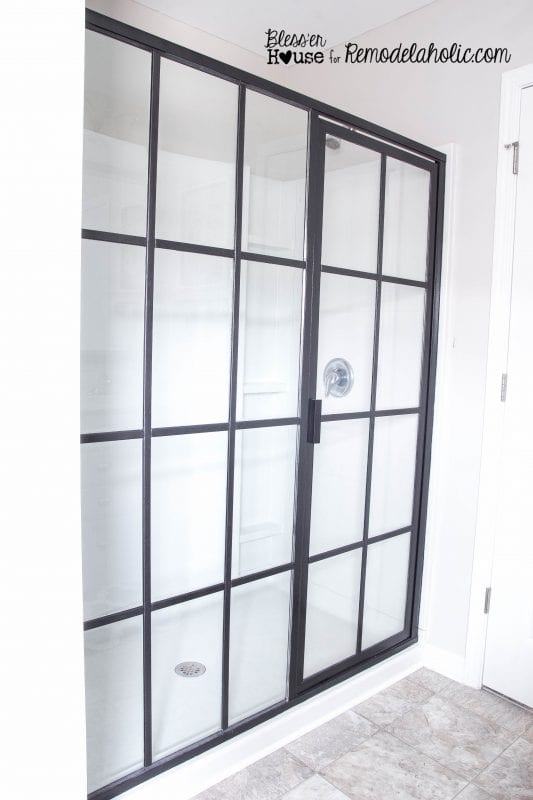
I am so, so excited to finally be sharing my tutorial for my DIY Industrial Factory Window Shower Doors from our bathroom makeover. This one will blow your mind, y’all! My inbox has been flooded with some of you asking for me to spill the beans, so I’ve kept my secret until today.


DIY Factory Window Shower Door | Bless'er House - The most epic builder grade home improvement project EVAH! So excited about this one.

Are you totally sick of this bathroom makeover yet? This is the last of it, I promise.
I had seen these gorgeous industrial style factory window shower doors all over Pinterest recently, and I was instantly smitten for them. The only problem was those gorgeous doors were very much out of my price range and would require some demo work with professional installation.
So I figured out a way to make the factory window look on my existing builder grade shower door. The best part- I accomplished it for just under $60.
Supplies:(Affiliate links are provided below. For more information, see my full disclosure.)
  • Approximately 3 cans of Rustoleum Universal Hammered Black spray paint
  • Painter’s tape  (I really like this brand.)
  • Plastic drop cloth
  • Respirator mask
  • Putty knife
  • 5 lengths of 1/4″ x 3/4″ x 96″ Polystyrene Lattice Moulding
  • Tape measure
  • Level
  • Black permanent marker
  • Loctite GO2 Glue
  • Loctite 2 in 1 Clear Latex Window and Door Caulk
  • Caulk gun
  • Caulk finishing tool

*I already had the tools and tape on hand since they’re usual staples in our workshop.

UPDATE: (12/2016) We still LOVE this shower door! The only change I would make to this tutorial is to spray the metal with automobile primer first, followed by the Rustoleum Hammered Black, and finished with spray lacquer. It’s still holding up great. There’s just a little wear on the bottom inside of the shower door frame that I think the primer and lacquer steps would have prevented. This project was still totally worth it to us.
Time:  3 days (I managed it all on my own without any help from my husband, so it wasn’t strenuous. Just a good bit of time waiting on paint to dry.)
And, of course, you need a framed hinged shower door to start with.
Here is what my shower door looked like before I started:
DIY Factory Window Shower Door | Bless'er House - The most epic builder grade home improvement project EVAH! So excited about this one.
Step 1. Start with a clean, dry shower. Get rid of as much soap scum as possible. A mixture of vinegar and dish soap can work wonders as long as you rinse it thoroughly after scrubbing. We didn’t use our shower for a full 48 hours to make sure all moisture was gone. (I promise we showered for those two days, just not in this one. In case you’re worried about hygiene here.)
DIY Factory Window Shower Door | Bless'er House - The most epic builder grade home improvement project EVAH! So excited about this one.
Step 2.  Tape off everything with the plastic drop cloth and painter’s tape-  the glass of the doors, the inside of the shower, the floor, the walls, anything but what you want painted. It will look like a crime scene in your bathroom for a while.
DIY Factory Window Shower Door | Bless'er House - The most epic builder grade home improvement project EVAH! So excited about this one.
Step 3. Be sure to open windows, if you have any in the room, and use a painting respirator mask for safety. Those fumes get rough!
Spray three thin, even coats of the black hammered spray paint on the inside and outside of the shower door frame. To prevent dripping, spray in a sweeping motion and keep your hand moving at all times. The great thing about this spray paint is it has primer built in, so you can eliminate that extra step. You can use a spray primer beforehand if you choose, but it’s really not necessary.
I did run into a problem with two of my three cans clogging up because I think the paint is rather thick. I had bought mine at Lowe’s, and they let me exchange them for new ones that worked. Maybe I had a bad batch.
DIY industrial factory window shower door tutorial
I admit, that first coat was scary. I instantly thought, “Ohhh what have I done?!” It’ll get better. Hang in there.
DIY industrial factory window shower door tutorial
Let each coat dry to the touch before another (about an hour).

DIY industrial factory window shower door tutorial
Step 4. Wait 24 hours for the paint to dry thoroughly.
Important:  Use a putty knife to score the edges of the painter’s tape before removing it and the plastic drop cloth. Do as I say not as I do because I ended up with this not-so-pretty result:
how to paint a shower door to look like a factory window, industrial style
Scoring my tape would have prevented that problem, but I didn’t think about it until after I had pulled off all the tape. I was the guinea pig for you guys in this experiment.
If you run into any “oops” spots, I figured out a few tricks, which you can read about in this post:
how-not-to-paint-a-shower-door.jpg

Even though I had to fix my mistakes, it turned out great!

how to paint a shower door to look like a factory window, industrial style
Step 5. While the paint on the shower door frame was drying, I went to work on the grid pieces of the “factory window”.
I had measured the dimensions of the glass inserts on the shower door beforehand.
I cut the vertical pieces of the grid first using polystyrene moulding. I decided I wanted my “window panes” to be 5 across and 4 vertical, so I cut 3 lengths for the height of the glass on my door.
Polystyrene is the perfect material for this job because it is moisture-resistant, designed ideally for bathrooms, extremely lightweight, and costs about $2 per length.
how to add window grids to a shower door for an industrial factor window look

Step 6. Spray paint the 3 cut moulding pieces with the hammered black. I did these in my garage.

how to add window grids to a shower door for an industrial factor window look
Paint the backside of the pieces first so the front side will be the smoothest in case of any paint wrinkling on your drop cloth when flipped over. I did three coats on both sides for these as well.
how to add window grids to a shower door for an industrial factory window look
Step 7. Here’s where I had to do a little math (which is not always easy for this former high school English teacher).
I had decided I wanted my shower door to be 5 panes across and 4 panes vertical. Since I needed 3 vertical sections on the left side door, I divided the width of the glass by 3. This told me how far apart the 2 moulding piece should be placed.
I did the same thing for the right side of the door (the side that opens) and divided it by 2, for placing 1 moulding piece.
I used a tape measure and a black permanent marker to mark where I needed to place the moulding pieces.
how to add window grids to a shower door for an industrial factory window look

I used the black marker so it wouldn’t show later on the inside of the glass against the black moulding pieces.

If you make mistakes, just wipe away any permanent marker with nail polish remover.

To figure out how far apart to place the horizontal moulding pieces, I divided the shower door height by 4 and marked where to later place them.
how to add window grids to a shower door for an industrial factory window look
Step 8. After the moulding pieces were fully dry from painting, I applied a line of the Loctite GO2 Glue to the backside. Only apply the glue one moulding piece at a time, not all at once.

This adhesive dries completely clear, is extremely strong, and is temperature and moisture resistant to make it durable against the humidity in a bathroom.

how to add window grids to a shower door for an industrial factory window look
Step 9. Apply each moulding piece, one at a time. I had a minute or two to reposition the piece and make any adjustments. I used a level to double check that they were straight, pressed the piece against the glass, and held for a minute as it dried in place.
how to add window grids to a shower door for an industrial factory window look
Step 10. Using the tape measure again, I measured the widths between the vertical sections to cut and paint 15 horizontal moulding pieces.
how to add window grids to a shower door for an industrial factory window look

Step 11.  I used the same process with the Loctite GO2 Glue for the horizontal pieces to place over my door markings. I used a small level again to double check them and adjust as needed before setting them in place.

(That level, by the way, is older than I am since it was handed down from my husband’s grandfather. It’s seen a lot of action, so it’s looking a bit shabby.)

how to add window grids to a shower door for an industrial factory window look

Step 12. To seal any cracks behind the moulding pieces and prevent mold or mildew from settling between the polystyrene and the glass, I used clear latex caulk.

how to add window grids to a shower door for an industrial factory window look
If you’ve never used this type of caulk before, don’t worry. It comes out white. I applied a line of the caulk on either side of the moulding strip and worked in sections.
how to add window grids to a shower door for an industrial factory window look
Then used a caulk finishing tool to smooth it out. It was a messy process, but it gave me peace of mind to reinforce the moulding and seal out any moisture.
how to add window grids to a shower door for an industrial factory window look
After the caulk was dry I had my dream shower door! We waited a full 24 hours after painting before using the shower again just to make sure everything set well. That first shower was a bit scary, but it held up 100% perfectly.
DIY industrial factory shower door how-to
If you’re worried about its durability over time, I can tell you that we’ve been using this shower for a month now and we’ve had absolutely no problems. No chipping, no peeling, nothing but awesomeness! I would avoid aggressively scrubbing with anything really abrasive though.
DIY industrial factory shower door how-to
rustic industrial bathroom
Probably every time we have guests come over, we’ll totally weird people out and say, “Hey! Wanna come see our shower?” If they know us, they’ll understand.
To see our full master bathroom reveal, head over here:
builder-grade-rustic-industrial-bathroom-makeover-budget (1)
You think you’ll attempt this one? If you try it, I’d love to see!

signoff


Follow:

Facebook | Pinterest | Instagram | Twitter | Google+ | Bloglovin | Hometalk

Related

Filed Under: Home Improvement
Tagged With: Home Improvement

« Master Bedroom Updates & Nadeau Furniture Browsing
Revamping the Breakfast Area »

Comments

  1. Karen @ The Decorated Nest says

    September 30, 2015 at 9:09 pm

    That is seriously gorgeous!

    Reply
    • Lauren says

      October 5, 2015 at 8:36 am

      Thank you! We really love it.

      Reply
  2. Ranell says

    October 10, 2015 at 5:23 am

    Gorgeous, all of it! Your shower is definitely better than builder grade with six shelves, but now it is industrial chic! Love your home. You can tell you have put your heart and soul into it! I really like your moulding in your entry! I would love to try that!

    Reply
    • Lauren says

      October 13, 2015 at 4:30 pm

      Thank you so much! Yes, those six shelves are really great. We’re thankful to have “builder grade” that’s still a bit on the higher end of the basic.

      Reply
  3. Erica says

    November 3, 2015 at 6:30 pm

    This is such an awesome diy! Thank you so much for the inspiration and keep up the amazing posts!!

    Reply
    • Lauren says

      November 10, 2015 at 2:48 pm

      Thank you, Erica! This one is still one of my faves. 🙂

      Reply
  4. Amanda says

    November 25, 2015 at 4:43 pm

    I am obsessed with this! Out of curiosity–how is it holding up now? I might have to try this at my house too! If so I will definitely share pictures 🙂

    Reply
    • Lauren says

      December 1, 2015 at 5:09 pm

      It’s held up pretty well! There are a few places on the very bottom of the frame on the inside that my three year old has rubbed her toys up against a lot and scratched it up, so I think to make it stand up to abrasion like that, I’d sand the chrome first and spray a coat of automobile primer followed by the spray paint and a high gloss laquer spray. I used that method on our shower fixtures and it can really withstand a beating. Here the tutorial for that if you need it: https://www.blesserhouse.com/2015/10/how-to-spray-paint-shower-fixtures.html

      Reply
  5. Christine says

    November 29, 2015 at 12:24 pm

    Love what you have done. We are in the process of looking for land now. We live in Asheville, NC, so not too far from you, lol. I think I will have to steal some of your Ideas, especially the shower door.

    Reply
    • Lauren says

      December 1, 2015 at 11:44 am

      Oooh I LOVE Asheville! We went to Biltmore for our honeymoon. Thanks so much for the love, Christine! Hope they come in handy!

      Reply
  6. Kathy says

    February 5, 2016 at 2:11 pm

    Can you post a picture of what it looks like from the inside of the shower? I’m wondering if this technique could be used for some windows without looking weird on the outside. Can the grids be removed if you change your mind?

    Reply
    • Lauren says

      February 9, 2016 at 10:01 am

      Hi Kathy! Actually, another blogger friend of mine used this same method on her windows! It’s where I got this idea actually. And hers are removable. Here’s her tutorial: http://www.remodelaholic.com/diy-custom-window-mullions-grids/

      Reply
  7. Alicia says

    April 15, 2016 at 10:44 am

    Lauren,

    Is it still holding up well? I’m currently building a house (within a planned community, so will be similar to yours) and I’m considering doing this to the included chrome shower door instead of paying $600 for them to upgrade to stainless/oil rubbed bronze. My final design selections are due in a few days and this is the only thing holding me up! It’s beautiful!

    Reply
  8. Nancy says

    July 22, 2016 at 11:01 am

    Do you think your process could possibly work with the older traditional sliding shower doors?

    Reply
    • Lauren says

      July 22, 2016 at 10:55 pm

      I don’t think it could work on sliding doors unless there is a considerable gap between the two. I’d be afraid of the paint scuffing up from the repetitive sliding and the grids coming off from rubbing against the other door.

      Reply
  9. Jamie Cervi says

    August 1, 2016 at 6:29 pm

    Can you see the glue from the inside? I am wondering if that would look funny. I love this btw!

    Reply
    • Lauren says

      August 3, 2016 at 12:06 pm

      Thanks, Jamie! You really can’t see the liquid glue at all since it’s clear. It blends right in with the black grids on the other side.

      Reply
  10. Lorree Mitchell says

    August 31, 2016 at 10:31 am

    I’m new to your blog and I have to say that I love your ideas! Keep ’em coming girl.

    Reply
    • Lauren says

      September 9, 2016 at 4:26 pm

      Thank you, Lorree!

      Reply
  11. Sara says

    October 4, 2016 at 4:20 pm

    You are a genius! This is so awesome!

    Reply
  12. Jessica says

    December 28, 2016 at 11:45 am

    This looks amazing!! Trying to figure out how many nap times this would take me to do? Did you paint the frame from the inside of the shower too or just the outside? Thanks.

    Reply
    • Lauren says

      January 3, 2017 at 11:01 am

      Haha! I think it took me about 4 nap times. Totally do-able, right? 😉 I painted the inside of the shower too.

      Reply
  13. debbi siebert says

    January 6, 2017 at 10:56 am

    Very nice job; I also spray painted our ugly gold frame and fixtures in the master bath with Rust-oleum Oil Rubbed Bronze, except I totally disassembled the frame and carried it to the garage to spray, easy peasy. It allowed me to clean out the grungy nooks and crannies before reassembling and new caulking. If I had to touch up, I just sprayed some paint into a cup and with a tiny brush touched up. It helped sell our house quickly.

    Reply
    • Lauren says

      January 6, 2017 at 1:45 pm

      See… you were the smart one. I tried a shortcut and it ended up being more work than if I’d just done it your way. Lesson learned. Haha! But I still love ours too. 🙂 Glad it helped you sell your house!

      Reply
  14. Haley Young says

    June 30, 2017 at 1:22 pm

    Quick question…how does it look from inside the shower? Can you see where it’s been glued? Thanks in advance! Absolutely LOVE the idea!

    Reply
    • Lauren says

      July 31, 2017 at 11:40 pm

      Hi Haley! The glue is very clear, so you really can’t tell unless you’re really trying to look for it.

      Reply
  15. MAIA says

    July 6, 2017 at 2:53 pm

    Hello Lauren,
    Your shower doors look awesome! I been looking at tutorials on this for a couple days and your tutorial is the only one I seen that includes applying some type of top coat. Can you post which high gloss laquer spray you used please?
    Maia

    Reply
  16. Esther Bailey says

    February 19, 2018 at 4:52 pm

    Love this idea but am having trouble finding the molding could you please give me some suggestions.Esther

    Reply
    • Lauren says

      February 20, 2018 at 10:06 pm

      Hi Esther! Here’s the molding at Home Depot: https://rstyle.me/n/cycfwgb5ky7

      Reply
  17. Sarah DeLoach says

    August 24, 2018 at 10:02 am

    I love this and have been looking for a tutorial for our shower. Did you add trim to the inside of the shower as well? If not what does it look like from inside the shower? Can you see the glue?

    Reply
    • Lauren says

      September 3, 2018 at 11:50 pm

      Nope! Only trim on the outside to keep the inside easier to clean. The glue on the inside is totally clear, so you shouldn’t be able to see it.

      Reply
  18. Laura Bass says

    September 9, 2018 at 6:39 pm

    Holy crap. This looks incredible!! I’ve been trying to convince my stubborn husband that, since he won’t let me gut-out and remodel our bathroom, to AT LEAST allow me to paint our horrible chrome trim! He thinks it’s a trick, though. He thinks it’ll look so bad that he’ll cave and let me replace the shower doors (which may or may not have been true until I saw this post). When you went into the project, did you have a plan B if this looked awful? Were you willing to live with a not-so-great outcome? I would like to bash my husband over the head with these pictures to show him how gorgeous it could be, but I know he’ll ask about durability. I saw you mention in a reply above that you’d recommend sandpaper + automotive primer were you to do it again, but how durable would that be?

    Thanks for being such a gracious guinea pig for all these gorgeous upgrades!!

    Reply
    • Lauren says

      September 10, 2018 at 9:23 am

      Haha! Yes, the plan B was to get a new shower door if it went to crap. But thankfully, it didn’t. We painted our tub/shower faucet in another bathroom using the sanding/primer/sealer method and I did not have any issues with it peeling or scratching at all in the two years we lived there. We did experience scuffs on the metal parts of the shower door where I didn’t sand/prime/seal, so that’s why I recommend those extra steps. Just don’t scrub with anything too abrasive on the painted metal. Clean them with a sponge or rag instead.

      Reply
  19. Lorie says

    October 18, 2018 at 4:03 am

    I luv, luv, luv the industrial look of this shower! I pinned a pic of one to our new house folder about 2 years ago. We just recently moved into our forever home and my plan the whole time was to have a shower like this until I found out what it would cost! $4200 over what my shower door allowance was. We have 3 showers in our house so I had to settle for just a black framed shower stall in our master bath. I was soooo disappointed until I saw your DIY pin! Thank you, thank you, thank you! I have not tried it yet, we have only been in our house for about 2 weeks and it has rained non-stop since. We have no furniture except what we had in our 825 sq. ft. apartment but thinking I’m gonna try this this weekend while my hubby is gone to the ranch.

    Reply
  20. Teresa says

    January 29, 2020 at 10:00 pm

    I’m not easily impressed. I’m impressed. This is creative and really adds charm to your bathroom!
    I’m going to remake my ugly gold 1980’s mirrored closet doors. Think this idea would work on them? As long as there is enough room between the doors?

    Reply
    • Lauren says

      January 30, 2020 at 11:11 am

      Absolutely! It can totally be done. 🙂

      Reply
  21. Clarissa Riddle says

    May 2, 2020 at 9:09 am

    Lauren, did you attach the trim to the rubber gasket around the perimeter of tge door and side glass, or did you cut it to butt up to it? I’m totally doing this to our sorry okd shower enclosurw!

    Reply
  22. Elena says

    March 13, 2021 at 11:22 pm

    I am currently in prep stages of attempting this project and had a question! Did you paint the clear sealant around the glass too? Our shower has clear tubing (not silicone but don’t know what it’s called) and trying to decide if I should paint that as well? And did you remove rubber or magnets from door?

    Reply
    • Lauren says

      March 15, 2021 at 4:26 pm

      Hi Elena! No, I didn’t paint the clear caulk. It likely won’t stick well since those don’t really take paint. It would peel over time. And I left the magnets on the door.

      Reply

Tell me what ya think! I read every comment I receive. Cancel reply

This site uses Akismet to reduce spam. Learn how your comment data is processed.

We’re Robert and Lauren, a DIY-loving duo just fighting the good fight in making our house a home one renovation and thrifted decorating adventure at a time. Home wasn’t built in a day, but the journey is half the fun. We’re so glad to have you here, and we hope you feel inspired to love the home you have.

Subscribe

Pin With Me

  • A step-by-step tutorial for a cozy outdoor DIY fire pit + the best equipment for making the job faster and easier.
  • An entryway decorated with a budget-friendly way to use leaves and flowers from your backyard for free art and decor.
  • How to Paint Wood Paneling: A complete step-by-step tutorial for how to paint wood paneling on walls with full supply list for a simple paint update that lasts.
  • A round-up of the best decorative bust sculptures and bust planters for all budgets for timeless classic home decor.
  • 20 Creative DIY Wall Decor Ideas | A round-up of 20 of the best DIY wall decor ideas plus tutorials and tips to pull off the look easily and get the designer look for less.
  • Simple, minimalist art ideas from Walmart that work perfectly in a bedroom to evoke a peaceful mood + charcoal gray wall paint

Privacy Policy & Disclosures

We are a participant in the Amazon Services LLC Associates Program, an affiliate advertising program designed to provide a means for us to earn fees by linking to Amazon.com and affiliated sites.

Read our privacy policy and disclosures →

Privacy Policy

browse by category

browse by date

Copyright © 2021 Bless'er House. Web Design by Viva la Violet.