Boom. Just like that we’ve hit the halfway mark of the One Room Challenge. I may or may not be hyperventilating into a paper bag right now. Kidding!
UPDATE: See the full playroom makeover reveal here!
It’s actually been pretty smooth sailing since we installed our built-in bookshelves. And after painting our entire upstairs space, next on the list was sawing a table in half.
Yeah, in half.
Since I’ve had my eye on the finish line, I was a bad blogger and didn’t even snap a photo of the sawing process. (I’m getting so slack, y’all! Please forgive my hot mess self.)
But to refresh your memory if you’ve been following along on our playroom makeover journey, here is what this half wall looked like in the beginning:
Meh.
This wall left me really stumped for a long time. Half walls are just whack (which is why it took me so long to figure out the best furniture arrangement).
But for a while I’ve been thinking Olivia and I both needed a pair of desks, one for her Play-Doh/coloring/homework when we get to that stage soon, and one where I can blog/craft while still being able to interact with her as she plays in here. #MultitaskingMommyForTheWin
Supplies Used: (Affiliate links are provided below for convenience. For more info, see my full disclosure here.)
- Solid wood table
- Circular saw
- Tape measure
- Pencil
- Level
- 2″x4″ board
- 1 3/4″ wood screws
- 2 1/2″ wood screws
- Fusion Mineral Paint in Midnight Blue
- 1 1/2″ angle brush (just my preference)
I found a solid wood kitchen table and four ladder back chairs on Craigslist for $100 total and knew it would be perfect to cut in half as desks for super cheap.
Even though I didn’t get a chance to snap a photo of the process, it was pretty simple. Robert and his dad swooped in to handle this one.
1. We just used the tape measure to find the very center of the table top, traced a straight line with the pencil down the middle, and cut carefully with the circular saw. Done.
2. We ended up cutting out the depth of the 2×4 on the table apron to give it extra security.
3. Then, we cut our 2″x4″ board to the width of the table, and using a level, we screwed the 2″x4″ with 2 1/2″ wood screws to the wall into studs.
4. We screwed the half table into the 2″x4″ with 1 3/4″ wood screws from the top. Ta da! Instant desk.
We double checked with the level one more time too to make sure it was good to go. These babies are suuuuper sturdy. If Olivia ever climbs on top of these things, I feel confident they will hold (but I’d really love if she didn’t give them a test drive).
Here’s a shot of the 2″x4″ secured with screws underneath a desk.
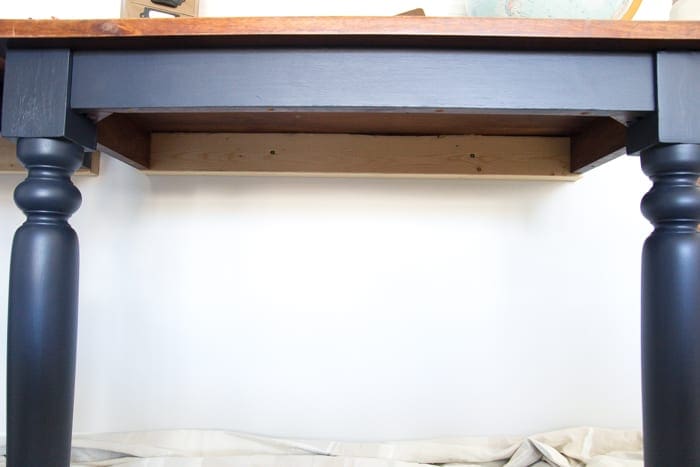
Since we painted the walls a very light gray (Behr Seagull Gray), I wanted some contrast, so I gave the bases of the desks a couple of coats of Fusion Mineral Paint Midnight Blue.
Since four chairs came with the kitchen table, I painted two of those too. I’ll probably end up selling the other two in a yard sale. $50 per desk with chairs isn’t too shabby, huh?
A very sweet friend sent this “S” she pulled out of a dumpster that originally came from a Starbucks sign. It. is. awesome! I’ve thought about painting it, but for now I’ve set it here as-is (sanitized after being in a dumpster, I promise).
And I found this globe at the thrift store for $5.
So now Olivia has her handy dandy coloring desk.
And I have my go-blog-crazy desk where I can sprawl out my to-do lists and check e-mails and go nuts with the hot glue gun while Olivia tosses around Legos like confetti. Woo to the hoo!
I parked this repurposed jewelry box here to keep some of my office supplies organized too.
This side of the room is officially complete! I still need to tackle decorating those shelves since I randomly just placed a few things up there while I figure it out. You might be able to see a little peek of the reclaimed wood wall we’re almost finished installing too. Eek!
Those wood crates are next to get painted. And we have a rug! I shared all about some of my favorites I considered in my playroom rugs round-up yesterday, but this one fit in best and is even more gorgeous in person. More about that soon though.
Here’s where we are on the playroom to-do list now:
- DONE: Install built in bookcases
- DONE: Paint and install desks
- DONE: Paint walls
- DONE: Find a great colorful rug
- DONE: Install ceiling fan (more on that soon)
- Frame and paint window (almost done)
- Install reclaimed wood wall (almost done)
- Make oversized storybook art
- Hang curtains
- Paint wood crates
- Slipcover sofa
- Find and makeover a coffee table
- Decorate shelves
- Implement and organize a toy storage system
The progress is feelin’ good. Olivia and I might have to celebrate with a crafting session at our new desks. And I might have to look around at more awesome things Robert can go all Jason on to saw in half. Maybe have a Willy Wonka kind of office going on, ya know? It’d be all the rage.
I can’t wait to see what our Week 4 update will look like. (And to be honest, the final reveal, but that’s kind of obvious.)
If you want to save this post for later, you can pin it here:
*This post was sponsored by Fusion Mineral Paint. As always, my opinion of my favorite furniture paint is 100% my own.
They turn out beautiful, I just love this idea.
You did an amazing job, as always! 🙂
Pinning ♥
Thank you, Diana!
Thank you for the idea! I made something similar, only I used my current table, and paid 10 for an old table to get the legs off of it. We used the original legs (one “leg” on each desk) and then used 2 of the purchased table legs on each desk. We added slide locks on the bottom of the table top. That way, it was sturdy enough we could put the two desks together and cover with a table cloth when we need a table. Still need to sand and paint the desks, but they do for now- I telework twice a week and my husband will be soon.
Where did you buy the file drawer pulls for the small wooden chest? Looking good so far!
I got them on D Lawless Hardware. 🙂 Here’s the link: http://www.dlawlesshardware.com/black-cup-pull-label-holder.html
Hmm… not getting why you’d want your back to watch your little one play? lol Also, why do something so permanent with the desks? What if you want to move furniture around at some point – adding those to the wall kinda lock you into that corner. Plus, I’d sure hate to patch all the holes in your house when the next occupant moves in and doesn’t appreciate all your diy stuff… lol I’m thinking you didn’t want a desk sticking out so far if you turn them INTO the room. I like the nice heavy wood desks & chairs – just not too crazy about bolting them to the wall. (and yes, I realize it’s “spack-able”). That’s a creative use for a table though!
If every decision I made about the changes we do to our house revolved around what the next occupants would want, I’d be at a complete standstill. We decorate with what we love, and I hope the people who have our house one day will love it too. But if not, that’s okay. They can change it when it’s theirs. I’m sure you have the same thought process when you decorate your own home, as you’ve obviously made clear in your comment. We all have our own tastes.
Kristine! Stop the hatin’! Why do people have to get on here with their negative comments??? I LOVE this idea of sawing a table in half, and the midnight blue is awesome!! Great job!! Great creativity!! If you ever change your mind, the wall is SO easy to fix! Keep going with your wonderful ideas – and BTW – I’m TOTALLY crushing on your Billy bookcase wall!!!
I love it! Fantastic idea…and I’m loving that you only painted the legs but left the top natural. I wish had your billy bookcase tutorial a few years ago, will definitely be saving that idea for later!
Thanks, Debbie! So glad I left the tops wood too. If I’d painted the tops, they probably would have just gotten scratched up from all of the crafting I plan to do on these desks anyway. 🙂 At least these are already intentionally roughed up.
LOVE the mommy/daughter desks…great paint color (I’m going to get it to paint our guest bath vanity and mirror, thanks for the inspiration!), and love where this space is headed. It’s going to be delightful…can’t wait to see the finished product!
Thanks, Patricia! I’m so excited about this room. 🙂
Desks look great! Love the blue! Hmmmmmm, where could I use that idea?????? I’ve pinned it! I’m betting Olivia will love her grown-up desk, right beside Mom’s. Darn half wall does warrant a serious safety talk with Olivia, but I’m sure you and Robert have got that covered. The “Mom” in me just had to mention it! I know you understand : ) Paint the wooden crates the same blue????? That rug was one of my favorites! Looking forward to the reveal!
Thanks, Karen! Safety talk has already been had. We’ve never had issues with her climbing on furniture before, but we had a serious discussion about it just to be safe. She knows it’s a no-no. If we had a daredevil child, I’d be more concerned, but she’s the very cautious type. I’m with you on the wooden crates too. I just spray painted them a blueish-gray and they work with that rug perfectly! Can’t wait to show the progress later. 🙂
Love the desks! They came out great! It’s all coming together well!
Thanks, Denise!
Exactly what I was thinking about the half wall. If Olivia climbs on the desk, I’d be more worried about her falling over the wall than the desk collapsing!
This child is scared to even jump into a swimming pool with me standing there waiting to catch her. She’s never been a climber. But just to be safe, we’ve given her a talking to about never climbing on these desks. I was about her age when my family moved into a house with a balcony overlooking a large family room and my mother had to give me the same talk- “No hurling your little brother or yourself or any toys over this balcony railing. Got it?” There were no casualties, so I think we’re good. 🙂
I really like this. I’m sure you’ll get lots of use out of these desks. I really love the midnight blue paint color….I might need this color in my life. What’s your plan to hide the side where the 2×4 is?
Thanks, Colleen! It might be hard to see, but I painted the 2×4 the same color as the blue on the desk, so now it just looks like a part of the furniture. Totally hidden. 🙂
I love how this room is coming along! That blue is such a great color to contrast with both the wall color and the desktop. It’s bold but soft at the same time. I can’t wait to see the finished result 🙂
Thanks, Samantha! That’s exactly what I was going for. Fun but not too in-your-face. 🙂
What a genius idea for your desks. Love them.
Can’t wait to see the full reveal.
Thank you, Dianne!
What a transformation in just what you have already done! My dad built little wall desks for my sister and I when we were kids and we just loved them! I’m sure Olivia will love hers just as much! Love the contrast of the light colors in the room with the pop of color on the desks too! Can’t wait to see what ceiling fan and rug you chose! Great job Lauren!
Thanks, Jana! I have a feeling these will get a lot of great use in the future. 🙂
Love this idea! And that blue paint is just gorgeous!
Thank you, Stephanie!
Lauren- it looks great! I want to use the Fusion Mineral paint on my 6 dining room chairs but I’m not sure how much paint I will need? Can you help?
Thanks, Chris! After painting these two desks and two chairs with two coats, I still have half of my 500 mL container still leftover. You can probably get away with using just one container, but maybe 2 just to be on the safe side. That’s one of the things I do like about the paint. The coverage is really good and a little goes a long way.
Lauren – this is super creative. A great way to repurpose a great piece of furniture and it looks so good with the blue paint!
Thank you! I’m so excited how it turned out. 🙂
I love the color of the desks! The midnight blue paint and the dark wood looks really rustic and pretty! Honestly, it would drive me nuts not to be able to move the desks or rearrange, but they look wonderful. Very creative! Can’t wait to see the rest of the playroom!
Thanks, Mary! There’s really nowhere else I’d want to move these desks in this room, so I’m completely okay with them being stuck to this wall. I debated this room’s layout for months before deciding this was the winner.
I was just looking at this color for chairs. Wouldn’t it look nice on chairs too? Is this the new “in” color now? I really love what you have done here mounting it on the wall.
I have no idea if it’s “in” but it’s a beautiful shade of blue and that’s a good reason to me. 🙂 Thanks, Mary!
Oh, I just love it! The desks look wonderful, with the warm wood and blue – and so lovely to have side-by-side desks! These will get a ton of use when your daughter starts school!
Thanks, Kim! Hopefully it will encourage stress-free homework nights, right? RIGHT?! Hehe
a. That S is amazing!
&
b. Wow! I love the twin desks!
Your whole room is coming together so beautifully!
Thanks, Jessica!
LOVE that gorgeous midnight blue! I look forward to seeing your progress each week and can’t wait for the final reveal!
Thanks, Jen! I’m ready for this final reveal too. We’re pretty much done with this entire room now and it’s KILLING me that I have to wait to show it off until week 6. Ahhhh!
I love the color! The desks look a bit small, though. I’m a sprawler myself-lol.
Wonderful blog, Thanks.
Thanks, Anne! I just have a laptop, so I don’t need a ton of room. If I had a desktop computer, it’d be a different story.
What a great idea! I love the midnight blue with the gray, the colors look great together. Great “Mommy and Me” work area. I can’t wait for the full reveal!
Thanks, Karen!
It looks great! I love the blue! I’m using dark blue but haven’t seen that one. I have to get some. lol
I think bolting them to the wall was clever. I hope following your blog will allow some of your creativity to come my way! ?
Thank you, Melanie! This is a brand new shade of blue Fusion just launched. So far, I’m in love. 🙂
I love, love, love this gorgeous, beautiful idea. Two desk from one table, genius!
Thanks, Ivory!
Those desks are awesome. I love your creativity. The room is really coming together. Can’t wait to see how you wrap things up over the next few weeks.
Thank you, Chelsea!
Your new desks look great! Love that Midnight Blue color. I’ve yet to try Fusion paint … but now that I know I can order it from Amazon … 😉 Good luck with the rest of the room.
Thanks, Cynthia! We’re loving them. 🙂
I love how this turned out, the colour you used is beautiful.
I’ve also really enjoyed reading the comments! I did think – oooo, climbing children but I totally agree that you can teach kids not to do something that’s dangerous, especially if they are not daredevil by nature. I also thought – oooo, not much space but then that’s good as the more space you have the more you use and the longer it takes to tidy up afterwards!
I don’t really get the idea of not making things difficult for the next occupants though, you’d never do anything permanent! Home are for living in. I’m looking forward to seeing the rest.
I have always wanted to do this! I love how it turned out and I love the color!
These is a terrific idea. You did a great job. Its not only nice but it has a useful purpose.
Such and cute and clever DIY project. Really makes the room! You’re a feature tomorrow at Welcome Home Wednesdays! Congrats! See you at the party tomorrow morning.
Thank you SO much, Erin!
You choose some beautiful colors and wonderful transformation! I like the little shelving unit you added to the desk too.
Thank you for sharing this with us on the #HomeMattersParty. We hope to see you again when we open our doors on Friday at 12 AM EST.
Thanks, Crystal!
I love to see when things get repurposed into something so fantastic! What was the original size of the table? We are trying to decide on one long or two desk for our girls. Thanks:)
Oh, gosh. I don’t remember exactly, and unfortunately we’ve moved and left those at the old house. But I want to say it was 4’x4′?
Love!! Thanks for the inspiration. I have a great table with no top (damaged prior). Now I can cut it in half for my foyer which needs a special depth table. Then top with something cool. Thx
You are not only brilliant, but a GENIUS as well! Every DIY you do is absolute perfection! I have much to live up to! Thanks for everything!
what a clever design! love the midnight blue you used on the desks! so much so, that i just ordered a jar for myself to try on some step stools i have lying around. #upcyclingisthewaytogo
Thank you! And yes, upcycling is the way to go! Personalize it and make it your own. 🙂 Good luck on your new project. Paint is awesome for giving new life to what we already own.
Lauren your ideas are brilliant. I have a little alcove that is meant for a desk but I couldn’t find one that worked. This desk is ideal. The color is also perfect. Once again thank you for sharing.
I love how you revive and beautify old boring things. They turn out awesome! Very nice desks you made. I love your kindness in sharing steps and instructions, so thank you. Just a word of warning if you raise boys they will find those chairs and desks as great climbing steps to climb or jump over that half wall. Half walls are just beacons for boys. I have them too, but figuring out how to furnish around them is very tricky, so in my life those desk ideas would have to be in another to space .Still love your ideas though.
Awe, Thank you!! And I am certain this warning will be appreciated by fellow readers. I am sure boys can make things a bit more challenging. We have two girls. For the most part they are pretty calm. Our older one has quite the imagination and loves to play. But there is no worrying about her jumping over walls. 🙂 Thank you so much for your kind words and helpful advice.