Bless'er House

  • Home
  • About
    • Contact
    • Advertise / Privacy Policy
  • Projects
    • Room Reveals
    • Budget Decor
    • Home Improvement
    • Organizing
    • Furniture Makeovers
    • Seasonal
  • Tour Our Home
    • Our Current House
    • Our First House
  • Shop Our House
    • Shop Our Current House
    • Shop Our First House
  • Shop Bless’er House
    • Shop Our Instagram
    • Shop BH Style
    • How to Install Lightroom Presets
  • Blog
    • Facebook
    • Instagram
    • Pinterest
    • Twitter

Eclectic Farmhouse Playroom Reveal & ORC Week 6

November 10, 2016 ~ 195 Comments

Sharing is caring!

13274shares
  • Share
  • Tweet

A boring and cluttered playroom gets a modern eclectic farmhouse makeover on a budget with DIY projects, smart storage solutions, and inexpensive finds.

Some days I’m just a teensy bit jealous of my 4 year-old. The girl can wear a princess dress and tiara in public, take a nap whenever she feels like it, and the hardest vote she ever has to make is whether to choose a cookie or brownie for dessert.

(But then I remember I can have a glass of wine, eat sushi, and ride roller coasters and suddenly being a grown-up feels pretty awesome.)

One thing Robert, Olivia, and I all can enjoy together though is our newly finished PLAYROOM!

Eclectic Farmhouse Playroom Makeover | blesserhouse.com - A boring and cluttered playroom gets a modern eclectic farmhouse makeover on a budget with DIY projects, smart storage solutions, and inexpensive finds. popular pin

Not that playroom.

THIS playroom!

Eclectic Farmhouse Playroom Makeover | blesserhouse.com - A boring and cluttered playroom gets a modern eclectic farmhouse makeover on a budget with DIY projects, smart storage solutions, and inexpensive finds. popular pin

It is officially reveal day after this 6 week long One Room Challenge, and I honestly cannot believe how quickly we were able to pull this one off. To be fair, we’ve had a lot of practice with the other ten rooms in our house.

You can see our entire ORC journey from the beginning in our previous weeks here:

Week 1 | Week 2 | Week 3 | Week 4 | Week 5

(I’ve written up a full source list with paint colors, links, and our budget breakdown at the bottom of this post too.)

Here is what this space looked like before:  (Affiliate links are provided below. For more info, see my full disclosure here.)

Eclectic Farmhouse Playroom Makeover | blesserhouse.com - A boring and cluttered playroom gets a modern eclectic farmhouse makeover on a budget with DIY projects, smart storage solutions, and inexpensive finds. popular pin

Womp womp.

And after!

Eclectic Farmhouse Playroom Makeover | blesserhouse.com - A boring and cluttered playroom gets a modern eclectic farmhouse makeover on a budget with DIY projects, smart storage solutions, and inexpensive finds. popular pin

Seriously, how did we live with all of this toy clutter everywhere? …and a random office chair.

Eclectic Farmhouse Playroom Makeover | blesserhouse.com - A boring and cluttered playroom gets a modern eclectic farmhouse makeover on a budget with DIY projects, smart storage solutions, and inexpensive finds. popular pin

This space is so functional, and we feel happier and more clear-headed now that the junky mess is gone.

Eclectic Farmhouse Playroom Makeover | blesserhouse.com - A boring and cluttered playroom gets a modern eclectic farmhouse makeover on a budget with DIY projects, smart storage solutions, and inexpensive finds. popular pin

Okay, one more for good measure and then I’ll dive into the details, I pinky promise.

Eclectic Farmhouse Playroom Makeover | blesserhouse.com - A boring and cluttered playroom gets a modern eclectic farmhouse makeover on a budget with DIY projects, smart storage solutions, and inexpensive finds. popular pin

BOOM.

Eclectic Farmhouse Playroom Makeover | blesserhouse.com - A boring and cluttered playroom gets a modern eclectic farmhouse makeover on a budget with DIY projects, smart storage solutions, and inexpensive finds. popular pin

From the very beginning when we first moved into this house, I knew that one day I wanted to install clean white built-in shelves in this room with a place to hang out and relax as a family.

But I also love the rustic farmhouse look, so I wanted to figure out a way to marry the two.

It wasn’t until this wood wall idea from Shades of Blue Interiors came along that the light bulb moment happened.

Eclectic Farmhouse Playroom Makeover | blesserhouse.com - A boring and cluttered playroom gets a modern eclectic farmhouse makeover on a budget with DIY projects, smart storage solutions, and inexpensive finds. popular pin

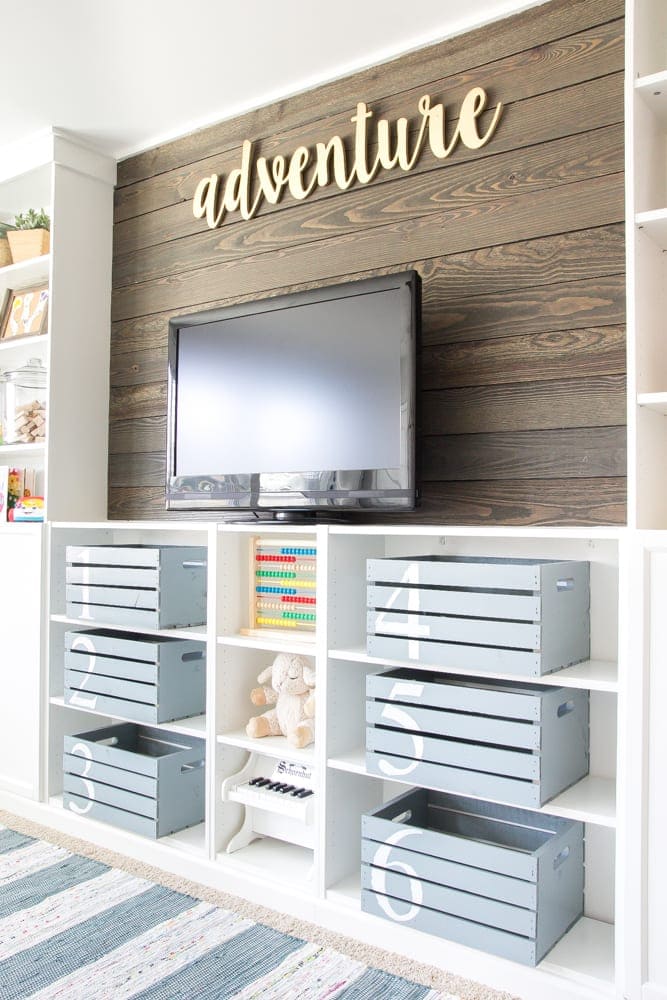
We ended up using these tongue and groove rustic style boards from Lowe’s after our cheap fence repurposing idea fell through. It was a bit of a blow to the budget, but I’m so glad we don’t have to worry about mold and dry rot being nailed up on our wall.

I ended up hanging this cut-out “adventure” sign above the TV and it’s so stinkin’ perfect!

Eclectic Farmhouse Playroom Makeover | blesserhouse.com - A boring and cluttered playroom gets a modern eclectic farmhouse makeover on a budget with DIY projects, smart storage solutions, and inexpensive finds. popular pin

For some easily accessible toy storage, I found these wooden crates on sale for less than $10 each, spray painted them with Rustoleum Winter Gray, and stenciled on the numbers. Easy! And cheaper than a lot of the other crate/basket storage options out there.

Eclectic Farmhouse Playroom Makeover | blesserhouse.com - A boring and cluttered playroom gets a modern eclectic farmhouse makeover on a budget with DIY projects, smart storage solutions, and inexpensive finds. popular pin

The most expensive project in the room by far were these IKEA hack built-in shelves, but they were absolutely worth it. Having the doors on the lower half have been great for hiding toys and board games, and they’re still easy access for Olivia whenever she wants to dig them out.

Eclectic Farmhouse Playroom Makeover | blesserhouse.com - A boring and cluttered playroom gets a modern eclectic farmhouse makeover on a budget with DIY projects, smart storage solutions, and inexpensive finds. popular pin

It was easy to decorate the shelves since I mostly used toys she already had. I stored some of her building blocks and musical instruments in these hocking jars that I picked up at Walmart. I searched high and low for large plastic or acrylic jars with no luck, but Robert and I just help dump out those toys whenever she wants to play with them.

Eclectic Farmhouse Playroom Makeover | blesserhouse.com - A boring and cluttered playroom gets a modern eclectic farmhouse makeover on a budget with DIY projects, smart storage solutions, and inexpensive finds. popular pin

I made a few cork board picture frames where we can easily display her artwork whenever she brings it home from preschool. And I found this cute vintage cage fan on Ebay for $8!

Eclectic Farmhouse Playroom Makeover | blesserhouse.com - A boring and cluttered playroom gets a modern eclectic farmhouse makeover on a budget with DIY projects, smart storage solutions, and inexpensive finds. popular pin

For this half wall, I knew it would be a great spot to install a pair of desks, one for Olivia and one for me, so I can blog or craft while she colors in her coloring books or works on her reading/writing skills.

Eclectic Farmhouse Playroom Makeover | blesserhouse.com - A boring and cluttered playroom gets a modern eclectic farmhouse makeover on a budget with DIY projects, smart storage solutions, and inexpensive finds. popular pin

I ended up finding a square kitchen table on Craigslist that we cut in half and mounted directly onto the wall. Ha! I’m still looking around for other pieces of furniture I could cut in half that would be equally as fabulous.

Eclectic Farmhouse Playroom Makeover | blesserhouse.com - A boring and cluttered playroom gets a modern eclectic farmhouse makeover on a budget with DIY projects, smart storage solutions, and inexpensive finds. popular pin

A very sweet friend sent me this “S” from an old Starbucks sign. Yay for dumpster diving! The rest of the desk decor were just things I already had around the house.

Eclectic Farmhouse Playroom Makeover | blesserhouse.com - A boring and cluttered playroom gets a modern eclectic farmhouse makeover on a budget with DIY projects, smart storage solutions, and inexpensive finds. popular pin

Eclectic Farmhouse Playroom Makeover | blesserhouse.com - A boring and cluttered playroom gets a modern eclectic farmhouse makeover on a budget with DIY projects, smart storage solutions, and inexpensive finds. popular pin

Eclectic Farmhouse Playroom Makeover | blesserhouse.com - A boring and cluttered playroom gets a modern eclectic farmhouse makeover on a budget with DIY projects, smart storage solutions, and inexpensive finds. popular pin

Eclectic Farmhouse Playroom Makeover | blesserhouse.com - A boring and cluttered playroom gets a modern eclectic farmhouse makeover on a budget with DIY projects, smart storage solutions, and inexpensive finds. popular pin

Eclectic Farmhouse Playroom Makeover | blesserhouse.com - A boring and cluttered playroom gets a modern eclectic farmhouse makeover on a budget with DIY projects, smart storage solutions, and inexpensive finds. popular pin

For the window side of the room, I made these pom pom curtains as Anthropologie / Pottery Barn knock-offs using IKEA sheers.

Eclectic Farmhouse Playroom Makeover | blesserhouse.com - A boring and cluttered playroom gets a modern eclectic farmhouse makeover on a budget with DIY projects, smart storage solutions, and inexpensive finds. popular pin

And I hung them up on this galvanized pipe looking curtain rod I found at Target.

Eclectic Farmhouse Playroom Makeover | blesserhouse.com - A boring and cluttered playroom gets a modern eclectic farmhouse makeover on a budget with DIY projects, smart storage solutions, and inexpensive finds. popular pin

I gave Olivia’s existing play table on this side of the room a quick makeover too.

Eclectic Farmhouse Playroom Makeover | blesserhouse.com - A boring and cluttered playroom gets a modern eclectic farmhouse makeover on a budget with DIY projects, smart storage solutions, and inexpensive finds. popular pin

After a lot of debating, Robert and I decided the cheapest, most practical solution for our old tan couch was actually to sell it and replace it with a white IKEA Ektorp. We made $200 from the old couch, so it covered a big chunk of the cost for a new one. (You’d think IKEA sponsored this room. We just went crazy all over the place in here.)

So now if Olivia ever gets this slipcover dirty, I can toss it in the wash with some bleach and it’ll be all fresh and clean. (I hope… we’ll find out.)

Eclectic Farmhouse Playroom Makeover | blesserhouse.com - A boring and cluttered playroom gets a modern eclectic farmhouse makeover on a budget with DIY projects, smart storage solutions, and inexpensive finds. popular pin

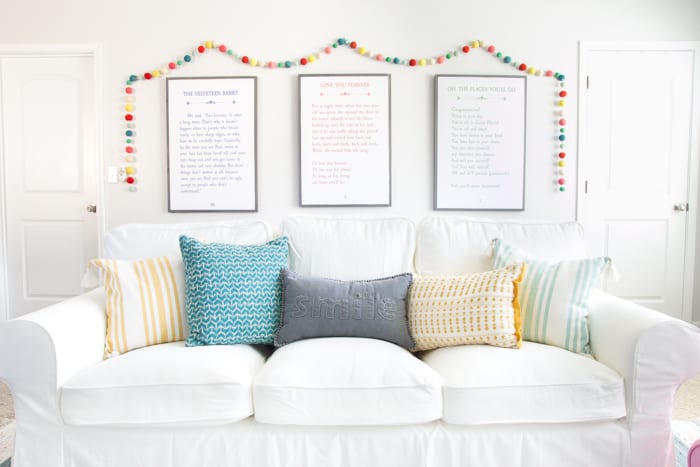
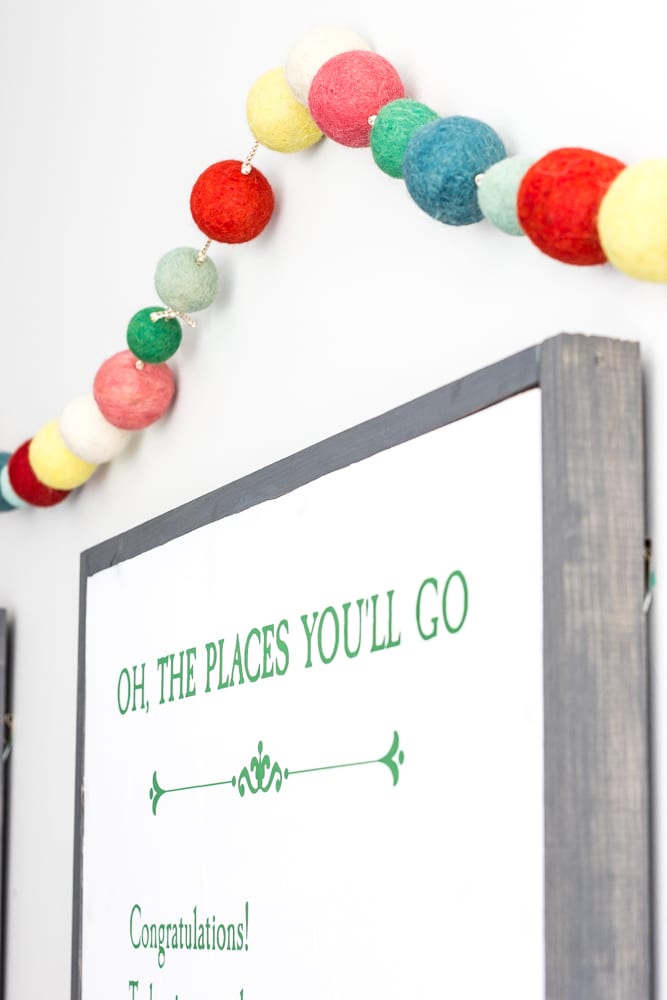
Robert and I have made several of these engineer print / wood framed type signs before, but this time I used colored engineer prints and typed up the wording on Picmonkey to create these oversized storybook pages. Is there a limit on how many times I can say “cute” in this post? I can’t even stand it.

I always have to get sappy and sentimental somewhere in every room we makeover; this project was definitely as sappy as it gets.

Eclectic Farmhouse Playroom Makeover | blesserhouse.com - A boring and cluttered playroom gets a modern eclectic farmhouse makeover on a budget with DIY projects, smart storage solutions, and inexpensive finds. popular pin

Eclectic Farmhouse Playroom Makeover | blesserhouse.com - A boring and cluttered playroom gets a modern eclectic farmhouse makeover on a budget with DIY projects, smart storage solutions, and inexpensive finds. popular pin

Eclectic Farmhouse Playroom Makeover | blesserhouse.com - A boring and cluttered playroom gets a modern eclectic farmhouse makeover on a budget with DIY projects, smart storage solutions, and inexpensive finds. popular pin

Eclectic Farmhouse Playroom Makeover | blesserhouse.com - A boring and cluttered playroom gets a modern eclectic farmhouse makeover on a budget with DIY projects, smart storage solutions, and inexpensive finds. popular pin

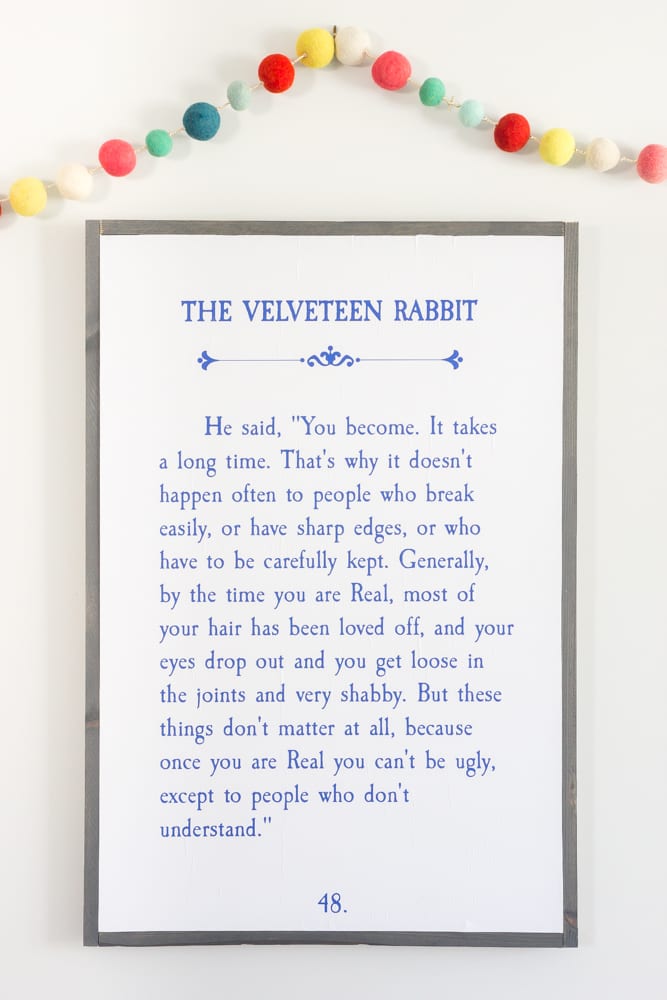
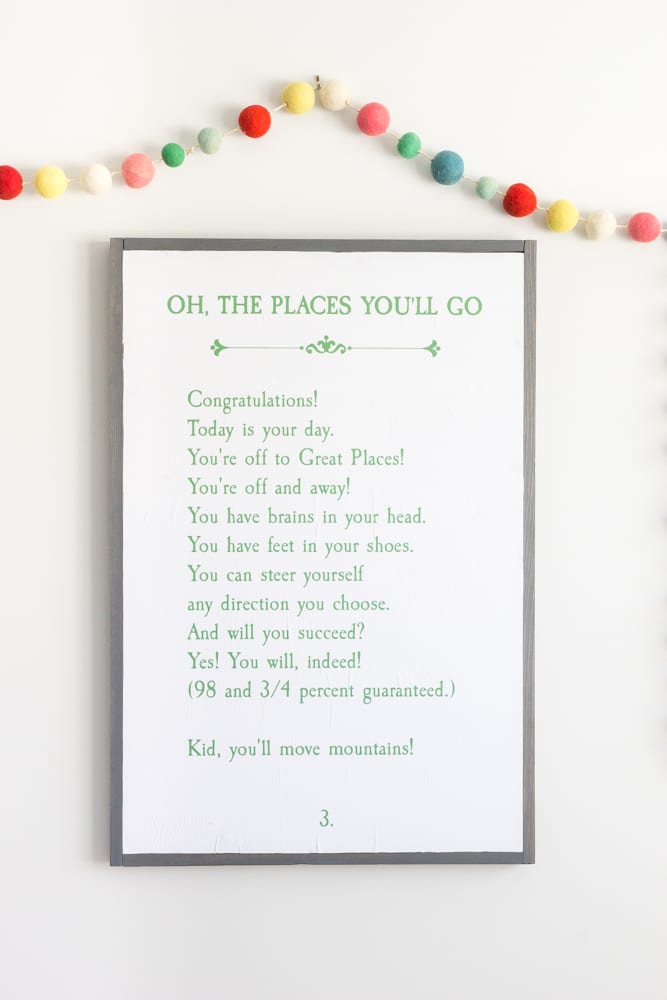
I hung up this felted pom pom garland for some whimsy and they’ve made this room feel very Dr. Seuss-ish.

Eclectic Farmhouse Playroom Makeover | blesserhouse.com - A boring and cluttered playroom gets a modern eclectic farmhouse makeover on a budget with DIY projects, smart storage solutions, and inexpensive finds. popular pin

Back when I was planning this room, I found all of these sofa pillows on sale at Target and they inspired the whole color scheme. I tried not to get too girly with pinks and purples in here, so blue and yellow seemed safe but still fun.

Eclectic Farmhouse Playroom Makeover | blesserhouse.com - A boring and cluttered playroom gets a modern eclectic farmhouse makeover on a budget with DIY projects, smart storage solutions, and inexpensive finds. popular pin

Eclectic Farmhouse Playroom Makeover | blesserhouse.com - A boring and cluttered playroom gets a modern eclectic farmhouse makeover on a budget with DIY projects, smart storage solutions, and inexpensive finds. popular pin

Eclectic Farmhouse Playroom Makeover | blesserhouse.com - A boring and cluttered playroom gets a modern eclectic farmhouse makeover on a budget with DIY projects, smart storage solutions, and inexpensive finds. popular pin

After debating foreverrrrrr on the right rug, this one fit in beautifully and it’s suuuuuper duper soft. I’m ready to wrap myself up in this thing like a blanket burrito. The three of us have loved sprawling out on it to have block building competitions and board game nights.

Eclectic Farmhouse Playroom Makeover | blesserhouse.com - A boring and cluttered playroom gets a modern eclectic farmhouse makeover on a budget with DIY projects, smart storage solutions, and inexpensive finds. popular pin

We finally replaced our plain ol’ builder grade light fixture with this mint one from Hunter Fan. Doesn’t it scream “playroom” to you? I love that it’s modern but still has a vintage vibe.

Eclectic Farmhouse Playroom Makeover | blesserhouse.com - A boring and cluttered playroom gets a modern eclectic farmhouse makeover on a budget with DIY projects, smart storage solutions, and inexpensive finds. popular pin

So now the big crazy breakdown! We ran into a couple of snafus with the wood wall and sofa slipcover plan from the beginning, so we ended up having to spend about $450 more than we originally planned. Ack!

But with furnishing this room with budget DIY projects and shopping as many sales as I could, we did our best to make this room as inexpensive as possible for our long wish list.

SOURCES AND BUDGET BREAKDOWN:

  • Paint – Behr Seagull Gray – $62.54
  • Bookcase built-ins – $899.62
  • Wooden plank wall – $117
  • Wall-mounted desks & chairs – $100
  • White slipcovered sofa – $299 (After selling our old sofa for $200.)
  • Striped cotton rug – $287.99 (On sale at 20% off)
  • Mint ceiling fan – $219
  • DIY window trim – $80.69
  • Pom pom curtains – $53.36
  • DIY storybook page art – $68.82 (Tutorial coming soon)
  • Pom pom garland – $27.27 (3 strands bought at a 30% off sale)
  • Adventure cut-out sign – $49.99
  • Wooden crates (spray painted with Rustoleum Winter Gray) – $59.94 (6 bought on sale)
  • Hocking jars – $45.84 for all 4
  • Barn wood frames – $47.96 for all 4
  • Galvanized bins – $29.88 for all 4
  • Yellow stripe pillow – $13.99 (on sale)
  • Aqua stripe pillow – $13.99 (on sale)
  • Teal print pillow – $13.99 (on sale)
  • Gray “smile” pillow – $11.89 (on sale)
  • Yellow geometric pillow – $13.99 (on sale)
  • Made over play table – $21
  • Metal pipe curtain rod – $32.99
  • Yellow cage fan – $8 (on Ebay)

TOTAL:  $2,578.74

Gulp. Well, that escalated quickly.

This is officially the last large room in our entire house besides our laundry room and closets. I guess 2017 is going to be the year of massive organization.

Well actually, not if this little tornado has anything to do with it.

Eclectic Farmhouse Playroom Makeover | blesserhouse.com - A boring and cluttered playroom gets a modern eclectic farmhouse makeover on a budget with DIY projects, smart storage solutions, and inexpensive finds. popular pin

It is absolutely amazing to me how much having this room complete has changed our family for the better. Before this, we would often park ourselves in front of the TV and watch Netflix after dinner for a couple hours before bed.

Now, we’ve been taking time in the evenings completely unplugged to play in here together as a family because it’s a space we can actually enjoy. And that makes all of the hard work worth it.

Eclectic Farmhouse Playroom Makeover | blesserhouse.com - A boring and cluttered playroom gets a modern eclectic farmhouse makeover on a budget with DIY projects, smart storage solutions, and inexpensive finds. popular pin

 I have no idea what you’d really call this style in this room. Eclectic? Farmhouse? Modern? I was hoping for a little Joanna Gaines meets Emily Henderson kind of vibe. All I know is I big puffy heart love it! And that’s what matters more than anything, right? Fill your home with what makes you and yours happy. This is definitely our happiest space yet.

If you want to save this post for later, you can pin it here:

Eclectic Farmhouse Playroom Makeover | blesserhouse.com - A boring and cluttered playroom gets a modern eclectic farmhouse makeover on a budget with DIY projects, smart storage solutions, and inexpensive finds. popular pin

signoff

Related

Filed Under: One Room Challenge, Room Reveal
Tagged With: One Room Challenge, Playroom, Room Reveal

« Soda Crate Hot Cocoa Bar & Free Printable Sign
Holiday Gift Guide 2016 + a Giveaway »

Comments

  1. Karisa Grimstad says

    November 10, 2016 at 1:18 am

    I can’t tell you how much I love this! Every detail is so gorgeous. What an incredible transformation. The fan and the signs are my favorite. All the colors are so fresh and bright. Perfect for a rainy day (ok. EVERY day.) Congrats on another amazing room! xoxo

    Reply
    • Lauren says

      November 13, 2016 at 12:50 am

      Thank you, Karisa!

      Reply
  2. Andi says

    November 10, 2016 at 2:26 am

    Oh my gosh, that is so cute! The “adventure” immediately reminded me of Up, and I really love the storybook signs!

    Reply
    • Lauren says

      November 13, 2016 at 12:48 am

      Me too! Love that movie! Thanks, Andi! 🙂

      Reply
  3. Paula says

    November 10, 2016 at 5:30 am

    You did an incredible job, Lauren. It looks fabulous and I know that you and your family are going to enjoy spending many hours together in this pretty space.

    Reply
    • Lauren says

      November 13, 2016 at 12:47 am

      Thank you, Paula! We definitely will. 🙂

      Reply
  4. Tasha Agruso says

    November 10, 2016 at 6:02 am

    So I NEVER leave comments on blogs anymore because I just don’t have time, but I HAD to take the time to tell you that this room is AMAZING and I love everything about it, Lauren. LOVE IT!!!! Did I mention I love it?!

    Reply
    • Lauren says

      November 13, 2016 at 12:45 am

      Haha! I’m the same way. Guilty! Thank you SO much for taking the time to comment, Tasha! I really appreciate it. 🙂

      Reply
  5. Linda says

    November 10, 2016 at 7:13 am

    I’ve been so excited to see the reveal. As always, you did an amazing transformation! LOVE it.

    Reply
    • Lauren says

      November 13, 2016 at 12:44 am

      Thank you, Linda!

      Reply
  6. Lanita Anderson says

    November 10, 2016 at 7:40 am

    Oh my goodness….what an AMAZING transformation!!! I LOVE it! My boys are definitely past the playroom stage, so won’t be doing one of those in my house anytime soon, but love all of the great ideas that went into transforming this space! I love the color scheme and how you accessorized, but my favorite might have to be the wood wall and the built-ins….definitely swoon worthy!! Congratulations on an amazing space for your family – hope you all enjoy it and make wonderful memories! Thanks for sharing….

    Reply
    • Lauren says

      November 13, 2016 at 12:44 am

      Thank you SO much, Lanita!

      Reply
  7. [email protected] says

    November 10, 2016 at 7:41 am

    It looks amazing what a great transformation, I’m sure it’s a good feeling to have it completed!

    Reply
    • Lauren says

      November 13, 2016 at 12:44 am

      Thanks, Sandra! It most definitely is. Now to decorate for Christmas. Whew! Haha!

      Reply
  8. Carol says

    November 10, 2016 at 7:59 am

    WOW! So pretty and practical!

    Reply
    • Lauren says

      November 13, 2016 at 12:42 am

      Thanks, Carol!

      Reply
  9. Kristin @ Postbox Designs says

    November 10, 2016 at 8:01 am

    So I’m re-doing my playroom area right now and I knew I HAD to check this out as soon as I saw it…PERFECTION!!! I love everything you did from your pompoms to the die-for mint green fan…congrats on pulling together a perfect playroom!!!

    Reply
    • Lauren says

      November 13, 2016 at 12:41 am

      Yay! Thanks so much, Kristin!

      Reply
  10. Dianne Gingrich says

    November 10, 2016 at 8:16 am

    Looks amazing. What a fun room for your family to enjoy!

    Reply
    • Lauren says

      November 13, 2016 at 12:41 am

      Thanks, Dianne!

      Reply
  11. Jana says

    November 10, 2016 at 8:28 am

    Bam! You have done it again Lauren!! Awesome room and I can totally understand escaping to that space at the end of the day for some family fun time! Great job creating a space that welcomes you in and says, come stay and play! Another amazing transformation! ?

    Reply
    • Lauren says

      November 13, 2016 at 12:41 am

      Thanks, Jana!

      Reply
  12. Kristine says

    November 10, 2016 at 8:40 am

    What a great transformation of that lofty-open space! From a real estate point of view, the built ins and wood wall are your best investment in that room. Lets people know what the room is. You’ve made it very comfy, cozy looking and I can tell it’s a warm family room. I’ll be interested in that tutorial regarding the storybook prints. I’d like to do that on a more adult theme. Also, we had that very same IKEA sofa, but I ended up selling mine after a year. Even after scouring the internet for any and all tips on cleaning those covers, mine never smoothed out (after endless steaming!). They just always had that “sloppy” sheet/slipcover look. I hope you have better luck! I know many have good luck with those – I just didn’t. I went for a more streamlined sofa and realized I preferred that afterall. Nicely done room and happy playtime for all of you! (great detailed blog btw, one of the best diy blogs out here)

    Reply
    • Lauren says

      November 13, 2016 at 12:40 am

      Thank you so much, Kristine! I’ll be sharing the storybook art tutorial later this week. I’ve heard mixed reviews about the slipcovered sofa, so we’ll see how it goes. People who love it have said they usually use Oxyclean to keep it clean and when they do a full wash of it, they put it on slightly damp so it stretches out the wrinkles and is easier to put back on. I’ll probably post an update in a few months to show how it holds up. 🙂

      Reply
  13. Melba says

    November 10, 2016 at 8:42 am

    I can hardly even stand how gosh darn cute this room is.
    It is a family haven. GREAT JOB!

    Reply
    • Lauren says

      November 13, 2016 at 12:38 am

      Thanks, Melba!

      Reply
  14. Denise says

    November 10, 2016 at 8:50 am

    Oh my goodness! LOVE this room Lauren! Every detail is perfection! Great job!!

    Reply
    • Lauren says

      November 13, 2016 at 12:37 am

      Thanks, Denise!

      Reply
  15. Erin says

    November 10, 2016 at 8:56 am

    Love the story book art with the pom pom garland! I think that’s my favorite part 🙂 Everything looks great, though!

    Reply
    • Lauren says

      November 13, 2016 at 12:37 am

      Thanks, Erin! That’s my favorite part too. 🙂

      Reply
  16. Sabrina says

    November 10, 2016 at 9:22 am

    Wow Lauren, your new playroom looks amazing! I love all the little details and the colors. You guys did such a wonderful job!!

    Reply
    • Lauren says

      November 13, 2016 at 12:37 am

      Thanks, Sabrina!

      Reply
  17. Mary Vitullo says

    November 10, 2016 at 9:31 am

    Well done, Lauren – I want to play in that room!!!!

    Reply
    • Lauren says

      November 13, 2016 at 12:36 am

      Thanks, Mary!

      Reply
  18. Jonelle says

    November 10, 2016 at 9:32 am

    Simply adorable. Well done! Would like to hear a review in the future on how well the sofa holds up to daily use.

    Reply
    • Lauren says

      November 13, 2016 at 12:35 am

      I am sure I’ll be checking back in with a sofa update down the road. 🙂 Thanks, Jonelle!

      Reply
      • Molly says

        January 27, 2017 at 10:24 am

        Looking for the sofa update 🙂 Thinking of getting the exact sofa for our TV Playroom and wondering if it’s comfortable and holding up

        Reply
        • Lauren says

          January 30, 2017 at 10:46 am

          Hi Molly! We’re about 3 months in and so far loving it! It’s definitely not a deep sitting sofa, but since neither my husband nor I are very tall, it works well for us.

          Reply
  19. Ardith says

    November 10, 2016 at 9:36 am

    Standing ovation to you and Robert on transforming this area so beautifully and functionally, Lauren. It looks phenomenal. What a fun place to rest or play. Cheers, Ardith

    Reply
    • Lauren says

      November 13, 2016 at 12:34 am

      Thanks, Ardith!

      Reply
  20. Carol says

    November 10, 2016 at 9:45 am

    Oh. My. Goodness!!!! This is fabulous! Thank you for the inspiration! Great style on a budget!!!

    Reply
    • Lauren says

      November 13, 2016 at 12:34 am

      Thanks, Carol!

      Reply
  21. Connie says

    November 10, 2016 at 10:03 am

    The room looks beautiful! So much work on so little time! I am wondering where you got the little drawer unit that sits on one of the desks. I love that and it seems so functional but taking up little space. Thanks! Connie

    Reply
    • Lauren says

      November 13, 2016 at 12:33 am

      Thanks, Connie! I actually made that desk organizer from an old jewelry box. Here’s the post about it: https://www.blesserhouse.com/2015/08/industrial-office-supply-organizer.html

      Reply
  22. Lacey says

    November 10, 2016 at 10:26 am

    We are in the process of buying a brand new “spec home” and I want to do every. single. thing you guys have done to your house!! I just recently found your blog and started from the very beginning and read ALL of it!! I feel like my style is almost the same as yours and I love everything you choose!

    Reply
    • Lauren says

      November 13, 2016 at 12:32 am

      WOW! Thanks so much, Lacey! I’m so glad you’re finding so much inspiration here!

      Reply
  23. LISA NICHOLSON says

    November 10, 2016 at 11:05 am

    Lauren it is BEYOND wonderful. I adore it! Every detail is so creative, well thought out and executed, and just perfection. SO proud for you! Lucky Olivia!

    Reply
    • Lauren says

      November 13, 2016 at 12:30 am

      Thanks, Lisa! We’re having a blast in here.

      Reply
  24. Melanie says

    November 10, 2016 at 11:13 am

    The room looks awesome!! Can I come play? lol

    Reply
    • Lauren says

      November 13, 2016 at 12:30 am

      Come on over! Hehe

      Reply
  25. Katie @ Little House of Four says

    November 10, 2016 at 11:34 am

    It looks fabulous, Lauren! It’s the perfect space for the entire family to hang out and enjoy. The desks and wood wall behind the TV are my favorite. Great job on another gorgeous makeover!

    Reply
    • Lauren says

      November 13, 2016 at 12:29 am

      Thanks, Katie! We’re so excited about it! 🙂

      Reply
  26. Amy @ My Life From Home says

    November 10, 2016 at 12:06 pm

    This space is so stylish and chic with functional built in! I love all the touches. It’s a room everyone can enjoy!

    Reply
    • Lauren says

      November 13, 2016 at 12:26 am

      Thanks, Amy!

      Reply
  27. Mary-the boondocks blog says

    November 10, 2016 at 12:24 pm

    Beautiful job Lauren. It is fun and practical at the same time. Congratulations. Those bookcases are incredible and the wood backdrop gives it the perfect balance. I believe you are done with the house now! What will you do?.

    Reply
  28. Chelsea @ The Johnsons Plus Dog says

    November 10, 2016 at 1:28 pm

    YAY! You made it 🙂 It looks AMAZING. I love those book pages prints. Those are three of my favorite stories!! Congrats.

    Reply
    • Lauren says

      November 13, 2016 at 12:25 am

      Thanks, Chelsea! Mine too. 🙂

      Reply
  29. Cassie Bustamante says

    November 10, 2016 at 1:55 pm

    what a fun space! it looks so clean- i am impressed! my kids can not keep ours clean… i should make it my one room challenge eeeeery time. 😉 but seriously, it looks so great!

    Reply
    • Lauren says

      November 13, 2016 at 12:25 am

      Haha! My daughter already destroyed it. Toys everywherrrrrrre. It was nice while it lasted. 😉 Thanks, Cassie! Your daughter’s bedroom is adorable!

      Reply
  30. Meg @ Green With Decor says

    November 10, 2016 at 2:29 pm

    This is such a fun space!!! I just love the built-ins, and those desks you made from a table are too cool! Love the prints on the wall, too, what a fun idea!

    Reply
    • Lauren says

      November 13, 2016 at 12:24 am

      Thanks, Meg!

      Reply
  31. Heather says

    November 10, 2016 at 3:17 pm

    I am literally obsessed with your blog. I have read every post. You have an amazing sense of style and I love the way you write. I check your site everyday for inspiration. Thank you.

    I LOVE the playroom makeover.

    Reply
    • Lauren says

      November 13, 2016 at 12:24 am

      Wow! Thank you SO much, Heather!! So glad you’re enjoying it!

      Reply
  32. Jen @ Noting Grace says

    November 10, 2016 at 3:19 pm

    Lauren!! This is such a beautiful transformation!! I’m loving your book page artwork – just gorgeous! And pom poms all around for the win!! Excellent job, my friend!

    Reply
    • Lauren says

      November 13, 2016 at 12:23 am

      Thanks, Jen!

      Reply
  33. Krista @ the happy housie says

    November 10, 2016 at 3:43 pm

    Lauren! This is SO FANTASTIC! CUTE is right – I love everything – all the pops of fresh colour against the white. And the pom pom garland and those book page engineering prints. It is all absolutely perfect!!

    Reply
    • Lauren says

      November 13, 2016 at 12:23 am

      Thank you, Krista!! It was so fun to pull together.

      Reply
  34. Angie M says

    November 10, 2016 at 4:34 pm

    Awesome transformation! Absolutely love it! Love how you’ve created areas for everything you want to do in this fabulous room.

    Reply
    • Lauren says

      November 13, 2016 at 12:22 am

      Thanks, Angie!

      Reply
  35. Karan Parris says

    November 10, 2016 at 4:50 pm

    AMAZING! Absolutely gorgeous! Love the different nooks you have created all in one design, seriously inspiring for our blank not used 4th bedroom/current playroom!

    Reply
    • Lauren says

      November 13, 2016 at 12:21 am

      Thanks, Karan!

      Reply
  36. Samantha says

    November 10, 2016 at 5:58 pm

    Oh my word, I love love love every bit! You did such an amazing job! I love the engineer prints with the garland and that rug and…seriously, everything!

    Reply
    • Lauren says

      November 13, 2016 at 12:21 am

      Thanks so much, Samantha!

      Reply
  37. Bonnie says

    November 10, 2016 at 6:06 pm

    Thanks so much for the reveal. Your playroom is so great!! You incorporated so many creative ideas like using the table to make 2 desks and planking the wall behind the TV. I really like the colors that you chose too.

    Reply
    • Lauren says

      November 13, 2016 at 12:20 am

      Thanks, Bonnie!

      Reply
  38. Min says

    November 10, 2016 at 6:30 pm

    Phew,well done team Shaver (*clapping hands*)! Not only have you created a perfect space for your family today, it will easily transform into pre-teen, teen & adult space for your little lady bug, with very few changes 🙂
    I can’t deny that my hubs & I plan to copy your built ins wall, with that fabulous rustic plank wall….LOVE it! I do need to ask where the TV cords are hiding and have you got a DVD player stashed in there somewhere?
    The storybook art really jerked at my heart strings. A project for my one day granbabies 😀

    Reply
    • Lauren says

      November 13, 2016 at 12:20 am

      Thanks, Min! Okay, confession time. I was in a rush to get this space photographed since I was down to the wire on the last few details for the week 6 deadline, so I just stuck the TV up there and figured I’d plug it up later. So the cord is tucked behind the TV in these shots. But we’re drilling a hole in the top of the built in with a hole saw bit, and we’ll run the cord through that to access the outlet in the middle of the wall behind the shelves. The DVD player will go on one of those middle shelves.

      Reply
  39. Lisa says

    November 10, 2016 at 7:04 pm

    You did an AMAZING job and in 6weeks!!!! I love the built ins and will prob steel the idea. You will love the slipcover even after washing. Wash and dry but remove the cover when it’s half dry. I do this at night. Put it back on the couch damp and you will love the slight relax it gives to it. Great Job!!!!

    Reply
    • Lauren says

      November 13, 2016 at 12:15 am

      Great tip! Thanks, Lisa!

      Reply
  40. Nancy says

    November 10, 2016 at 7:23 pm

    Beautiful, beautiful job. What a wonderful family room/playroom. Olivia is one lucky little girl.
    I love the adventure sign.

    Reply
    • Lauren says

      November 13, 2016 at 12:15 am

      Thanks, Nancy!

      Reply
  41. Karen says

    November 10, 2016 at 10:50 pm

    Great job! You’ve created a multi-purpose room for your family to enjoy and your daughter will never outgrow! Love the quotes for the children’s books as art for the wall. TV built in looks wonderful! Now, sit down, relax, and enjoy that room!

    Reply
    • Lauren says

      November 13, 2016 at 12:14 am

      Thank you, Karen!

      Reply
  42. Katrin says

    November 11, 2016 at 1:08 am

    Wow, you’re amazing, it looks beautiful and fun!

    Reply
    • Lauren says

      November 13, 2016 at 12:13 am

      Thanks, Katrin!

      Reply
  43. Lesley says

    November 11, 2016 at 8:08 am

    This is so adorable. I am still in love with the fan and I think I am going to have to find a table to cut in half now for our playroom! Such a great idea! Love it all! Enjoy

    Reply
    • Lauren says

      November 13, 2016 at 12:12 am

      Thanks so much, Lesley! Your little guy’s bedroom turned out soooooo cute too!

      Reply
  44. Brooke Riley~Re-Fabbed says

    November 11, 2016 at 12:44 pm

    This turned out beautifully. Not too over the top “childish” but just enough. My favorite part is the oversized prints over the couch. SO cute.

    Reply
    • Lauren says

      November 13, 2016 at 12:12 am

      Thanks, Brooke!

      Reply
  45. amy says

    November 11, 2016 at 4:11 pm

    Simply Adorable!!

    Thanks to you, i just came back from picking up my first “engineer print” for my first DIY sign. 🙂 Thanks for inspiring!

    Reply
    • Lauren says

      November 13, 2016 at 12:10 am

      Yay!!! Hope it turns out well, Amy!

      Reply
  46. Karen Ploransky says

    November 11, 2016 at 7:03 pm

    It looks soooooo good! I love the wood wall and the desks! The artwork is adorable and that rug would look really good in my living room. And all that storage!!!! What a great place for you, Robert and Olivia to kick back and enjoy each other! Job Well Done!

    Reply
  47. Darleen says

    November 11, 2016 at 7:45 pm

    Love it ⭐️

    Reply
  48. Lisa D says

    November 12, 2016 at 7:55 am

    Lauren, I LOVE everything about your house. If I could just take every room and do my house the same I would be one happy momma!!!! I do have a design question for you I pray that you can answer me back. I am going to paint my kitchen cabinets and I LOVE yours! We are also considering black. Am I going a whole new direction with black or can I make it work with the whole farmhouse feel? PLEASE GIVE ME YOUR OPINION. IAM A BIG GIRL AND I REALLY CAN HANDLE THE TRUTH!!!!

    Lisa D(better known as Momma Lisa)

    Reply
    • Lauren says

      November 12, 2016 at 11:59 pm

      Aw thanks, Lisa! You can absolutely do black and still keep the farmhouse feel! I’ve always loved this kitchen in particular: https://www.pinterest.com/pin/292874782003026726/ I think if you incorporate some wood tones in your accents and keep the backsplash and countertop light to balance it out, you can make it work. 🙂

      Reply
  49. Beth Smith says

    November 12, 2016 at 11:15 am

    I am looking for slipcovers for my furniture. Where did you get your slipcovers? I need a good source.

    Thanks,
    Beth

    Reply
    • Lauren says

      November 13, 2016 at 12:04 am

      Hi, Beth! I got ours at IKEA, called the Ektorp. But I rounded up 10 slipcovered sofas last week if that helps: https://www.blesserhouse.com/2016/10/white-slipcovered-sofas-on-a-budget.html

      Reply
  50. Pamela says

    November 13, 2016 at 11:49 am

    Your room looks great! Thanks for sharing.

    Reply
    • Lauren says

      December 7, 2016 at 2:56 pm

      Thanks, Pamela!

      Reply
  51. Ashlea says

    November 14, 2016 at 12:32 am

    This is so adorable Lauren! I just love it all- the colors, the wood wall, and especially those story prints. Beautiful work! xo

    Reply
    • Lauren says

      December 7, 2016 at 2:54 pm

      Thank you, Ashlea!

      Reply
  52. Candy Walsh says

    November 14, 2016 at 1:08 am

    Everything about it is sheer perfection! The family time and memories that will be made in that gorgeous room will be priceless~so make as many as you can! Great Job!

    Reply
    • Lauren says

      December 7, 2016 at 2:54 pm

      Thank you, Candy!

      Reply
  53. Tori says

    November 14, 2016 at 1:08 pm

    Great job! It looks wonderful! ?

    Reply
    • Lauren says

      December 7, 2016 at 2:49 pm

      Thanks, Tori!

      Reply
  54. Becky says

    November 18, 2016 at 9:13 am

    You guys knocked it out of the park on this makeover!! Every detail is outstanding and it looks so comfortable and cozy. Your family is going to have many, many wonderful memories created here. Outstanding!

    Reply
    • Lauren says

      December 7, 2016 at 2:39 pm

      Thank you so much, Becky! We’re so thrilled with how it turned out. 🙂

      Reply
  55. Erin @ Lemons, Lavender, & Laundry says

    November 18, 2016 at 4:41 pm

    So much to love in the space! Love the crates you found (I’m keeping that color in mind for future painting projects 🙂 ). Also loving that you cut a table in half… How fun is that? Gorgeous book quotes. Love it!

    Reply
    • Lauren says

      December 7, 2016 at 2:34 pm

      Thank you, Erin! We had so much fun in here. 🙂

      Reply
  56. Corinne says

    November 18, 2016 at 10:31 pm

    I am completely head over heels in love with every inch of this space. Amazing job!

    Reply
    • Lauren says

      December 7, 2016 at 2:31 pm

      Thanks, Corinne!

      Reply
  57. kimberly mukes says

    November 20, 2016 at 5:18 pm

    I LOVE this room! When my oldest two where young, we cut an old table in half for wall mounted desks too. They loved them.

    Reply
    • Lauren says

      December 7, 2016 at 2:27 pm

      Thanks, Kimberly! Hope my little one loves it as much as yours did. 🙂

      Reply
  58. Heather says

    December 8, 2016 at 11:45 pm

    AMAZING!!!! Love the “built ins”, artwork and sofa. Looks great

    Reply
    • Lauren says

      December 13, 2016 at 12:06 pm

      Thanks, Heather!

      Reply
  59. Lauren Griffith says

    December 30, 2016 at 11:28 pm

    I love, love, love this multi-functional playroom space! I’m in the process of re-working our bonus play room and would love to know the dimensions of your room so I can compare your ideas with how they might fit in our space. Great job! Lauren

    Reply
    • Lauren says

      January 3, 2017 at 10:47 am

      Thank you, Lauren! The dimensions of the room are 17’3″ x 18′. Hope that helps. 🙂

      Reply
  60. Elizabeth says

    January 16, 2017 at 9:15 am

    Found you through Pinterest. Just wanted to say that you did an amazing job!! It’s gorgeous. Can I move in with you guys so I can stay in this playroom? Pretty please?

    Reply
    • Lauren says

      January 16, 2017 at 8:17 pm

      Haha! Thanks, Elizabeth!

      Reply
  61. Shannon Cantellano says

    January 22, 2017 at 12:24 pm

    How did you run the power cord to the TV behind the shelves since they’re flush to the wall?

    Reply
    • Lauren says

      January 22, 2017 at 7:01 pm

      You can buy cord cover strips to help hide them. 🙂 http://amzn.to/2jOlMYZ We left a small gap between the shelves in the middle and the wall behind them to have room to run cords.

      Reply
  62. Sole says

    February 2, 2017 at 10:14 pm

    Hi! New to your blog! I fell in every with the word adventure…could you please tell me what color is it? I have been reading your blogs and love what you have done to every space! Thank you!

    Reply
    • Lauren says

      February 6, 2017 at 11:42 am

      Thank you! I’m not sure what color that “adventure” sign is. It came from the Etsy shop I linked to. They used a gold paint.

      Reply
      • rebecca says

        November 5, 2017 at 1:13 pm

        Hi, it says you paid 59.99 I think for the “adventure” sign. I clicked on the link and now they charge $599+, I was just checking to see if you really only paid the 59….
        The entire room is beautiful!!

        Thanks.

        Reply
        • Lauren says

          November 5, 2017 at 8:38 pm

          That’s weird. I just clicked it and it doesn’t say $599+. Maybe it was a typo that they caught after you clicked it? Here’s the link to it: http://rstyle.me/n/ctx6mcb5ky7

          Reply
  63. Kacey says

    February 7, 2017 at 10:21 pm

    Hi! What an amazing playroom!!! I LOVE it! I was looking at the link at Target for the rug you got. Can you tell me the color you purchased? Was it the grey color or charcoal? It’s on sale right now and I’m thinking about getting one… thank you!!

    Reply
    • Lauren says

      February 7, 2017 at 11:24 pm

      Hmm… I clicked the link and I’m only seeing mine, no other color options. It’s this one you’re seeing, right? http://rstyle.me/n/cemsz2b5ky7 I wouldn’t describe it as grey or charcoal (more like teal/aqua), so that’s really strange if it’s being described as charcoal on Target’s site. Weird.

      Reply
  64. Olga Vorobey says

    February 10, 2017 at 1:18 pm

    This is absolutely beautiful. Can you tell me what size this room is?

    Reply
    • Lauren says

      February 11, 2017 at 3:13 pm

      Thanks! The room is 15’x12′.

      Reply
  65. Jenna Miller says

    February 14, 2017 at 10:21 pm

    Hi! I am in the middle of planning our house build and came across this and just love it! What was the color of the rug? I thought maybe the Ivory/Charcoal color? Such a beautiful room!

    Reply
    • Lauren says

      February 17, 2017 at 10:15 am

      Hi, Jenna! I’m not sure why, but I’m not seeing the color listed in the description on the Target website. But it’s the 8×10 rug in this link: http://rstyle.me/n/cfizyvb5ky7

      Reply
  66. Ali says

    March 22, 2017 at 9:53 pm

    I love the little wooden drawer thingy! Where did you find it?

    Reply
  67. Cathy says

    March 24, 2017 at 11:14 pm

    How did you print the big wall art? I love it!!

    Reply
    • Lauren says

      April 1, 2017 at 12:37 pm

      Hi Cathy! You can find more about the wall art in this post: https://www.blesserhouse.com/2016/11/diy-storybook-art.html

      Reply
  68. Larene says

    May 11, 2017 at 3:27 pm

    Lauren – sooo in love with this room. Question, are the bookcases cut into the wall or just up against the wall itself? Love the half desk (eyeballing a desk i have to do the same to). No wonder people hide my power tools.
    Hope i can do this justice.

    Reply
  69. Lindsey Domer says

    June 13, 2017 at 12:15 pm

    Lauren, I know this is a late comment to an old post, but this space is gorgeous! I love how bright and airy it is! Plus, it can grow with your family. I can see those desks becoming homework desks and a fun place to have friends over! I do have a question— what did you do with your TV cords? I have built-ins and the cord clutter and boxes are driving me nutso!

    Reply
  70. Gina says

    June 19, 2017 at 8:47 am

    This post has inspired me! I love this playroom! My daughters basement playroom is desperate for a makeover. Any advice for a dark space?

    Reply
    • Lauren says

      June 20, 2017 at 9:15 am

      Thanks, Gina! For a dark space, definitely keep the walls light. Maybe incorporate some recessed lighting, if you can.

      Reply
  71. MELISSA STINSON says

    July 2, 2017 at 10:36 am

    A.D.O.R.E. I.T. Such a great room, L.O.V.E.?

    Reply
  72. Melissa says

    July 13, 2017 at 10:45 pm

    Love this playroom! The storage ideas are perfect! Also, where did you find that dollhouse?!

    Reply
    • Lauren says

      July 14, 2017 at 10:02 am

      The thrift store! Can you believe it? “Santa” took it back to his workshop and the “elves” fixed it up one Christmas. 🙂

      Reply
  73. Sarah says

    July 23, 2017 at 9:16 pm

    What color rug is that, turquoise?

    Reply
    • Lauren says

      July 31, 2017 at 10:34 pm

      In the online descriptions on Target’s site, it says it’s gray, but in person, it’s definitely a turquoise/teal color.

      Reply
  74. Sarah says

    August 16, 2017 at 12:41 pm

    We are just starting our playroom make over (of course its the first room in the house to get new floors, kids first right?!) I keep coming back to this post for inspo! Thank you for sharing!

    Reply
  75. Elizabeth says

    September 12, 2017 at 11:04 am

    This is my favorite of all the room renos I’ve EVER seen! I love absolutely every single thing!!

    Reply
  76. Rachel says

    October 9, 2017 at 7:40 am

    I adore this!!! When I click on the link to the rug, the description says turquoise, but the picture looks very light blue on the target website. By any chance do you know if that’s the one you have?

    Reply
    • Lauren says

      October 9, 2017 at 8:46 pm

      I don’t know why but the picture is very off on the website. The turquoise should be the correct color.

      Reply
  77. Molly says

    November 7, 2017 at 9:34 am

    Hi Lauren,

    Just wanted an update on your Ektorp–is it holding up? I’ve been debating for months on purchasing it and keep going back and forth 🙂

    Also, is it easy to clean? I’m hoping you can just take the slipcover off and bleach it and easily put it back on–but if it’s anything like the anywhere chair from Pottery Barn I’m thinking it’ll be more difficult!

    Thanks!!

    Reply
    • Lauren says

      November 7, 2017 at 1:02 pm

      Hi Molly! So far, it’s holding up great! We’ve had magic markers and dirty feet and all kinds of craziness on this couch, and I just spot treat with Tide pens or toss it in the wash with some Oxiclean White Revive detergent when it needs a whole refresh. I will say it’s not the comfiest couch in the world. The cushions are on the firm side and it’s not very deep-sitting, but for a playroom, I think it’s perfect. 🙂

      Reply
      • Molly says

        November 7, 2017 at 5:34 pm

        Good to know!!! Thanks so much!

        Reply
  78. Katy Beacher says

    November 18, 2017 at 4:39 pm

    Who would’t want spend their evenings here? I especially like the table halves attached to the wall! Brilliant!

    Reply
  79. Shannon says

    November 20, 2017 at 7:17 pm

    On the Target website, it said turquoise which was a light blue. I found it on amazon and it says ivory/charcoal and looks more like yours. Is that the one you chose? The charcoal looks like a deep teal.

    Reply
    • Lauren says

      November 20, 2017 at 10:44 pm

      Yes! For some odd reason, they have it listed as charcoal, but it’s definitely teal.

      Reply
  80. Krystin says

    November 21, 2017 at 10:46 am

    Do you know the length of your garland?

    Reply
    • Lauren says

      November 21, 2017 at 12:57 pm

      It’s actually 2 garlands that are 6 feet long each. I just connected them in the middle.

      Reply
  81. Jennifer marshall says

    November 21, 2017 at 1:26 pm

    Where is the doll house from!?

    Reply
    • Lauren says

      November 21, 2017 at 3:34 pm

      It was a lucky find at my local thrift store for $10. 🙂 We just fixed it up with paint and scrapbook paper.

      Reply
  82. Kristen says

    December 31, 2017 at 5:07 am

    Where did you find the crates that fit on these shelves? Thanks!

    Reply
    • Lauren says

      January 1, 2018 at 10:42 pm

      Hi Kristen,

      There is a link at the bottom of the post to JoAnn Fabrics for the exact ones I purchased. And it looks like they are on sale currently! 🙂

      Reply
  83. Lindsay hunter says

    January 5, 2018 at 1:50 am

    I love this room!! Can I ask how you organised the toys into those numbered drawers? I never know how to organise my girls’ toys! Thanks

    Reply
    • Lauren says

      January 5, 2018 at 11:24 am

      The numbered crates aren’t really organized. They’re just cute. Because there’s no way I could get my 4 year-old to keep them organized anyway. 😉 We’re in a new house now though and we’re currently planning our next playroom makeover, so I’m working on some ideas to get a system more down pat.

      Reply
  84. Jamie says

    January 19, 2018 at 1:47 pm

    I LOVE this room. It is beautiful, peaceful, and still whimsy and playful. Any chance you ha e a more detailed post or even a download on the art behind the couch? I would love to replicate it in my playroom!

    Reply
    • Lauren says

      January 19, 2018 at 3:11 pm

      Thanks, Jamie! Yes, here’s more info about the art here: https://www.blesserhouse.com/2016/11/diy-storybook-art.html

      Reply
  85. Rebecca says

    January 27, 2018 at 6:58 pm

    I love this room and especially the storybook art. I was wondering if you put up the tutorial for the storybook art?

    Reply
    • Lauren says

      January 29, 2018 at 9:50 am

      Hi Rebecca,
      I sure did! Here’s all you need to know.
      https://www.blesserhouse.com/2016/11/diy-storybook-art.html

      Reply
  86. Jennifer says

    February 14, 2018 at 12:58 pm

    Love, love, love this playroom!!! As we are about to build a house, we are incorporating play room as well! Would you mind sharing the dimensions of your room? Thank you in advance!!

    Reply
    • Lauren says

      February 20, 2018 at 10:21 pm

      Thanks, Jennifer! It’s 14’x18′.

      Reply
  87. Christine says

    March 12, 2018 at 3:16 pm

    How did yall plug the TV in? did you drill holes on the shelving unit?

    Reply
    • Lauren says

      March 12, 2018 at 4:04 pm

      Yes, we drilled a hole in the top of the bookcase and fed the wire through.

      Reply
  88. Amy says

    May 29, 2018 at 5:50 pm

    I stumbled upon your playroom makeover and it is amazing! I am working on our daughters playroom now. Do you sell the engineer print signs you created? They are beautiful.

    Reply
    • Lauren says

      May 29, 2018 at 9:57 pm

      Thank you! I don’t sell them, unfortunately. But here’s the tutorial to make them, if that helps at all: https://www.blesserhouse.com/diy-storybook-art/

      Reply
  89. Katie says

    January 28, 2019 at 11:00 am

    Do you have a tutorial on your storybook pages?? I they are SO precious! I’m trying to recreate them for my daughters playroom. I read somewhere that you used PicMonkey but I’m having a hard time using the app and getting them to look the exact same ??. Can you help me?! ? thank you!!

    Reply
    • Lauren says

      January 28, 2019 at 8:42 pm

      Thank you, Katie. Here is a link to the post about the storybook art. https://www.blesserhouse.com/diy-storybook-art/

      Reply
  90. Christina says

    January 29, 2019 at 9:41 am

    Love your playroom! You did a great job! What color rug is it? Was about to purchase it but can’t decide if it’s the gray or turquoise Carine rug ?! Thank you!

    Reply
    • Lauren says

      January 30, 2019 at 11:03 am

      Christina!! The rug in the playroom is https://rstyle.me/n/c3tvaib5ky7 . It is the Hillsby Blue/Orange. It may be out of stock on Overstock but is still in stock through the link shared in this response to Wayfair.

      Reply
  91. Ashley Schwartz says

    March 28, 2019 at 9:42 pm

    Hi! Love this space! Is there any chance you remember where the little wooden drawers are from? Thanks!!

    Reply
    • Lauren says

      March 29, 2019 at 9:03 am

      The small wooden drawers are something that I already had around the house. I am sure I got it from Target or Michael’s, maybe Office Depot. AAAHHHHH, I wish I could remember. I did google for ‘small desktop wooden drawers’ and found some cute similar ones.

      Reply
      • Ashley Schwartz says

        March 29, 2019 at 11:20 am

        Thank you!!!

        Reply
  92. Dawn says

    May 4, 2019 at 4:32 pm

    I am trying to convince my husband that white slip covered furniture will be perfect for our living room. We thinks they will be grungy and gross in months. I wondered, how is your sofa holding up and has it been easy to care for?

    Reply
    • Lauren says

      May 4, 2019 at 8:07 pm

      WE STILL LOVE IT!! It is easy to wash. We certainly live in our house. We do not tip toe around the furniture. It gets sat on, snacked on and napped on. I hope you can talk him in to it. 🙂

      Reply
  93. Danielle Farinella says

    July 10, 2019 at 1:43 pm

    Is there a way to print your storybook art for the 24X36 size? When I try via staples, it is super small unless I print 18X24? Thank you!

    Reply
    • Lauren says

      July 10, 2019 at 9:18 pm

      HI! If you have photo shop or lightroom you should be able to resize the prints. OR, you can try to print from overnightprints.com .

      Reply
  94. caitlin rossi says

    July 31, 2019 at 10:03 am

    Hi, this room is amazing! Do you happen to have a tutorial on how to make the built-in shelves? Thank you!

    Reply
    • Lauren says

      August 1, 2019 at 7:08 pm

      Hi Caitlin. Yes, I certainly do. Here is the post https://www.blesserhouse.com/diy-built-ins-from-ikea-bookcases-orc-week-2/.

      Reply
  95. dawn fox says

    September 26, 2019 at 6:12 pm

    Hi. The room looks amazing! I was wondering, since it has been a few years, How has the white slip covered sofa held up? I’m considering the same sofa for our living room. Thanks!

    Reply
    • Lauren says

      September 26, 2019 at 9:18 pm

      Hi, Dawn!! Thank you! The sofa and slip cover held up GREAT!! We have recently gotten a new couch. However, my husband was a bit bummed when I told him that we were replacing it. We all really enjoyed the choice. I would have kept it but the new one is stain resistant without having to take off the cover to wash.

      Reply
  96. Annette says

    May 27, 2020 at 11:45 pm

    Love your playroom we are currently redoing ours and I love the shelf that the TV sets on where did you purchase that and do you remember what the name of it was also wondering where you purchased the crates and what size they were love that whole set up you did an amazing job

    Reply
    • Lauren says

      June 10, 2020 at 10:05 am

      The crates are from Joann. The built ins are Ikea Billy bookcases that we did an entirely separate post on!

      Reply
  97. Annette says

    May 29, 2020 at 11:37 am

    This room is absolutely amazing I was wondering where you purchased the wooden crates and what size they were also what the name of the IKEA shelf is that the tv and the crates are sitting on I absolutely love how this looks.

    Reply
  98. Annette says

    June 28, 2020 at 1:33 am

    Thank you I found the crates and the bookcases I’m so excited to get them out together. One last thing where did you get the stencil for the crates I really love the look of the whole shelf you did an amazing job. Also how can I follow your other blogs please.

    Reply
  99. Annette says

    July 15, 2020 at 11:34 pm

    I was wondering where you got the stencils from for the crates absolutely love these. Also how can I follow your blogs you have amazing ideas.

    Reply
  100. Annette says

    August 17, 2020 at 11:25 pm

    I was wondering if you could tell me where you got the stencils for the crates absolutely love these.

    Reply
  101. Annette says

    September 11, 2020 at 7:08 am

    Sorry to keep asking the same question. Could you please tell me how you did the numbers on the crates love these and have everything bought to do them just need to know how you done the numbers. Absolutely love this room thanks

    Reply
    • Annette says

      September 29, 2020 at 4:16 pm

      Ok so I’ve figured out the font last question is did you make all the numbers the same height and width or just change the height thanks

      Reply
      • Lauren says

        November 21, 2020 at 7:41 pm

        HI. The numbers are all the same height.

        Reply

Tell me what ya think! I read every comment I receive. Cancel reply

This site uses Akismet to reduce spam. Learn how your comment data is processed.

We’re Robert and Lauren, a DIY-loving duo just fighting the good fight in making our house a home one renovation and thrifted decorating adventure at a time. Home wasn’t built in a day, but the journey is half the fun. We’re so glad to have you here, and we hope you feel inspired to love the home you have.

Subscribe

Pin With Me

  • Home Office Ideas
  • A round-up of 20 of the best DIY wall decor ideas plus tutorials and tips to pull off the look easily and get the designer look for less.
  • How to paint a sink, countertop, tub, and shower for $100 and how to make it last using Rustoleum Tub & Tile Refinishing Kit #bathroom #bathroommakeover #diyproject #homeimprovement #paintedsink #paintedcountertop #paintedtub #paintedshower
  • A guide for the best sizes of rugs for different rooms, the best rug materials for different uses, and ways to pair them in open floor plans.
  • Learn to how to make hobnail Easter eggs inspired by vintage McCoy Pottery and hobnail art glass and milk glass. Paint the eggs in pastel colors and display them alongside your favorite vintage collections.
  • A round-up of over 50 beautiful coffee table books filled with inspiration from art, travel, design, music, history, fashion, and more.

Privacy Policy & Disclosures

We are a participant in the Amazon Services LLC Associates Program, an affiliate advertising program designed to provide a means for us to earn fees by linking to Amazon.com and affiliated sites.

Read our privacy policy and disclosures →

Privacy Policy

browse by category

browse by date

Copyright © 2021 Bless'er House. Web Design by Viva la Violet.