I have been sponsored by the Glidden® brand paint for PPG to write this post but the thoughts and opinions expressed are my own.
Woo to the hoo! It’s DIY board and batten reveal day!
If you missed out earlier this week, I revealed our foyer makeover and shared all of the details for part one of our DIY board and batten.
I’m so excited how this one turned out!
Last week, our foyer looked like this:
That shiplap wall added tons of character, but the front door…not so much. It was still very plain builder grade.
Our hallway connecting our foyer and living room was rather one-dimensional too. It was dark with no natural light and had no wow-factor at all.
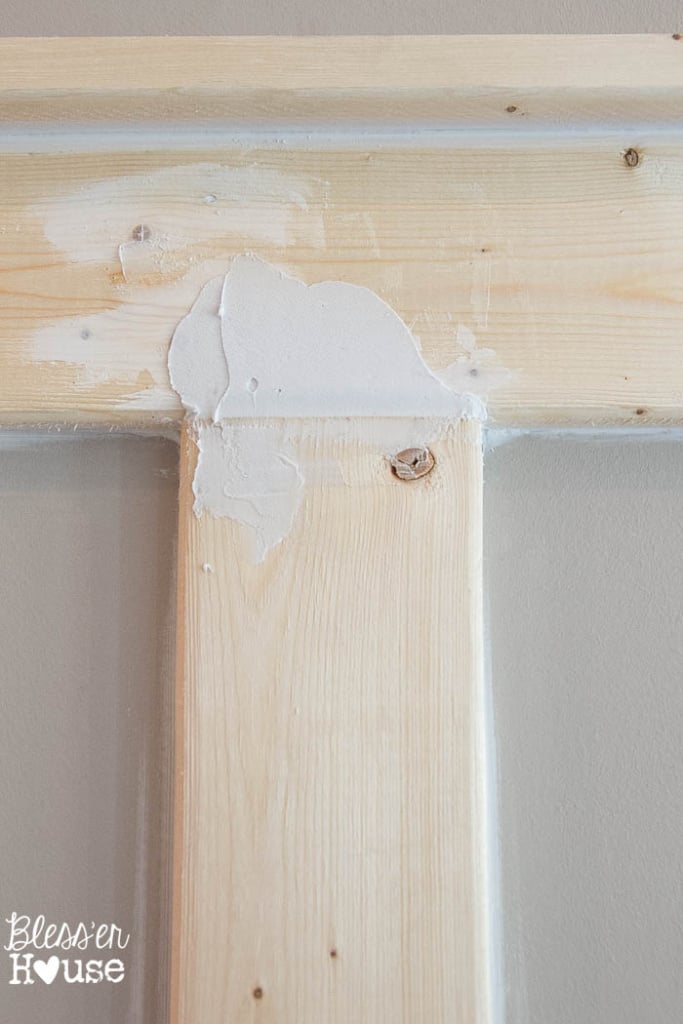
On Sunday, this was our situation. Fresh bare board and batten just begging for a pretty paint job.
We spackled, caulked, and sanded all of the wood knots, seams, and nail holes to prep for a smooth finish.
I shot this prior to sanding. (Sanding is important, y’all.)
Then taped up our trim.
Olivia helped out too. Can you tell by those little tape pieces stuck on the wall? She calls them stickers. Bless.
Glidden Paint was so wonderful to send a gallon of paint to me to try out. This was the first time I’d ever used Glidden Paint Duo Paint + Primer after using many other brands before, and I’m sold on this one.
Staying under budget is really important to me in all of my projects (if you’ve been following for a while, you probably already know).
Glidden is inexpensive, but it didn’t behave like a cheap paint for me. I was really happy with the coverage, and the finish was really smooth. A great quality paint brush can make a huge difference (mine has seen a lot of action).
I used the color Crisp Linen White in a semi-gloss finish.
I started on the trim first, and I feathered it out as I went so I didn’t have a hard paint line showing.
Lola was my supervisor, as usual. She’s my naptime DIY buddy.
Once the trim was done, I started rolling with a mini roller.
I always like using a plastic grocery bag as a paint tray liner for quick clean-up.
The paint is low VOC so, thankfully, it didn’t stink up our whole house. There was no smell at all.
I ended up doing two coats since I was painting directly over rather dark wall paint and wood. It dried really quickly though, so as soon as I was finished with one coat, I could start on the next.
After painting our entire hallway and foyer with all of those little trim details, I still had a cup or two of paint left in my gallon can. You can see lots of reviews from other DIYers on their Ratings and Reviews site. (I usually like to do my homework on that kind of thing.)
The whole process was tedious but worth it! I lurv our hallway now!
It’s finally a space Robert and I are proud of and flows so well into the rest of our house.
It adds so much charm alongside our $80 wood beam doorway.
Next stop on our to-do list is painting that front door something other than white. What color do you think we should do? I’m leaning toward something gray or blue but I’m stuck.
For comparison’s sake, can we check out a real before picture here? I shot this on closing day in December 2013.
We’ve come a long way in less than two years.
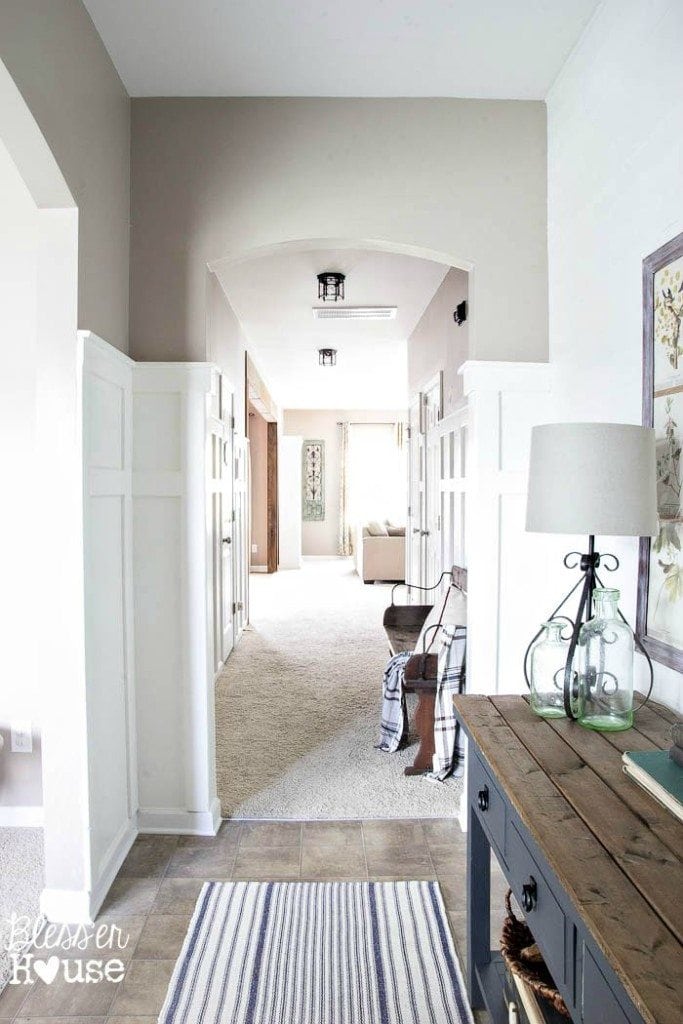
Our $35 wagon bench we found on Craigslist pops so beautifully against our shiny new trim.
We’ll be adding hooks and a little art above the bench eventually too.
If you ever want to go the DIY route for some board and batten yourself, be sure to pin this post:
And about that giveaway? Glidden® is giving away a $50 Home Depot gift card if you want to try out their paint too. Just enter using the Rafflecopter widget below. (Eligible only to continental U.S. residents. Contest ends 9/6/15.)
Follow:
Facebook | Pinterest | Instagram | Twitter | Google+ | Bloglovin | Hometalk
Awesome job! I’m still intimated though! I vote for charcoal on that door.
Thanks! I know what you mean. I was very intimidated but my desire to have b&b won out. Haha! Thanks for the door color input!
Lauren,
I just had to leave a comment right away. This looks so awesome! What a transformation. I have been dreaming of doing this in my house. I think you have convinced me. Like you, I have a beige builder grade house I am working with. Furring strips are a brilliant idea but sometimes it can be hard to find enough good ones. The thing that has me stuck in my tracks is that I have an off white kitchen with with chocolate glaze. The rest of my house has white doors and trim. I’m just stuck on the color of the board and batten. Plus I think I want to paint ALL of my interior doors. I’m stuck in a color loop. On your door I think I would go with a grey blue. Something that looks great with all the duck egg.
Thank you, Nancy! I agree. Finding good furring strips takes a little while to sort through the stack. But I was determined not to spend a lot. Wood filler and a sander can do awesome work though. I think for the board and batten color, I would match your existing trim unless you plan on painting that some day too. I think it’s okay if the cabinets are a little different from everything else. Interior doors painted to contrast board and batten is soooo pretty. I don’t think I’ll ever have the courage to do that. Hope you figure it all out though. The hardest part of decorating is figuring out your direction, for sure.
Love it! I put up Board and Batten in our side entrance and wanted to do shiplap in our front entrance but was wondering about the 2 different styles and if they would work. Your’s looks great! I used MDF and thought it was pretty inexpensive but yours was even more! I will have to remember the furring strips!
I was a little worried about that too. And then I just went for it. Haha I love how ours turned out though. I had to dig up a lot of inspiration of other homes that I’d seen it in to give me the courage though. I say go for it. 😉
This looks AH-mazing! Wow! What a transformation! You two have been busy!
Carrie
curlycraftymom.com
Thanks, Carrie! Let’s just say…we’re ready to give the power tools a break for a while. Haha
Wow you have been busy. If it were my door I think I would buy a new pine door and stain it to match the table top and the diy doorway. You can buy them at a fairly reasonable price. And it will block sound better.
Ooh! Good idea, Alison! I would LOVE to have a wood door but it all depends on the budget. Thanks for the tip about the pine. I’ll have to look into that.
Your welcome. I think a pine door would look great. We installed them in our hall and trimmed them with pine and I am happy we did. It’s been a while but I think the doors were around $80.00. Good luck with it.
You could also try painting it to look like wood with a faux wood painting technique. That way, you don’t have to worry about matching the outside color to satisfy you HOA. If you don’t like it after you try it, then you can get a new door. Just a thought. Can’t wait to see the hallway in person! It looks great!
You read my mind! I did a faux wood painting technique on our coffee table top, so I might do that again.
This post is timely for me! After coming back from a weekend away and finding my pedestal sink floated away from the wall in my 1/2 bath, I removed it to patch it up and decided I wanted to do my first attempt at board and batten in this small room to add some interest. After reading this, not only do i have confidence to use these boards vs. MDF i was going to do, but I really think it will lighten up my dark entry hallway as well. What a transformation for yours— thank you so much for sharing all your instructions / details.
Yay! I love it when that happens! (The timely post thing, not the pedestal sink issue. That stinks!) I’m so glad it could help!
Looks great, Lauren. I like the mix of board and batten, shiplap and wood beam type trims. That is a style of bench that I have always admired.
Thanks, Elizabeth! So glad you like it. I was nervous about mixing all of that but I like how it turned out too.
Looks awesome! Love the board and batten! I’m hoping to do that in my house when I redo the kitchen living room and hallway. Thanks for sharing! Thinking about the shiplap for my bedroom.
Thanks, Sherry! It really does transform a room. We’re thinking of a few other rooms for the shiplap too.
The blue color of the chest by the door or an olive green are my votes for your front door color!
Thanks, Carrie! I didn’t think about olive green but that could be pretty!
You are a machine lady!!! The difference that board and batten/wainscoting makes never ceases to amaze me. It looks awesome and like twice as wide! For the door, I vote a light gray, similar to the inside of Sarah’s from Life on Virginia Street. Second choice is the stained wood vote above.
You read my mind, Emily! I’m definitely considering that color that Sarah used. Thanks, lady! By the way, I just spent way too much time the other day pouring over your Style Me Pretty feature. So gorgeous.
Lauren, this looks amazing! I’d love to put board and batten in our 1932 cottage home, but since the walls are plaster, I’m not sure it would look as smooth as yours in between the boards. Yours turned out really lovely…and you’re blessed to have a hubby to enjoys doing projects with you 😉
Just love your site! BTW, do you have pics of your chalkboard wall in the kitchen? A-dor-a-ble!
Thanks, Caryn! Oh yeah the plaster could be tricky. I have no idea how I would tackle that. Maybe one day it can work out for you though. I’m sure a 1932 cottage already has lots of lovely character.
I’m definitely very blessed with this handy hubby of mine. We crank up the music as we DIY, dance around, and make a date of it. 😉
I really need to show more of my kitchen…but I’m just not in love with it right now since we’ve barely touched it. There’s a another shot of the chalkboard in our home tour but that’s about it for now. We’re hoping it will get a makeover in the spring. Fingers crossed. 🙂
I love it! You’re much quicker than I am at completing projects! I have been working on installing board and batten in an upstairs bathroom and it has taken me a few months 🙂 I have a very similar bench too that I was thinking about dumping off, but seeing yours has given me some inspiration for is. Thanks for the giveaway, I can think of lots of ways to use that $50!
Thanks, Melanie! We made this one quick but we’ll be taking a breather from the power tools for a little bit. I like powering through and getting it done than having to look at the home improvement mess for weeks on end. Definitely don’t dump your bench! I know about 30 other people who want one just like it. Haha!
Sooo yummy! I adore board & batten, you and your hubs have inspired me to talk it over with my dear man… I do need to ask though, how high are your ceilings..? Mine are only 8ft and I worry that board & batten may make my ceilings look like they are even lower… Any thoughts on this would be much appreciated 🙂 Until I read Alison G’s great comment about staining the front door to match your console table top & beam doorway (fantastic idea!), I was thinking that a darker version of the Fusion Mineral Paint in Ash you used on the console table would look great.
Thanks, Min! My husband has said before, “I bet all of the husbands of the women who read your blog absolutely hate me because we give them more stuff to put on their honey-do list.” Haha! We have 9 ft ceilings, so we had the space to take it up that high. I’d maybe go 3/4 up the wall for an 8 ft ceiling if that’s what we had. Thanks for the door ideas! The only down side to the pine door idea I realized is our HOA has to approve everything about the exterior of our house, so they may not go for the wood door idea. Paint is Plan B now. We’ll see. 🙂
Thanks for the review, I need to paint over the paneling in the den.
It’s awesome stuff for working with a small budget for sure. 🙂
Great project. Adorable pup!
Thanks! 🙂
I am in the process of diying my rental home on a very small budget but I am in no hurry so its all good…I love what you did and i’m thinking about trying it or at least talking to my SIL who is doing all the labor thank God for him….I also like the wood beams you used on the entry way of a room and I was wondering if you have any info on how you did this? TIA
Tina
Glad it could help, Tina! We DIYed the wood beam a couple months ago. Here’s the tutorial: http://www.remodelaholic.com/2015/07/diy-wood-beam-doorway/
Wow Lauren Gorgeous! Such a difference and that bench L-O-V-E it!
Over from Sand and Sisal. Beautiful transformation. Another option, painting inside of door, same as outside. Pretty color. Also love that bench!
Thanks, Lisa! Our builder painted the outside. I’m not even sure what color it is. It’s whatever HOA approved for our house. The joys of being in a cookie cutter. 😉
Goodness, you did a fantastic job. The transformation is awe-inspiring.
Thanks so much! We love how it turned out.
I left a review on Glidden for Glidden Duo Primer & Paint (livesimply1111)
Thanks, Tammy!
I have just started remodeling my new house, and found your board and batten tutorial at just the right time. I wound up taping and mudding my basement myself, and this was the perfect thing to hide some irregularities in the mudding and sanding! I spent a couple of hours going through the furring strips at Home Depot, and am currently in the sanding and caulking phase. Thanks for the easy tutorial!
Oh that’s a great solution! So glad it came in handy! We had to inspect our sanding strips too and it did take longer than it probably would have with the more expensive wood. But still so worth it for the money saved. 🙂 Hope it turns out well!
Love it, love it, love it! I don’t think I’ll ever tire of board and batten – so classic and timeless. Love the character it added to your space!
Thanks, Jenny! I’m right there with you. Board and batten is magical stuff. 🙂
Love the tutorial and hope to this is on a wall in our kitchen this spring. Did you paint your baseboards and the doors in your home with the crisp linen white paint also? I would like my board and batten wall to be white but I’m afraid that it won’t match the doors and baseboards throughout the house. Thanks again!
Yes, definitely paint the doors and baseboards. It’s crazy how different two shades of white can look. You could maybe get away with just painting the doors and baseboards that are next to your board and batten. It’s not noticeable at all on the other doors in the rest of the house if you want to tackle just a little at a time. Or you could take a scraping of your current white paint on your trim and get it matched. Most places will do that.
New to your blog but absolutely love your decorating style! We are going for a similar look and I was researching Crisp Linen White. What paint is the greige on your walls? Is it glidden also? I really love the combo.
Thank you so much! The greige is Perfect Greige by Sherwin Williams.
Hi Lauren, I’m planning on doing this in my hall. One question – do the boards slightly overhang the original baseboards? I’m trying to decide if I need to replace our old baseboards at the same time. Thanks!
Hi, Suzanne! Our boards do slightly overhang, but you can cut your vertical boards on the bottom at an angle with a miter saw so that you don’t have to worry about changing your baseboard.
Just a quick question! it looks like your baseboard has a little dip on the top just like mine, did you just put the board straight on top of it and leave a little gap or did you taper the boards on the bottom? i was trying to zoom in on some of your photo’s but i just couldn’t get close enough.
We totally cheated and just put the boards right on top of our existing ones. We’re hoping to eventually change all of our baseboards to a Craftsman style. In hindsight, I would have at least tapered them but our miter saw was acting up and we nixed that plan. If you can though, I would taper them.
I have a question.. do you have a tapered trim at the bottom? If so how did you get the boards to line up flush with the baseboard.
Hi Nicole! We didn’t taper our trim, but in hindsight, I would have cut our battens (the vertical boards) at an angle at the bottom with a miter saw.
Where did you get your tree topiary by your bench
I got it from IKEA but I think they’ve since been discontinued, unfortunately.
Are the walls of the board and batten textured? My wife and I are looking at doing something similar but our walls have texture on them. Trying to figure out what to do with it! Thanks!
Hi, Josh! No, our walls aren’t textured, so unfortunately board and batten for your house would probably be more expensive than ours. This tutorial might work better for you: http://www.rachelteodoro.com/2016/03/true-board-and-batten-tutorial-on.html
Hi! It’s amazing the difference the b&b made in your house. It’s so light and bright and airy now. We are getting ready to do the same in our two story foyer and down the hall into the kitchen. We are doing ours 6ft in height. I was planning on doing satin, alabaster for the paint. Now reading your blog I’m confused! Should we do it semi gloss and bright white like our baseboards? We just shiplapped our laundry room and kitchen island base and painted Alabaster. I was thinking it would all flow, but now I don’t know what to do!
Since you already have the Alabaster in other parts of your house, I think either one will work. 🙂 I do think the creamy white of Alabaster is beautiful and looks a bit more antique.
The exterior of our very boring 1970’s rancher is being re-sided in board and batten right now. There is a hideous, clunky chair rail throughout the house. We found your tutorial and are going to do B&B on the wails to cover the hideous holes we’ll make when we yank the hideous chair rail. (See a theme here? haha) Thanks for the great ideas and photos.
Haha! That’s awesome, Pamela! I hope it turns out well for you!
Where on earth did you find that wood bench? It’s amazing! And all your projects are great!
Thank you so much! It was a $35 Craigslist find. Can you believe it?!
I’ve been wanting to do this in our hallway for awhile now. What kind of finish is the wall? Do you have to have a smooth finish on the dry wall?
We do have smooth finish drywall. If yours is textured, I would use a thin smooth panel on the wall first before adding the boards and battens.
I know this post is old but I’m just starting a board and batten project in my daughters room and was wondering if you mitered the horizontal 1x4s that met on joining walls?
Hi Ashley! We didn’t miter them at the time, but in hindsight we should have. I’d definitely recommend mitering, if you can.