How to create a faux reclaimed wood look on a solid painted wood table top using just a circular saw and paint.
I’m a fake person. Not fake personality-wise (I like to keep it real in that department) but when it comes to a lot of the elements in our home, I love getting tricky. Cue this song.
I was all gung-ho to reveal lots of projects today, but wouldn’t you know, all three of the huge things I’d been working on during my week off hit a road block. It happens. And when it comes to DIY, sometimes you just have to shrug it off and opt for Plan B or C or the other 23 letters of the alphabet.
I promise, you’ll be seeing them soon. But for today, I’ll just give you a teaser with our coffee table top I’ve been working on.
I found this super functional trunk table on Craigslist a few months ago for $50, and it seriously has the best storage ever! Drawers for DVDs + a liftable top for toys = a winner in my book. (Ahem. That garage chaos behind it doesn’t exist…we’ll pretend.)
But, it was looking very vanilla along with the beige sofas and beige carpet in our living room. I lurv me some neutrals, but even THAT neutral I can’t deal with. She needed some personality. And I wanted a reclaimed planked wood top, but nailing wood planks on top would have made the toy storage capability completely useless.
And I couldn’t strip the trunk down to bare wood because it is made of veneered MDF.
Thanks to my good ol’ buddy Pinterest, I stumbled upon two wonderful tutorials that set me on the path the achieve the look I wanted without having to buy a single piece of wood.
Here are the two I used:
DIY Faux Planked Desk by Maison de Pax
It’s times like tackling my own furniture that I’m so thankful to be living in the DIY-craze era. I would not have figured out this project had it not been for these two talented bloggers. (Be sure to visit both links for their supply lists.)
Both are great tutorials and gave me a good starting point to adapt and tweak for my own needs. I would definitely suggest checking out their step-by-steps too, but here is how I did it.
I measured the width of the top and decided on how many planks I wanted to create. The hinge, thankfully, was exactly at the 1/3 of the table. It was 30 inches wide, so I marked my faux planks at every 5 inches.
Then chalk lined where I wanted to make my cuts.
Using a circular saw set at 1/8 of an inch deep, my super sweet hubby cut the lines on the top and sides. (One of these days I’m hoping he’ll trust me with power tools, but for now since he still takes on my odd carpentry jobs without complaints, I’ll take it.)
To give the cut lines more definition and to make them look more aged, I worked Annie Sloan Dark Wax into the grooves and wiped away the excess.
Then, for the wood grain finish, this is where things got tricky. (Don’t make me play the song again. I’ll do it.) You can check out the materials used
here.
To provide a nice base for the grain, I painted on a base coat. After the base was dry, I used a mixture of glaze and a slightly darker paint to brush a light coat on top, leaving some of the base coat showing.
Here’s where the fun begins! After the medium glaze is dry, brush on the glaze/darker paint mixture. I did one plank at a time.
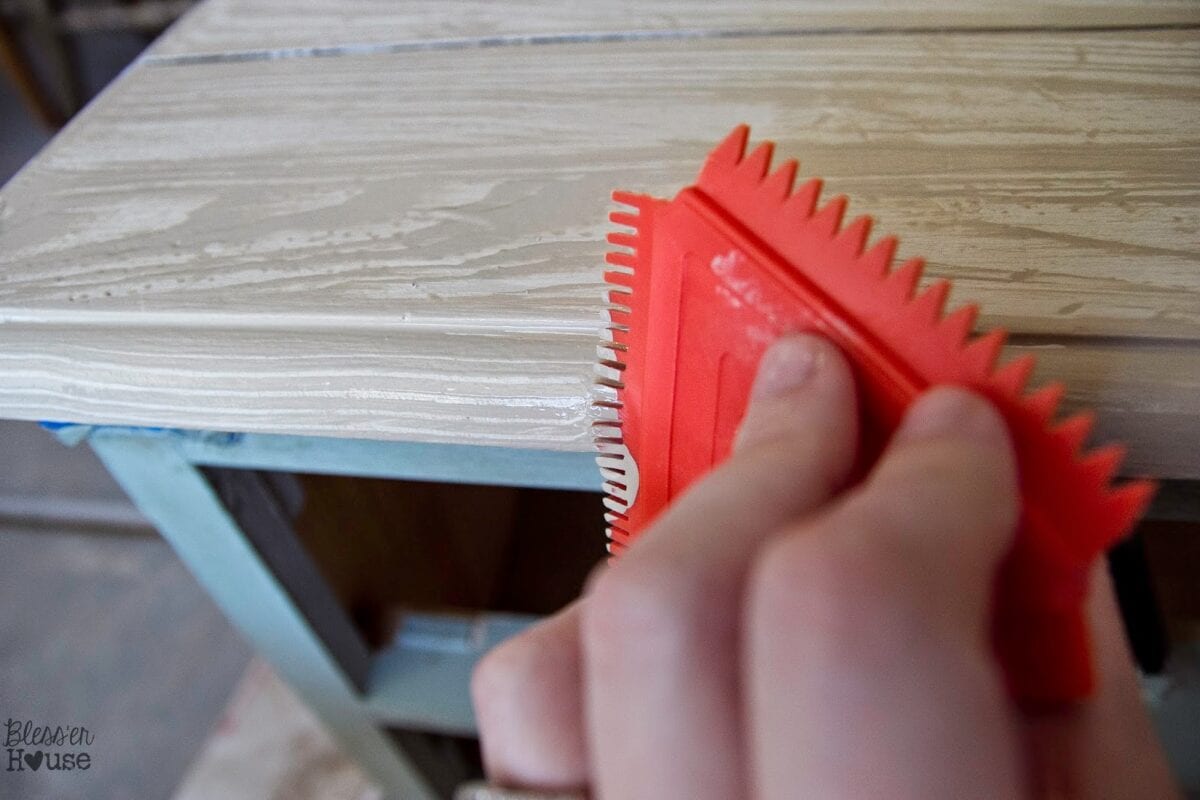
And use a wood graining tool to drag and rock through the paint glaze to create a grain effect.
Use a smaller wood graining tool for the sides too.
Once the darker paint glaze is dry, brush on a light glaze randomly on top of the grain.
Here’s where I changed it up a bit. Instead of using Minwax Finishing Cloths as suggested on Pretty Handy Girl, I chose to use General Finishes Gel Stain in Antique Walnut (affiliate) for a deeper wood tone.
The gel stain has almost a pudding-like texture, so it’s really easy to work with and doesn’t drip easily. I just swiped it on one plank at a time, wiped it up with a rag, and that was it.
Can you tell the difference? It’s subtle but richer.
Make sure to stain the sides too. (See that sneaky peek of the trunk color? I’m super excited about it, but you’ll see that later.)
There ya go. A faux reclaimed wood table top. There were a lot of steps, I’ll admit, but the end result was well worth it.
I’m so ready to put this baby back in our living room all beautified. The toys that were in it are thrown all over our floor, and I can hardly think straight with the chaos. On the bright side, our toddler is having a ball now that our entire house seems to have become her playroom with nowhere to stash her craziness.
Be sure to check back in tomorrow! I can’t wait to get our house back in order so that I can share the fun I’ve been up to.
If you liked my fakeness here, check out these:
Blessings,
Follow me on
Or find me on