
Cheapest and Easiest DIY Board and Batten Guide

8 simple steps to take the guess work out of building cheap board and batten walls and wainscoting to add character and timeless detail to plain walls.

Did you ever read that book as a kid? “If You Give a Mouse a Cookie”? And the whole book is about this domino effect of a little mouse who keeps discovering more things he wants?
Well, there’s a grown-up version.
If you give a DIYer a table makeover, she’s going to want a shiplap wall. When you give her a shiplap wall, she’ll probably ask for board and batten wainscoting. Or at least, that’s how the story goes around here.

UPDATE: See Part Two of the DIY Board and Batten here for the full reveal.
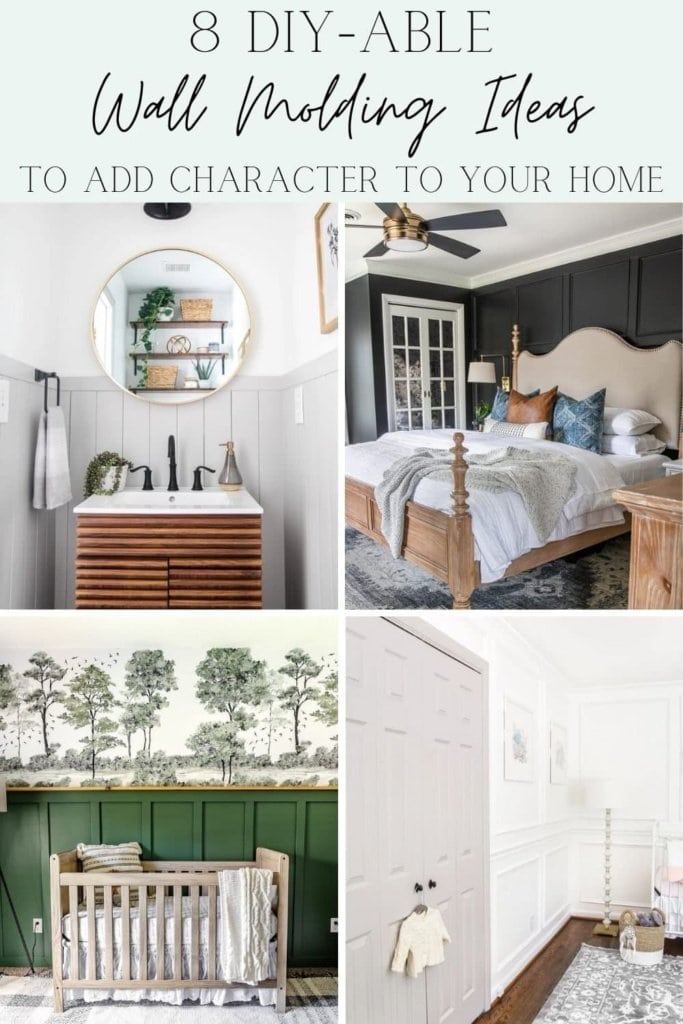
What is Board and Batten?
Board and batten is a type of wall treatment or interior molding that uses strips of wood boards nailed vertically side-by-side with a horizontal strip of wood called a “batten” placed over the seams.
The end result creates shadows and dimension that adds character to plain walls.
Board and batten is often used on exterior siding, fences, and furniture, but for the DIY tutorial in this post, we’re using it to make board and batten wainscoting.
It’s the perfect wall treatment to add character to any room: hallways, entryways, bathrooms, bedrooms, dining rooms, anywhere that deserves an aesthetic upgrade.
Even better news: It will be in style for a long time because it works for a variety of home styles and creates visual interest that is timeless.
Here is a gender neutral nursery makeover we did for a family member of ours featuring a board and batten accent wall.

What Kind of Wood is Used for Board and Batten?
The wood type we chose for our DIY board and batten wall treatment is what helped us achieve the look on a super tight budget! Most builders use MDF or pine trim strips for board and batten.
But we discovered by using pine furring strips instead, it cost less than half of the traditional method! To be fair, there is a little more time and work involved since you do have to fill knots and sand out some of the imperfections, but it’s a great way to get the look for less.

Just make sure you only use wood in non-humid rooms. For wet areas like kitchens and bathrooms, PVC is a better choice.
Tip: When selecting wood pieces for this project at the hardware store, look at the end and stare down the edge of each wood strip to make sure they’re not warped.

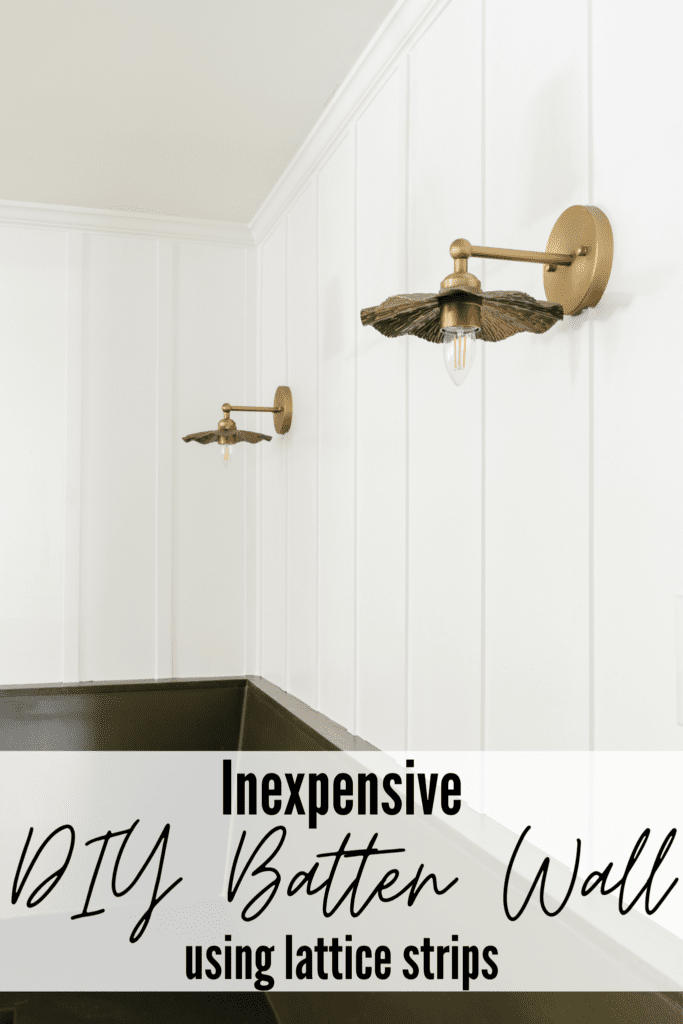
Another money saving trick that’s a good idea to create a batten board wall for less than the traditional method is to use lattice strips! You can even make it without needing a single power tool. This batten look tutorial below just skips the horizontal boards to place straight cut strips on the entire wall.
Tutorial: Inexpensive DIY batten board wall with lattice strips

If you prefer a softer, more traditional look, you can round out your boards with the addition of a panel cap molding like we did on this board and batten style DIY grid wall behind our bed.
Tutorial: DIY Grid Wall Accent

Why Board and Batten is a Perfect Choice to Brighten Hallways
Robert and I agreed our hallway needed a little help. This space had no natural light, and it really felt like a cave. The dark paint I blindly chose on moving day didn’t really help matters.
If you have a dark hallway with no natural light, board batten is especially great at brightening those dark tunnel-like spots in the house. And it adds TONS of character for not a lot of money! It just looks expensive.
Installing wainscotting isn’t that hard; it’s just tedious. But the end result is worth it.

How to Install the Cheapest and Easiest DIY Board and Batten
A 1x4x8 furring strip costs about $2.00 at most hardware stores (at the time of this post’s publishing). That’s 70% cheaper than MDF boards. And they’re solid and ready to put up.
It was still quite a tedious process to install board and batten, but it eliminated some extra steps on the front end. And I love how the whole project turned out. (And at least we didn’t have to spend time ripping MDF.)
Supplies
- 32 1x4x8 pine furring strips (or however many you need for your space)
- 4 1x2x8 pine furring strips
- 2 boxes of 2 inch brad nails
- Hammer or brad nailer
- Stud finder
- Level
- Miter saw or circular saw
- Jigsaw
- White trim caulk
- Wood filler
- Medium to fine grit sandpaper
- Liquid Nails or other construction adhesive (if you want to make your boards permanently secure to the drywall)
Note: We have smooth walls, which helps make this process cheaper. If you have textured walls though, you will need to use this MDF paneling between battens.
Our hallway is very long, and we still ended up staying under our $100 budget (not counting the tools we already own – but you can rent tools from the hardware store to stay within a reasonable budget if needed). Furring strips are da bomb diggity, y’all!
Steps
1. Place the Top Boards
We placed the boards (the horizontal 1x4s) at 65″ on our walls checking that it was perfectly level, with the top of the 1×4 at the 65″ mark from the top of our existing baseboard.
(I tried my best to remember to take pictures as we worked but this was definitely a two person job.)
Tip: You can choose to build your board and batten wainscoting using your existing baseboard and just miter the ends of the vertical boards to sit on top of the baseboard.
Or you can remove your existing baseboard to replace with a board the same width as the top board so the wainscoting is balanced at the top and bottom. In hindsight, I wish we had done this.

2. Nail the Top Boards
Once level and at the height mark you want, nail each board into studs to attach it to the wall. This is where that stud finder can really come in handy. Our nail gun wouldn’t work with 2″ finishing nails so we had to resort to the good ol’ hammer method. Womp womp.
The good news: It’s proof you can handle this project with not a lot of power tools if you don’t own them already.
It took much longer this way but we felt better that with longer nails, the boards were more secure.
We had to measure each section of wall for some of the boards and cut with a circular saw for the more narrow spaces.
Tip: To make the boards very permanent, apply a bead of construction adhesive to the back of the board before nailing it into place on the drywall.
To attach the board to the drywall so it causes minimal damage later, in case you ever want to take it down, apply the finish nailer at a 45 degree angle against the board. Then, place the following brad nail in the opposite direction. This will allow board and batten strips to stay flush against the drywall but can still be removed later.

Progress! And we were blissfully unaware that this was the beginning of a long 3 days. Just warning ya.

3. Measure and Cut Vertical Battens
Then, we got to measuring and cutting our battens (the vertical 1x4s). Each one was around 61.5″ long. We measured for each batten individually from the top of our existing baseboard because we wanted as snug of a fit as possible.

4. Cut Around Obstacles
We had to work around some tricky areas like our security system keypad, outlets, and light switches. For the keypad, we had to cut a board into two parts.

Robert held up vertical boards against the keypad to mark where to cut with his circular saw.

For boards that were only partially intersecting light switches and outlets, we held the board in place next to it, marked, and cut the section out with our jigsaw. It’s not ideal, but sometimes there’s no other choice than to work around them.

5. Nail Battens to Studs
The trickiest part of all though was figuring out how to stay consistent with our spacing battens. And we didn’t want to nail them to just drywall for fear that it could really cause some drama later. (Like a monkey kid who decides to yank on them…you just never know.)
Tip: Nail your battens to studs. They should (hopefully) already be evenly spaced, and it will make the battens more secure.

By the way, for 90% of the projects you see on this blog, Lola is sitting right beside us supervising our every move. The other 10%, she’s usually snoring on the couch.
One guess who put the Dallas Cowboys jersey on her (and it just might be the guy wearing the Dallas hat there). She’s the only wacko dog I’ve ever known who actually likes wearing clothes.

Whew! Getting there. That stud trick works!

I sort of spaced out on taking pictures at this point because I was so ready to have this madness finished.
6. (Optional) Add A Second Board 12″ Below the Top Board
We measured each space between the battens for our second horizontal board. Most were 12″ apart, give or take a few millimeters. We left a 12″ space between the bottom of the top board and top of the second board.
7. (Optional) Add a Shelf Detail to the Top Horizontal Board
To finish it off, we nailed a 1×2 board flat on top like a little shelf. That one detail made it look really complete. You can make your top ledge a little deeper to create a picture ledge, if you choose.

8. Caulk Gaps and Wood Fill Knots and Nail Holes
To fill gaps, run a bead of caulk along each edge where the wood boards meet the wall.
We caulked all seams and board edges and wood filled knots and nail holes for longer than I care to remember. Once it was all dry, we sanded the dried wood filler until smooth.

I had no idea before we tackled this project ourselves just how much work it entailed.
Maybe if we’d attempted a smaller space first it wouldn’t have been so overwhelming, but Robert and I are so happy with how it’s turned out. Totally worth it.

UPDATE: See the final board and batten reveal here!

I would love to rip out this carpet one day to put down hardwood floors to go with this pretty wainscoting, but progress is progress. This hallway is already a huge improvement from before.

Have you ever attempted board and batten in your house before? Or any other architectural DIYs that worked wonders in a room? Tell me all about it!


How do the battens tie into the baseboard? Are your baseboards 1″ at the top? Are your battens hanging out over the top of the baseboard or did you miter them? Can you post a close up photo?
I absolutely love this and want to do it at my house but not sure if it’s doable with my traditional baseboards. Thank you in advance.
It’s totally up to you how you want to do it, but with traditional baseboards, I would miter them so that they end up the same width at the bottom as your baseboards.
Hello,
It looks like you didn’t miter the bottoms to meet the baseboard. How do you like it?
We have been really pleased the outcome to the project.
Do you have textured walls?
I don’t. Our walls are smooth. With textured, I wouldn’t recommend the way we did it.
That is going to look great and really brighten up your hallway. We used chunky mdf in our kitchen but you are right that it can get expensive. I will have to keep this in mind if we tackle another area. Oh, and around here we prefer a large double double (I’m referring to your skim hold the whip comment in case you think I have lost my mind haha.)
Haha! Yay! Someone got it! I thought, “Nobody is going to get that and will think I’m crazy.” The chunky mdf is definitely less work when it comes to sanding, filling wood knots, finding good boards to use and all of that but it does add up.
We are in the process of putting board and batten in our bathroom. It is a much smaller space so we could not rely on your stud method, that and the fact our studs were not evenly spaced. I love it and am also putting bead board on the ceiling . Cannot wait until it is done!!
Oh that is tricky. Ours was a challenge because we had doors, outlets, switches, weird corners, and all of that going on so studs was the answer for us. Hopefully, you have a flat wall without all of those crazy obstacles. I’m not gonna lie…I’m kind of jealous that you’re getting bead board on your ceiling. 😉 Haha
Oh my word – we would be dangerous together. My hubs is already thinking I’m crazy with the amount of projects I have going in my head – this is something I have been talking about doing in nearly every part of the house. I can’t wait to get going on this. Thank you for coming up with & sharing a low cost alternative. I would have instinctively gone with the mdf & paid way too much. LOVE this!
Haha! I have a feeling we would be too. DIYs definitely take a little sweet talking on the hubby but mine is usually as excited as I am about it. We both got the DIY bug lately, but this one probably made us realize it’s time for a breather from the power tools for a few..um…weeks. Haha. Glad my little tip could help. Love your blog, Gina!
Hi!! What is the name of this wall color?! ?
It’s Sherwin Williams Perfect Greige