A DIY tutorial about how to build a realistic looking oversized faux fireplace using a thrifted mantel.
When we moved in to our builder-grade-basic cookie cutter house 7 months ago, we immediately started pining for a fireplace. (Considering we moved in a week before Christmas and didn’t have a mantel for our stockings, that might explain it.)
The builder would have charged $5,000 for one and we just couldn’t swing that in our budget. We got the crazy idea to build a faux fireplace, but we wanted it to be more than a simple mantel nailed to the wall.
This idea was big. REALLY big. So big in fact that I’m having to split this project up into 4 posts. Woo hoo! So stick with me. What you see today is only a glimpse of the beginning stages, and I’ll show you every step of the process for under $500! So much better without that extra zero, isn’t it? Even if it is a faux one for now.

Just last week, we were living with this situation (which I already whined to you about before):

Those shelves were a constant battle with our toddler who made it her daily job to completely dump all of the DVD cases onto the floor. Ugh! So we trucked those two bookcases up to the office, and we were left with this:

Yep. We’re starting from scratch, people. Well…mostly anyway. Several months ago, we found a beautiful mantel from a house being demolished in Charlotte. Robert thought the seller said it was built in 1916. I heard 1940. Either way, this thing has some history.
And my ingenious father-in-law came over to help us through the entire process (that took all weekend long…this man deserves a lollipop.) I mainly shadowed his and Robert’s work and shoved a camera in their faces half the time.
Supplies used for Part One: (Affiliate links are provided below. For more information see my full disclosure here.)
- The ready-made mantel front (found for $100 on Craigslist)
- 3 plywood sheets
- 9 2×4 boards
- Carpentry nails
- Finishing nails
- Drywall screws
- Tape measure
- Circular saw (I’ve heard amazing things about this one, which we’ll soon be upgrading to.)
- Jigsaw (We use this one a lot.)
- Piano hinge
- Hammer or pneumatic nail gun (We have this 3-in-one nailer/stapler and love it!)
- Power drill
- Hack saw
*I didn’t include measurements in this post since your measurements will depend on the mantel you use as well as the size of your room. But in the case of fireplaces, it’s better to have an oversized, statement-making fireplace in a room than a small one that could become dwarfed in a large room.
First thing we did was find the center of the wall and decide on the measurements based on the existing mantel front.

We chose not to have Lowe’s pre-cut our wood in case we needed to make any adjustments during the process. So Robert got to be all manly with his circular saw. (Right after this shot, he remembered his safety glasses. Safety first, peeps!)

To frame out the base of the hearth, we cut two long 2x4s about 8 inches longer than the mantel and connected them with shorter 2×4 pieces at 24 inches long. Nail the long sides to the end pieces first, followed by the center piece, and the other two middle pieces last. (The diagram below can show you.)

Once the hearth base frame was secure, we lined it up to the center of the wall and nailed the back of the frame to anchor it to the wall. We had thought about cutting a couple of holes in the carpet underneath to anchor it to the floor but decided it wouldn’t be necessary with all of the weight of the fireplace itself. This sucker is heavy and that hearth isn’t going ANYWHERE.
If we ever decide to rip up the carpet one day and put in wood floors, it can be done with a box cutter and quarter round at the base of the hearth.

To cut the plywood pieces, Robert’s dad schooled us on a bit of woodworking knowledge, which he has TONS of. One of his tips was to cut a piece of plywood using a circular saw in a shallow position.


From the plywood sheet, Robert cut out the piece for the top of the hearth.

Then, we (and by we I mean they) layed it out on the hearth frame. It lined up perfectly!

Then nailed the hearth top into the frame base.

For the mantel, we nailed in 2x4s inside the back of the frame to later use as an anchor to the wall.

Then, we nailed up 2x4s at the same height as the mantel back.

Here is the hearth and wall anchor ready for the mantel:

Olivia thought it was her own personal stage, so she put on a little show for us during our break. So stinkin’ cute!

Then we cut plywood strips to screw onto the back of the mantel to anchor the surround that would come next.

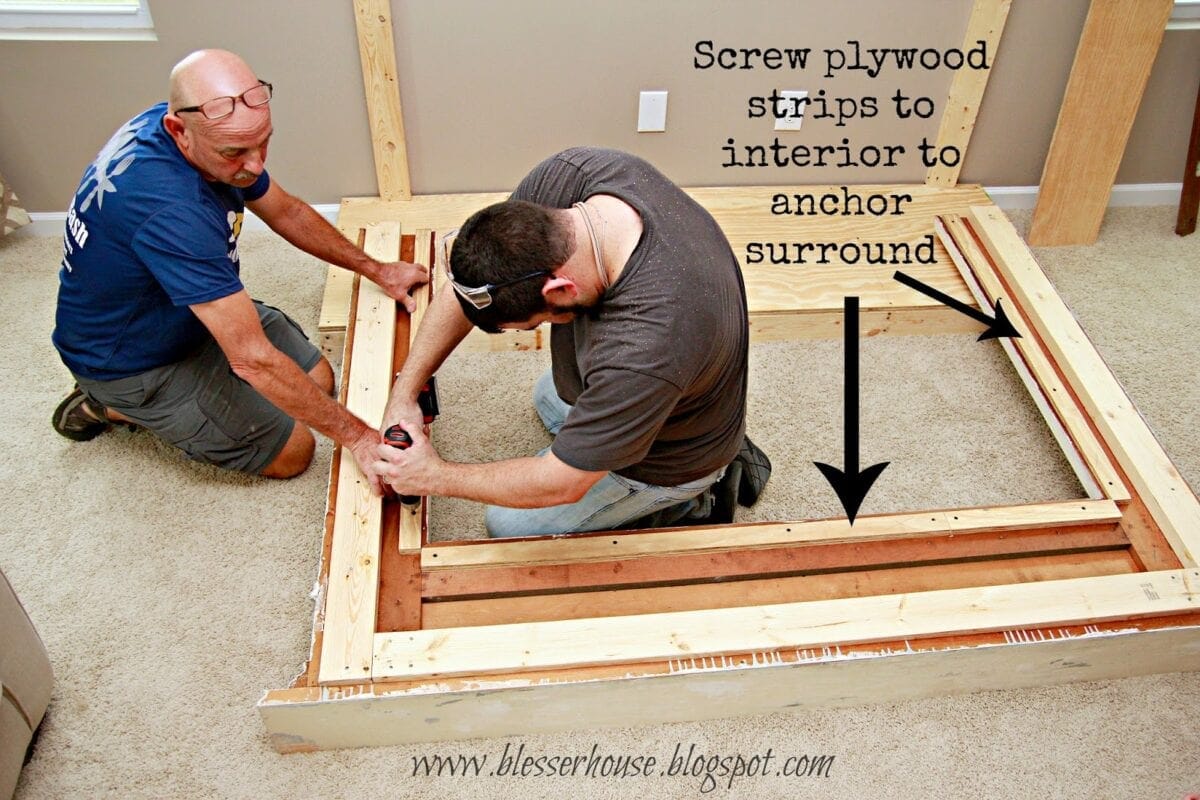
We used a piece of plywood over the mantel opening to make into the surround.

We used drywall screws to fasten the plywood to the anchor strips from the previous step.

Here’s where our faux fireplace becomes a bit more than a faux fireplace. We wanted this space to still be useful, so we put in a door to fake a firebox and have access to our outlet to run our cords out of sight. We measured the faux firebox door and left a little space at the bottom to create a threshold and prevent the surround from bowing.

We switched circular saw blades to cut out the door to one that was thin and would be precise.

My father-in-law did the honors of this part. 🙂

For the corners, he used a jigsaw to make sure each cut was exact.

It’s looking more and more like a real fireplace! (Robert is excited too in case you couldn’t tell.)

To create the firebox door, we screwed a piano hinge into the surround piece. We cut it to size first using a hack saw.

To make sure the door wouldn’t cause any bowing or movement in the surround, we made a door frame on the back of the mantel.

We shaved off just a teeny tiny bit of the door, and it fit like a glove once attached to the piano hinge!

To anchor the mantel to the wall (the big oooh ahhh moment…well the first one anyway), we nailed plywood strips to the 2x4s we had previously attached to the wall and back of the mantel. We nailed the bottom piece under the door to a 2×4 attached to the hearth inside of the firebox but somehow I forgot to photograph that step. Sorry, y’all. :-/

After the two plywood side pieces were up, this is what the top looked like:

To close in the top, we added a plywood piece and attached it to the 2x4s on the mantel and wall as well as the plywood side pieces. That thing was going no where!

We laid down one more plywood piece on the top and mimicked the end molding of the mantel shelf. Robert secured it with finishing nails.

And then helloooo fireplace!

I know it still looks rough here, but this is only part one. The rest isn’t so complicated.
You can see Part Two here!
One day, we might muster up the funds to have a real gas firebox insert put in, but we’re excited about the versatility of our setup.
What are your thoughts on it so far? Have any of you built a faux fireplace before or have a hankering to?
Follow:
Facebook | Pinterest | Instagram | Twitter | Google+ | Bloglovin | Hometalk
Oh wow, I can’t wait to see how this looks when it’s done. I loooooove the mantel!
Oh wow! I can’t wait to see how it looks when it’s finished. LOVE the mantel!
Thanks! I can’t wait either! 🙂
I love this!!! I so want to do this in my house though I am not sure where I would put it right now….LOL If you would Iike, know my readers would LOVE this DIY, you are welcome to link up at my link party Tuesday’s with a Twist. I would love to see this there so my readers can enjoy this as well. 🙂
Thanks for letting me know! I’m always up for a good link party. I’ll be there. 🙂
Lauren what a great addition to your living room! Can’t wait to see it completed.
Thanks Pamela! I can’t wait to show you the big reveal!
That looks wonderful! and I am loving the stage performer too, she is a doll!
Thanks, Christine! I think the stage performance was our hint that ballet classes are in our future. 🙂
You designed a beautiful fireplace……… I just found your blog……..love it………….I am your newest follower.
Woo hoo! *Insert new follower celebratory booty dance* Thanks, Susan. 🙂
I am so excited about your new “fireplace” and happy to hear you had a performance stage for a while…. What a great idea! 🙂
xox, Crystelle
CrystelleBoutique
Thanks! I’m excited to share the final reveal!
Oh my gosh, it looks awesome! I can’t wait to see the finished product! My favorite post yet!
this is so great. I can’t wait to see all the steps so I can convince husband he should do this in our bedroom
This is absolutely phenomenal! Thank you so much for sharing at Project Inspire{d}, Lauren. This will be one of my features for this week’s party. I hope to see you there!
Thanks so much, Mary Beth! I just linked up my update on it. 🙂
WOW! I HAVE BEEN LOOKING TO DO A FAUX FIREPLACE/MANTEL IN MY BEDROOM AND I JUST HAVE TO SAY THANK YOU!!! THANK YOU FOR SUCH WONDERFUL STEP BY STEP INSTRUCTIONS!! YOU SAVED ME FROM GIVING UP THE WHOLE IDEA!! I JUST LOVE YOUR WEBPAGE AND REALLY LOVE YOUR PINTEREST PAGE ALSO!!! CANT WAIT TO SEE WHAT ELSE YOU HAVE!! HAPPY MEMORIAL DAY!!!
I’m so glad you’re enjoying my little corner of the blogosphere, Sandy! This project was definitely a big undertaking but the end result was worth it. 🙂
man! That looks great! There are a lot of young husbands taking on home projects and they do fabulous work. Weekend warriors, I salute you.
I don’t know how I got so lucky with this handy hubby of mine. 🙂 Thanks, Geri!
Hi Lauren!
I’ve read and re-read and re-read again all your fireplace posts. I’m a bit obsessed haha. I love how you’ve done it and my husband and I are wanting to give this a try. I just have a couple questions. You mentioned in one post you weren’t going to include the dimensions you used because ours may be different according to our space. Well this is where I’m getting a little hung up in the process and was wondering if I could ask your advice? I’m curious how deep your mantel ended up being? Our tv would be placed above the fireplace as well but I want a deep enough mantel to decorate. Also curious how tall it is? I’m worried about the tv being too high for viewing.
Thank you so much for your help. I enjoy everything about your site, decorating, humor, family, etc etc….thank you so much for sharing your gifts with all of us. 🙂
Beckie
Hi Beckie! I’m so sorry for my delay in getting back to you. I finally remembered to bust out my tape measure for you. The mantel is 58″ tall from floor to mantel shelf. We have a 6″ tall hearth included in that measurement. The width of our mantel is 78″ and the mantel shelf is 16″ deep. It gives me just enough space to set our bluray and PS3 players on top with a little room to decorate with lanterns/garland and all of that. We have a 60″ TV if that helps as a reference point too. It hangs 8 inches above the mantel. I hope that clarifies things a bit for you. 🙂 If you build it, I’d love to see!
Measurements…Just what I was looking for! Thanks ?
I absolutely love this. I am trying to talk my husband into doing a faux fireplace in my master bedroom. I’ll keep my fingers crossed and keep talking. Great inspiration!
If I had a dollar for every time I tried to sweet talk my husband into a project…Haha! Fingers crossed for you! It would be beautiful in a bedroom.
I think the fireplace looks amazing but am let down that there is no place to stash the CDs now. I thought there would be a place built into the fireplace somewhere.
You could definitely still stash the CDs in the firebox behind the wood slice door and put in a shelf if you wanted. We just happened to find a great storage coffee table with drawers that solved our CD storage problem.
I found your blog post over a year ago and fell in love with it. I said when we looked for a house that we needed to have a fireplace. Well, life happened and we did find a house. It has everything I wanted…minus the fireplace. I came back to these plans then and started plotting. One day I happened to be on Craigslist and there was a mantle listed for sale. It looks much like yours for $50 so I picked it up. The hubs and are are ready to get started after this has been sitting on the back burner for another 6 months. The problem that I am seeing (that I hope you can advise me on) is that my baseboards around the room in my living room is original to the house and probably 6-8″ tall. The people who remodeled before we bought it overlayed the drywall, so I believe it would be impossible to remove the moulding without damaging the new drywall. Thoughts? I am thinking this would make it difficult to mount the hearth and mantle to the wall.
Hi, Grace! I’m so excited that you’ll be tackling this project! It was a long process but so worth it. We actually left our baseboards on and butted the hearth up to it and it looks great, so don’t at all feel discouraged that you can’t do it if you can’t remove your baseboards. The weight of the fireplace on the hearth and the mantel anchored to the wall definitely keep it from going anywhere.
I am in love with your ceiling fan/light fixture! Could you please tell me the Brand Name, and if possible the model name/number? Cheers, Alex
Thank you, Alex! Absolutely! We got it at Lowe’s a couple of years ago. Here’s the link to it: http://fave.co/1PAhpw7
I just found your blog and I must say I love it! I really love this diy fireplace!! Something I definitely want to do in my home! 🙂
One question: Did you nail the hearth base to the baseboard?
Thank you, Stephanie! Yes, I believe we did nail the base to the baseboard. It’s definitely not going anywhere. This fireplace is a BEAST!
My husband and I are doing this project in August. He would like to know how you finished it. The stone/brick. Paint? I am so excited to do this!
That’s great, Renee! Here’s the finished product with all of the updates we’ve done: https://www.blesserhouse.com/2016/04/diy-faux-fireplace-updated.html It was quite a process but we love it!
I am attempting to complete this project myself, how do you anchor the 2x4s to drywall? Did you have to use a stud finder? Or were there drywall screws what you used in place of?
We did have to use a stud finder to anchor the 2x4s to make sure it was as secure as possible. It definitely worked because it hasn’t budged since we built it two years ago.
Hi! I know I’m late to this party, but I LOVE your fireplace you have built. Did you wind up putting a gas firebox insert in?
Thanks! No, we never did do the gas firebox. We ended up moving after 3 years, but I think it can be done. If anything, an electric one could work.
I love the faux fireplace. Do you have a cable box consealed in there somewhere? I would love this in my own home but hubby is a huge sports fanatic therefore a receiver would need a spot.
Suggestions?
I’m thinking of doing a similar project in our living room!! I noticed your tv point and outlet were at floor level behind the logs…How did you hide the cords going all the way up into the back of the tv?
We used these handy these cord covers 🙂 http://amzn.to/2ClIpcS
Love this!!! So well done Thank you!
This is so helpful! I found a mantle on marketplace and will use your tutorial to help install in. One question, how did you get the new plywood for the top back piece to match the existing moulding on the mantel shelf?
We just trimmed it with square dowels and quarter round to get it as close to matching as we could. 🙂
Hi! ive been searching forever to find a similar project i have in mind minus the fireplace. so thank you for making this!!! may i ask what was the piano hinges are for? i want to make a small door to have access for plugs and outlet, and im in search of ideas on how to that with shiplap… i hope you can give me ideas,. this project really turned out great!!!
Hi. The piano hinge is what we used to create the firebox door. If when you are reading the post. It is mentioned a few spaces under the picture stated ‘it is starting to look like a fireplace. Robert is excited’ and Robert is standing through the wood frame. I have not worked with creating a door with shiplap. I did google and have a link here to share https://www.finehomebuilding.com/1997/01/01/quick-easy-access-panels. Also, the facebook group I have created for decorating has some amazing members with a lot of talent with GREAT ideas. Someone there may be able to guide you through the process or at least give you a direction of where to start.
Buy a house and definitely want to add this to it do you know the size of the TV ?
Hi Danielle! This was a 60″ TV I believe. We’ve since moved out of that house, but if I recall, that was the measurement.
Do you know how tall your ceilings were in this house? Wanting to do a fire place like this but our ceilings are pretty low!
The ceilings were 9′. The mantel itself was a standard mantel. You could build the surrounding area to fit custom for any size of space.