DIY Cane Nightstand Makeover
How to turn a basic glass cabinet nightstand into a designer-worthy cane style that works for both modern and traditional styles.
It’s been a looooong time since I’ve done a designer knock-off of anything around here. Too long, really.
But ever since we started embarking on the master bedroom refresh, and I began the planning, I kept envisioning this pair of gorgeous designer nightstands for our space.
The only problem was they were $1,100 each! Yeesh. Nah, I’m good. Thanks.
Instead, DIY to the rescue!
UPDATE: See our final Master Bedroom reveal here!
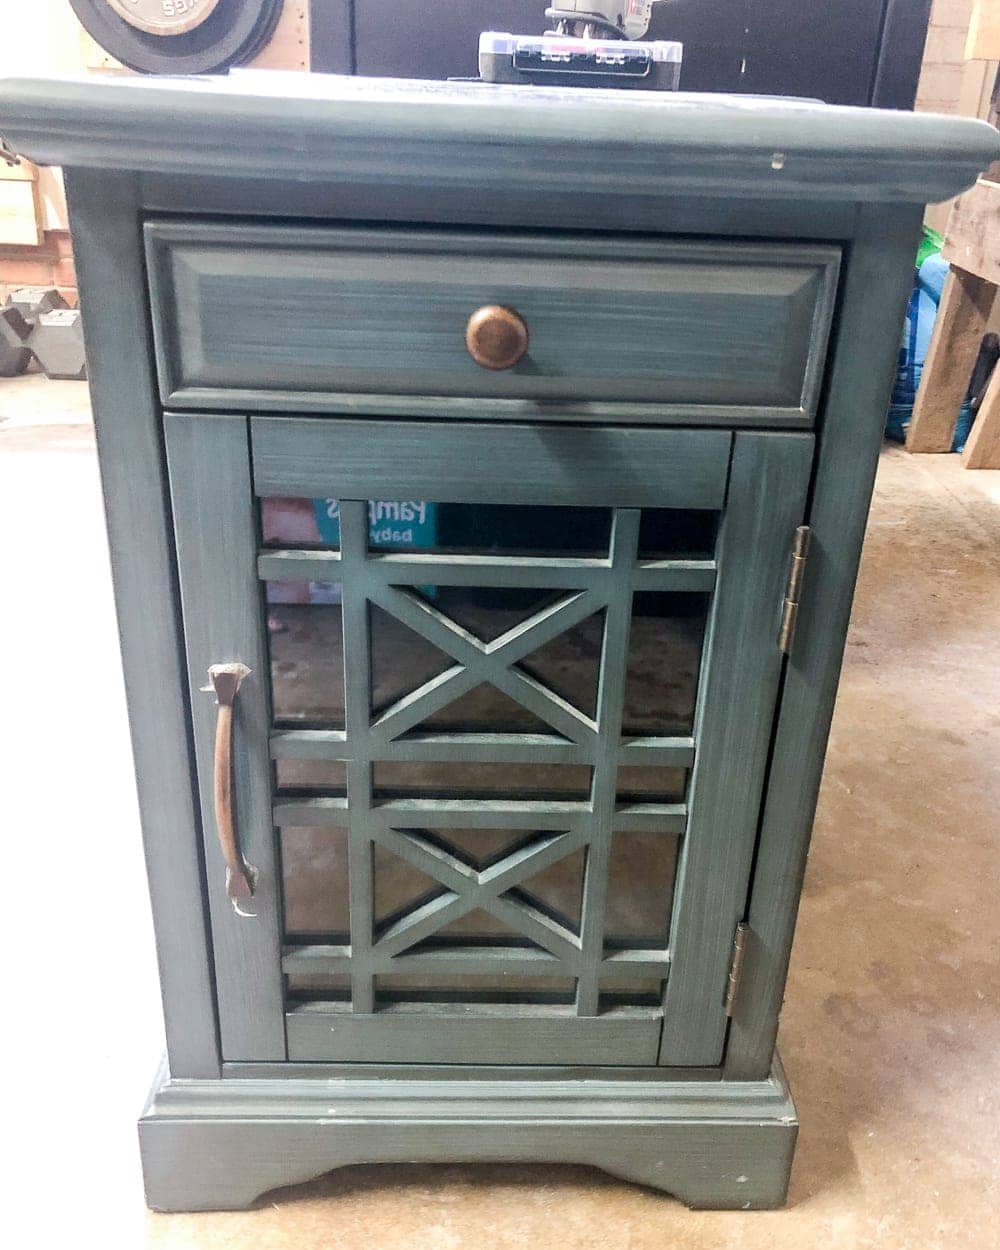
Pardon this terrible cell phone shot I took at night in our garage, but there ya go. The before.
I’m sharing this one for this month’s Trash to Treasure Transformation Tuesday. (You can see past T2T transformations here and 4 more thrifty makeovers from my T2T blogger friends at the end of this post.)

To be fair, our nightstands had absolutely nothing wrong with them to begin with. But sometimes you just get the itch to change things up.
The one thing that always bugged me about these is our books and bedside table junk were completely visible in that glass door cabinet. I’m not organized. I just don’t like seeing my clutter.
So here’s what I did to create its new look…
Supplies:
(Some affiliate links are provided below. Full disclosure here.)
- Fusion Mineral Paint Ultra Grip (highly recommend if you are painting laminate furniture)
- Fusion Mineral Paint in Lamp White
- Cane webbing
- Pencil
- Scissors
- Manual staple gun
- Minwax driftwood stain
- Paint brush
- Rustoleum Modern Farmhouse Metallic Gold spray paint (my fave for a matte brass look)

The Steps:
1. I removed the glass from the cabinet doors first, and I applied one coat of the FMP Ultra Grip to both nightstands first and let dry.

2. Once the Ultra Grip was completely dry, I brushed on two coats of Fusion Mineral Paint Lamp White.
(If you’re new to these parts, FMP is my favorite furniture paint because it is self leveling [doesn’t show brush strokes], doesn’t typically require any prep work [except in this case on laminate], and doesn’t require a sealer. This post isn’t sponsored or anything. I just love the stuff.)
Would you like to save this?

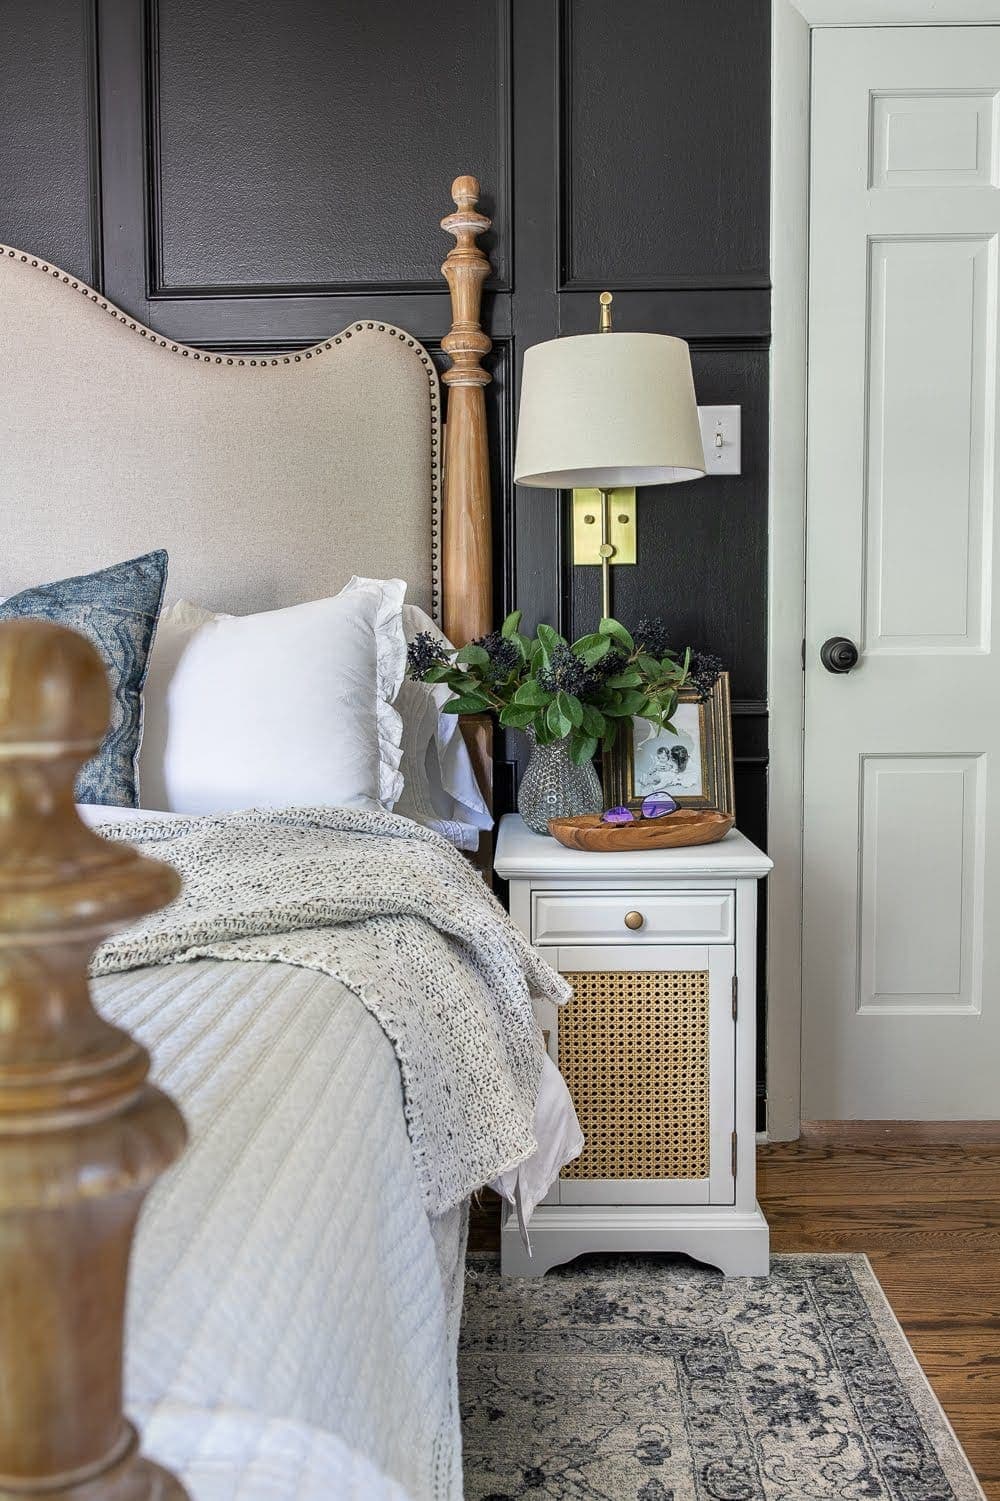
3. Once the Lamp White was fully dry, I used the glass piece I removed from the door to trace and cut out the cane webbing.
4. Then I just attached the cane webbing using a staple gun on the backside of the door where the glass used to be.

5. I decided to add a slightly weathered, antique look to the cane webbing by applying two coats of some Minwax Driftwood I already had from a previous project. It coordinated with our bed a little better this way too.

6. For the pulls, knobs, and hinges, I applied a coat of the Rustoleum Modern Farmhouse Metallic Gold for a more modern touch. (It’s my favorite that I use on light fixtures and mirrors too.)
Then Robert and I just popped the hardware, doors, and drawers back on and hauled those pretty new nightstands back up to the master bedroom.

Look how pretty!!! It was super easy and inexpensive, and I saved roughly $2,100 total from the designer ones. Insanity.
By the way, how cute is this master bedroom looking now?! The rest of the room is an absolute hot mess besides this one little spot, but I’ll share more about the progress on that soon.
You can see the other Trash to Treasure Transformations from my T2T blogger friends below for more thrifty ideas:

Clockwise from top left:
Girl in the Garage | Confessions of a Serial DIYer | Girl in the Garage | Prodigal Pieces
If you want more furniture makeover ideas from years’ past you can see them all here.