DIY Creepy Halloween Art Using a Thrifted Picture Frame
How to make your own light-up creepy Halloween art using a thrift store picture frame for macabre style wall decor.
This spur of the moment Halloween wall decor I made on a whim this week is proof that snapping up a $5 picture frame at a thrift store and stashing it until “the perfect project comes along” is always a good idea.

And this wall art craft idea is PERFECT for a Halloween party or beside your front door for a trick or treat greeting.
That’s exactly what happened with this project.
I bought a big vintage picture frame from Goodwill over the summer with no clue what I’d do with it. But a $5 picture frame is hardly ever wasted around here (along with these other thrift decor items I always buy.)
I remember riding through the Disney Haunted Mansion as a kid and being so creeped out by the glowing macabre art portraits.
So I thought it would be fun to make a DIY version for creepy Halloween art with blood red glowing eyes! *shudder*

DIY Creepy Halloween Art With Glowing Eyes
Supplies
- Picture frame (Any size will do. Just keep an open mind for whatever picture frames you find at the thrift store. I used a 20×24 size I found for $5.)
- Old portrait painting printed (printable below) on blueprint or poster paper (I used Office Depot’s same-day print services for $20.)
- Black foam poster board (A scrap piece of cardboard could work too.)
- Spray adhesive
- Utility knife
- Matte Mod Podge
- Chip brush
- Masking or painter’s tape (duct tape works too if you have that instead)
- Red battery lights
- Command hanging strips
Free Art Printable
If you want the printable Halloween portrait for yourself, you can click here or the button below to subscribe to my email list and get access to the free download:

If you’re already an email subscriber, the file should already be in your inbox, or just access it from the printable library here (the password is at the bottom of every email I send).
Steps
Step 1 – Adhere Print to Foam Board
If your foam board doesn’t fit your picture frame, cut it with a utility knife to the size you need.
Protect your work surface with newspapers or a drop cloth first. To give the art print a rigid backing to fit inside of the picture frame, spray the adhesive on the foam board.
(You could use a scrap piece of card board instead, but since my art print was an inch too short on either side and left the backing visible in the picture frame, I needed to use a black board.)
Place the paper art print onto the foam board, smoothing out any air bubbles. Let dry for at least 15 minutes.

Step 2 – Cut Out Small Eye Holes
Make sure to put a scrap piece of cardboard underneath the art to protect your work surface for this step. Using the size of your battery light bulbs as a guide, cut a small hole in each eye on the art with a utility knife.

Would you like to save this?
Step 3 – Apply Mod Podge for a Brush Stroke Effect
Once the spray adhesive is dry, brush a coat of Mod Podge all over the art in a haphazard motion with the chip brush. As the Mod Podge dries, it will create a texture similar to brush strokes on a real painting.
I made the mistake of not allowing the spray adhesive to dry completely before applying the Mod Podge effect, and it caused my art print to wrinkle.
It’s totally okay though. I think it just adds to the distressed look similar to the effect a haunted creepy art portrait would have anyway.


Step 4 – Tape Board Into Frame
Place the fully dried foam board inside of the picture frame and tape it to attach.
(If your picture frame comes with clips, you probably won’t have to worry about taping it. But mine was only a picture frame with no existing backing or clips.)
Step 5 – Tape Lights Behind Art
Place each battery light into the eye holes on the backside of the frame and tape them in place.
Tape the battery pack to the back of the frame as well, leaving the switch accessible so you can turn the lights on and off as you need.

Step 6 – Hang Frame With Command Strips
Hang up the picture frame on the wall using Command hanging strips as a temporary art solution. Be sure to follow the directions on the back of the Command package to ensure it stays up.
I press the Velcro strips for 30 seconds each and let the adhesive “set up” for an hour before hanging the picture frame on them.

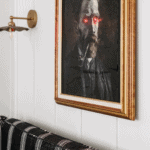
The Finished DIY Creepy Halloween Wall Decor
Check out how this Halloween art turned out! Oh my gosh! It’s so darn cool… and scary.
By the way, do you recognize who is in this painting?
I’ll give you some hints: He painted this portrait of himself. And you probably know him by his missing ear and another “glowing” starry art piece of his.
Regan and Olivia call him Vinny and walk past the art waving, “Hi, Vinny!”
Haha! They’re unfazed by this guy. He’s juuuust scary enough with the eyes, but we can turn them off whenever we want to do without his red glow so that he’s just a regular dude hanging on the wall.
You could totally hang it up on as front door decor on Halloween night too or wherever else you want spooky wall hangings for a Halloween party.

Now that this Halloween art craft is done, I’m whipping up some table decor in the breakfast nook to go with it for a fun Halloween dinner party with the girls.
I’ve never gotten into the DIY Halloween craft thing nearly as much as I have this year. I’m having WAY too much fun. But there’s no such thing, right?
Once Halloween is over, maybe I’ll even repurpose this picture frame into Christmas art. What do ya think?