
How to Dry Fruit and Preserve Leaves for Natural Christmas Decor
A step-by-step guide for how to dry oranges, cranberries, and pomegranates and preserve magnolia leaves and boxwoods for natural Christmas decor.
I’ve had ONE main goal for Christmas this year: to make our home feel cozy and classic by foraging our yard and using lots of elements from nature.
So over the last few weeks, I’ve been gathering up leaves from our magnolia tree and boxwood shrubs. And I’ve been bringing home fruit from the grocery store to dry for Christmas decor.

If you want to go the natural route and make your cheap Christmas garlands and wreaths look more high-end, here are a few different ways to dry fruit and preserve leaves.
How to Preserve Magnolia Leaves and Boxwoods
I tried two different methods.

Leaf Preserving Method 1
This method using WiltPruf is the quick way, but it doesn’t fully preserve the leaves. It just prevents them from drying out for several weeks.
Leaf Preserving Supplies
- Magnolia leaves or boxwood stems
- WiltPruf
- Spray bottle (if you don’t buy WiltPruf already in the bottle)
Spray the magnolia leaves on both sides (outdoors) and let dry. Once dry, you can arrange them how you’d like on garlands and wreaths or in floral arrangements.

Leaf Preserving Method 2
This method takes several days to work, but the leaves will be preserved after and can last pretty much forever.
Leaf Preserving Supplies
- Glycerin
- Water at room temperature
- Hammer
- Large dish or bin
- Plate or a relatively heavy object to keep leaves submerged
Mix 1 part glycerin to 1 parts room temp water in a large container. Hit the ends of the stems with a hammer to crush them and allow the glycerin to penetrate.
Submerge the leaves in the glycerin mixture so the leaves don’t overlap. Place a plate on top to keep the leaves from floating to the top. Leave in the mixture for 3-4 days and let dry.

You can use the same two methods with boxwood stems as well.
For the fruit, I bought oranges, cranberries, and pomegranates. But you could use a similar drying process for apples, pears, and figs.
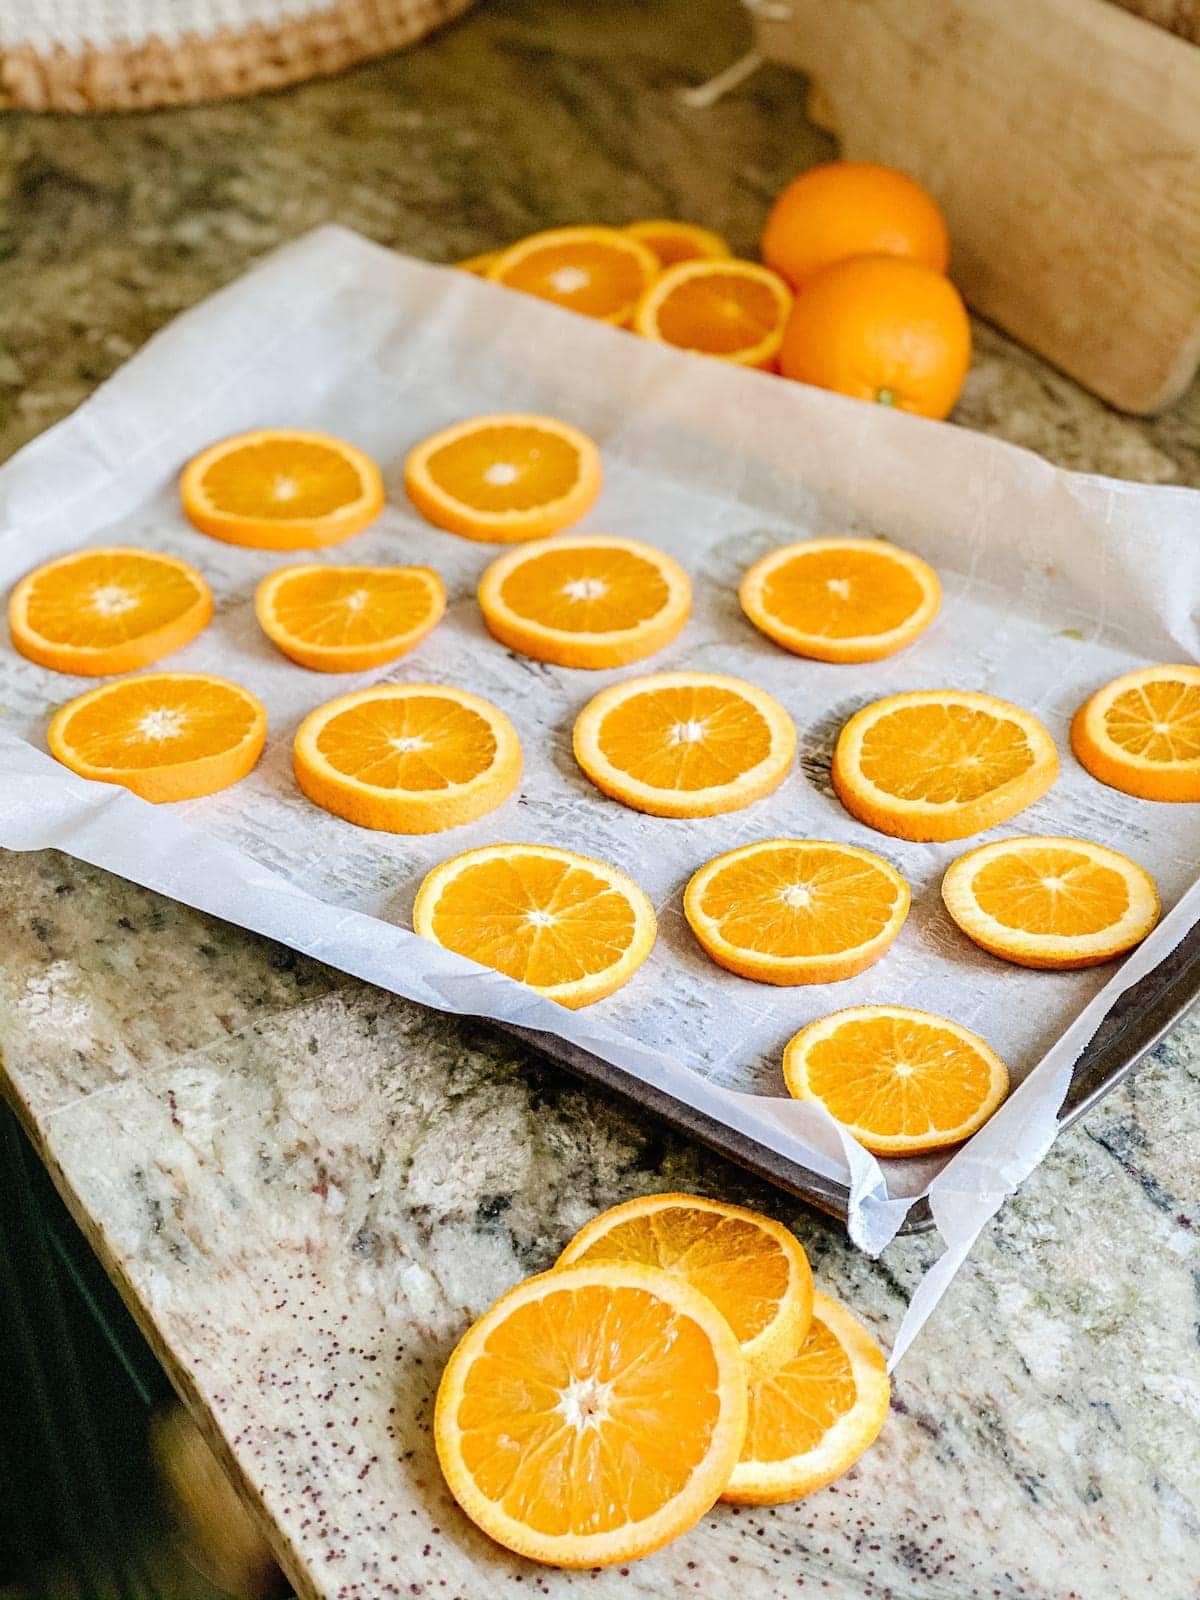
How to Dry Orange Slices
Orange Drying Supplies
- Knife
- Cutting board
- Baking sheet
- Parchment paper
- Oven

Orange Drying Steps
1. Slice oranges into thin slices (approximately 1/4″ thick).
2. Place slices on parchment paper on a baking sheet.
3. Put orange slices in the oven at 200°F for 45 minutes.
4. Flip the slices over and continue baking for another 45 minutes. Keep flipping every 45 minutes until the slices feel relatively dry (usually around the 3 hour mark). The thicker your slices, the longer they’ll take to dry.
Tutorial: Easy Tutorial: How to Make DIY Dried Orange Garland
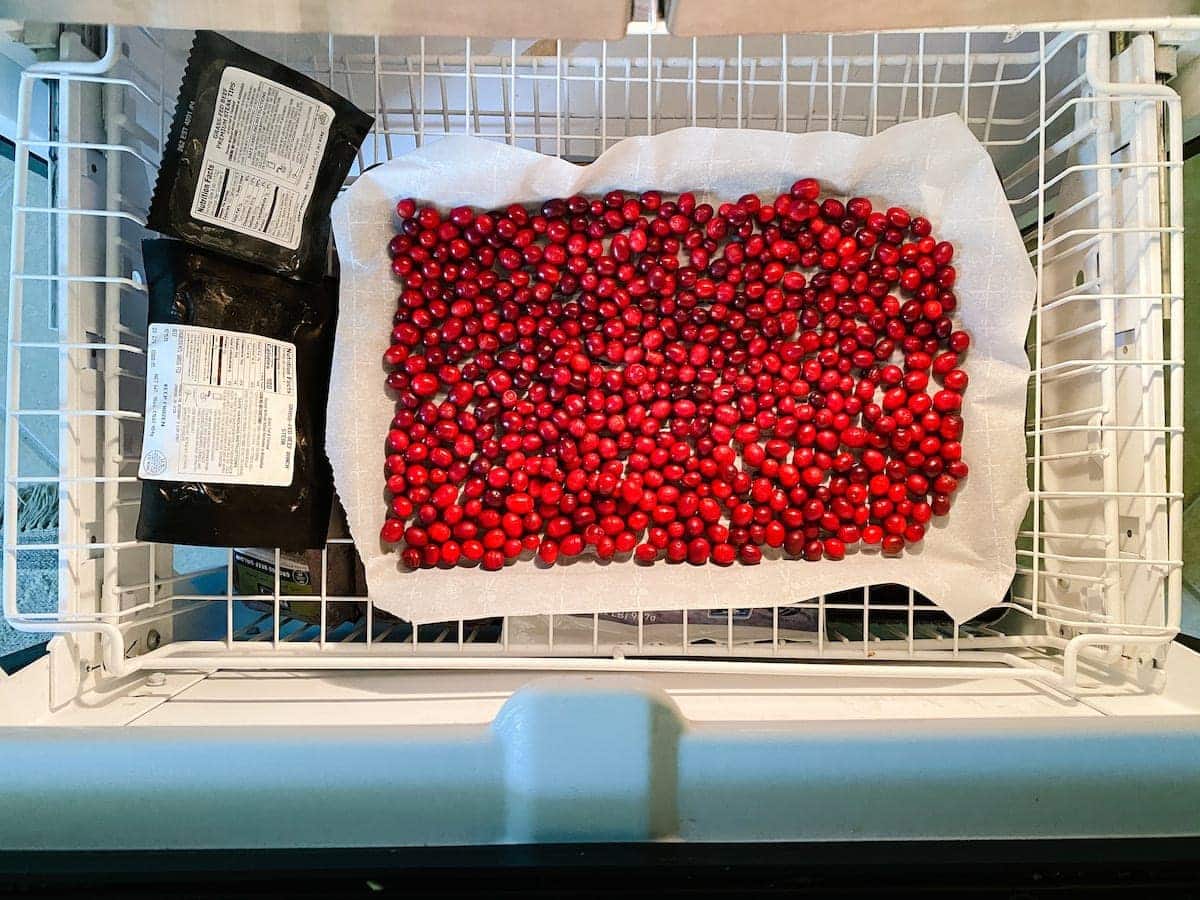
How to Dry Cranberries for Christmas Decor
I didn’t want to buy a bag of dried cranberries since those are for eating and don’t quite have the look I wanted for Christmas decor.
Cranberry Drying Supplies
- Fresh cranberries
- Large bowl
- Large pot filled 2/3 with water
- Baking sheet with parchment paper
- Oven
- String and needle for stringing garland (optional)
Cranberry Drying Steps
1. Pour your fresh cranberries in a large bowl.
2. Boil a large pot of water.
3. Pour the boiling water over the cranberries and let sit for 8-10 minutes. This allows the skins to expand.

4. Drain the hot water and place the soaked cranberries on a baking sheet with parchment paper.
5. Place cranberries in the freezer for a few hours until completely frozen.
6. Put the baking sheet in the oven at 180°F. Give the baking sheet a shake every 45 minutes to turn the cranberries. Allow the cranberries to bake for 5-6 hours until dry.
Scatter them on tables or string them into garland once cool.
How to Dry Pomegranates
These take the most patience, as there’s really not an easy way to speed up their process as easily.
Pomegranate Drying Supplies
- Fresh pomegranates
- Toothpicks
- Wire rack
Pomegranate Drying Steps
1. Choose smooth, firm pomegranates that aren’t visibly bruised or scraped.
2. Stick the rinds with a toothpick in evenly spaced multiple places all over the pomegranates.
3. Put the punctured pomegranates on a wire rack and store in a cool, dry, dark place. A cabinet or closet shelf will work just fine. Let dry for 3-4 weeks.
The pomegranates will shrink in size and be less vibrant. Place them in greenery or use them as bowl filler.
DIY Dried Fruit and Preserved Leaf Christmas Garland Centerpiece
Once ALL of that work was done, I had a big pile of dried fruit and preserved leaves to put all over our house for Christmas to beef up our wimpier pieces. Use floral wire to attach them to artificial greenery.
1. I’ve had this artificial garland for a few years that I laid on the table curved to accommodate room for candles.

2. I added these little lanterns and tucked the stems of the preserved magnolia leaves into the artificial garland. (If this garland were hanging, I’d use floral wire to attach them completely.)

3. I added the boxwood stems next, spacing them between the magnolia leaves.

4. Then I spaced the dried orange slices evenly.

5. And then nestled in the dried pomegranates.

6. To finish, I sprinkled the dried cranberries throughout. You could add cinnamon sticks and whole unshelled nuts too.

It feels so cozy and like a little touch of Colonial Williamsburg in our home now.

I cannot wait to add all of these little natural elements all over our house next.

Natural Christmas Decor Ideas
Here are some ways you can use your dried fruit and preserved leaves throughout your home to add a cozy traditional Christmas look reminiscent of Colonial Williamsburg.
Mixing Orange Slices Into Staircase Garland
Disperse dried orange slices throughout artificial garland by attaching them to stems with florist wire.
Tutorial: How to Hang Garland on Stairs + Entryway Christmas Decor

Plant Paperwhites
Place a bowl of paperwhite flowers beside your kitchen sink for easy, natural Christmas decor. The best part is it works well even after Christmas into January.

Use Orange Pomanders in Table Centerpieces
People have been making orange pomanders for centuries. They originate all the way back to Medieval era when they were used as a way to repel bad smells.
Use a toothpick to poke holes all over an orange, in a pattern if you wish, and press whole cloves into the holes of the orange skin.
Tutorial: Simple and Inexpensive Christmas Table Centerpiece

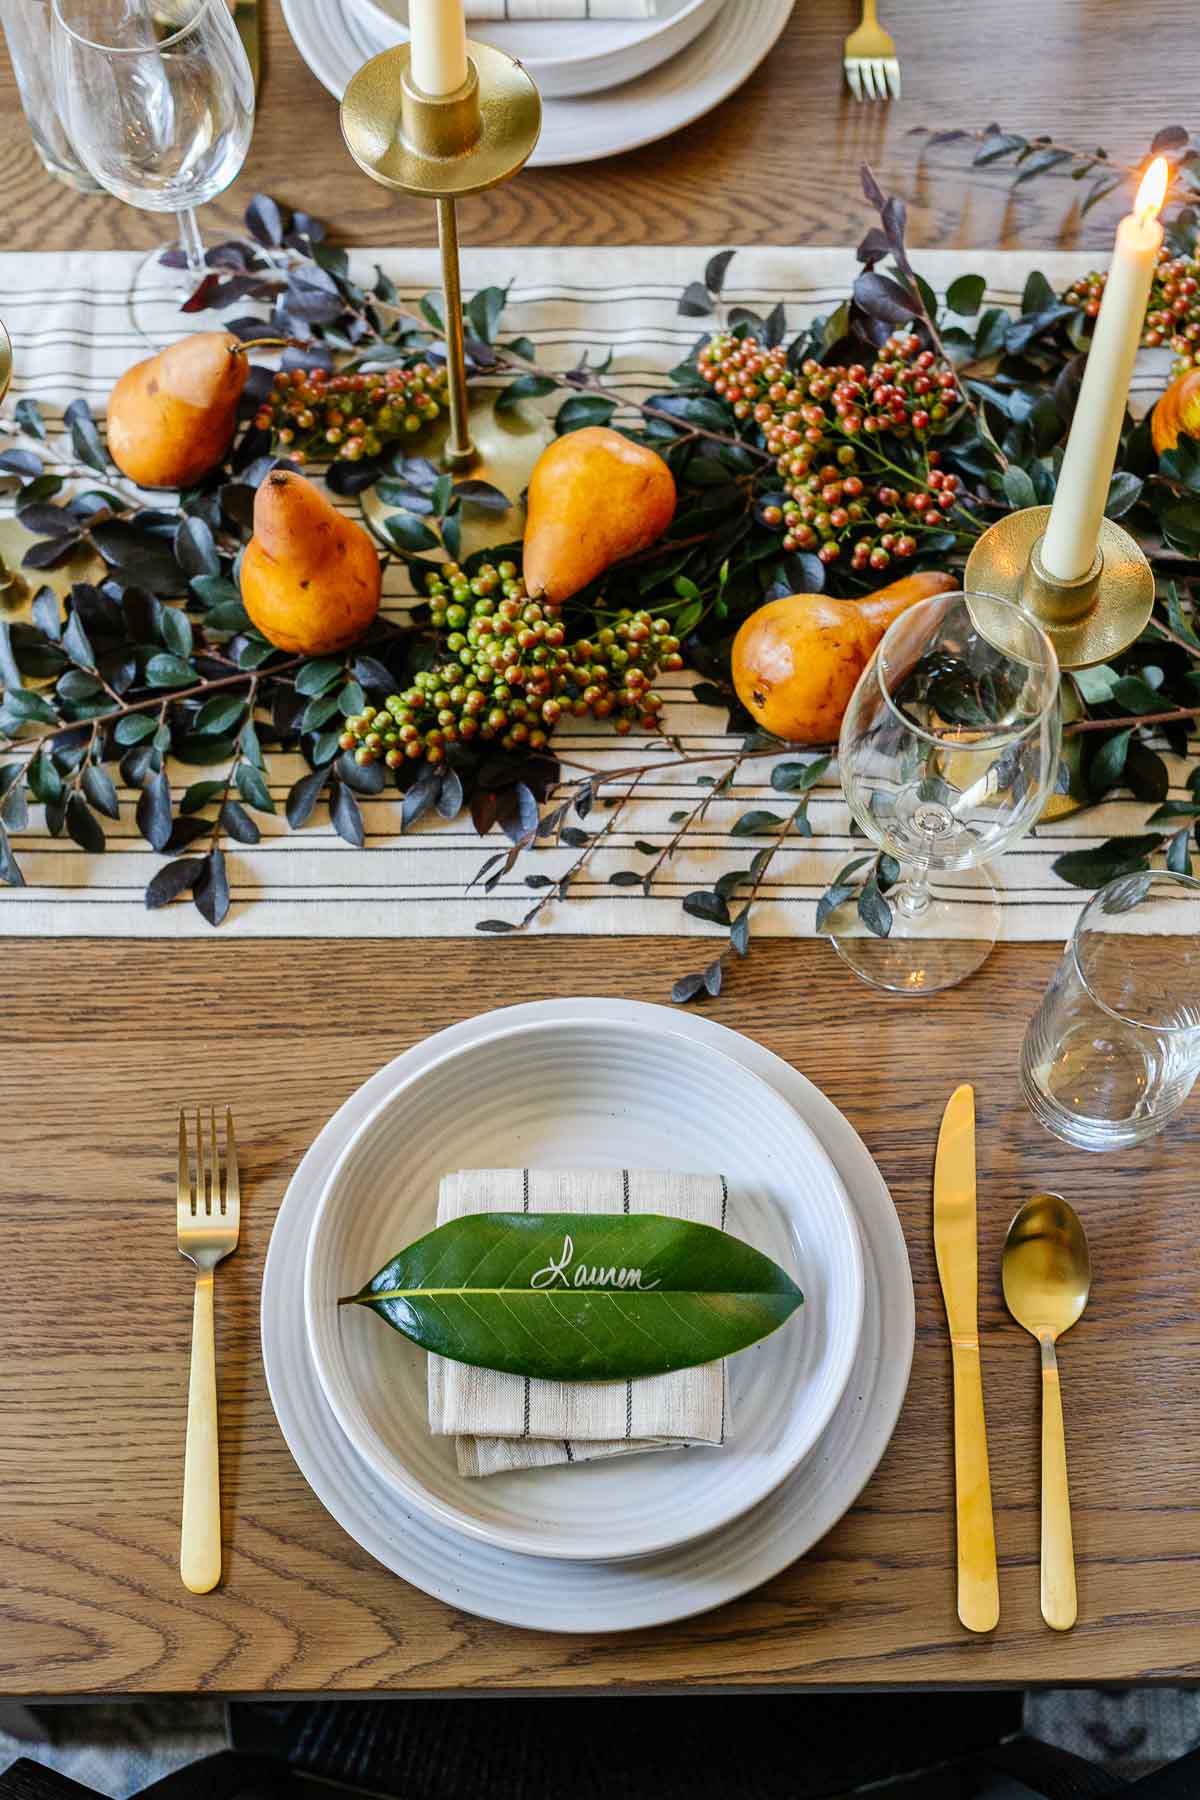
Use Leaves as Place Card Holders
I love using stems snipped from pine, juniper, and cedar trees, not only because it looks beautiful, but it smells heavenly. After cutting them, dunk them in water for an hour to remove bugs, give them a good shake, let dry outside, and them style them where you want them around your home.
It’s a fun touch to use magnolia leaves as place card holders. Just write loved ones’ names on them in metallic Sharpie.
Tutorial: Simple Thanksgiving Table Decor Done in 10 Minutes
Mix Pine Cones Into Greenery
Forage your yard for pine cones of all shapes and sizes to make your faux garland look more realistic.
But first, make sure to bake your pine cones to get rid of any lingering bugs. Set the oven temperature to 200 degrees F, place pine cones on a cookie sheet, and bake for about 30 minutes. Check on them throughout to make sure they don’t burn.
Then, attach them to greenery around your home with a little florist wire.
Tutorial: How to Make Beautiful DIY Mantel Garland for Christmas

Make DIY Orange Slice Garland
After drying orange slices, string them up into garland! I added some mini bells to mine for a little extra charm.
Tutorial: How to Make Dried Orange Slice Garland

Have you ever dried or preserved anything out of your yard? Or decorated with things from the produce section at the grocery store for me?
It’s the best little tradition to add some natural, historical charm to the store-bought Christmas decor.


Lauren, thanks for this tutorial. I also love natural elements in my Christmas decor, and this is just what I needed. I was getting tired of the overpowering aroma of store-bought bags of potpourri. You’re brilliant 🙂 XO
Thank you!!!! This is so natural and warming. I have a miniature pomegranate tree but I didn’t know how to preserve the darling fruits!
Have a glorious Season with your loved ones.
Thanks for the great ideas! 2 questions:
1. Where did you get the glycerin? How much did you get? I can only find 6oz bottles.
2. Do you leave the toothpicks in the pomegranates or just puncture the holes and remove toothpics?
Thanks!!
HI, Ellen. Six ounces should be plenty as you are mixing part with water. The toothpick is to just puncture the pomegranates leaving the holes exposed to air out. Great questions. 🙂
Your centerpiece is awesome, and I can just imagine how your house smells. I will definitely try this. I have never dried fruit before. Thank you for this very thorough post.
Where did you get the square glass candle holders?
These beauties are from WalMart!! 🙂 They are from the Better Home & Garden line.