
The Beginner’s Guide to Painting Cabinets
A step-by-step beginner’s guide to painting cabinets including necessary supplies, tips to make the process easier and faster, and how to give them a smooth professional finish.
Get your happy little bum wiggle on y’all! Dougie, nae nae, or twerk it (or ehhhh…maybe not). But have a victory dance of some kind because our hallway bathroom cabinets are painted!
Anti-cabinet painters, look away. Right now. And please forgive me for these graphic images of cherry stain being destroyed.

We’ve been really lucky in the cabinet department. Our basic builder grade package included very nice ones, but the finish wasn’t ideal. Don’t get me wrong; I think cherry wood stained cabinets are beautiful, but why put up with something you feel like isn’t you style?

After I painted our master bathroom cabinets, some of y’all started asking me about my cabinet painting process. Because really it’s one of those more-than-one-way-to-skin-a-cat situations. (Random thought: Isn’t that the worst figure of speech ever?)
You get it though. There are 3,547,654,764 tutorials out there for painting cabinets.

So it was time I delivered my deets. This really is the beginner’s guide to painting cabinets. Truthfully, I’m a bit of a beginner. As in, this is my second time doing it.
But I’ve admitted before that I research the heck out of some home advice, and this method works! If you find yourself staring at those old cabinets in your house that you hate, or you can’t justify painting your cabinets because they’re fairly new, let me tell ya, one beginner cabinet painter to another, you’ve got this. I believe in you. Don’t live with something you don’t love.
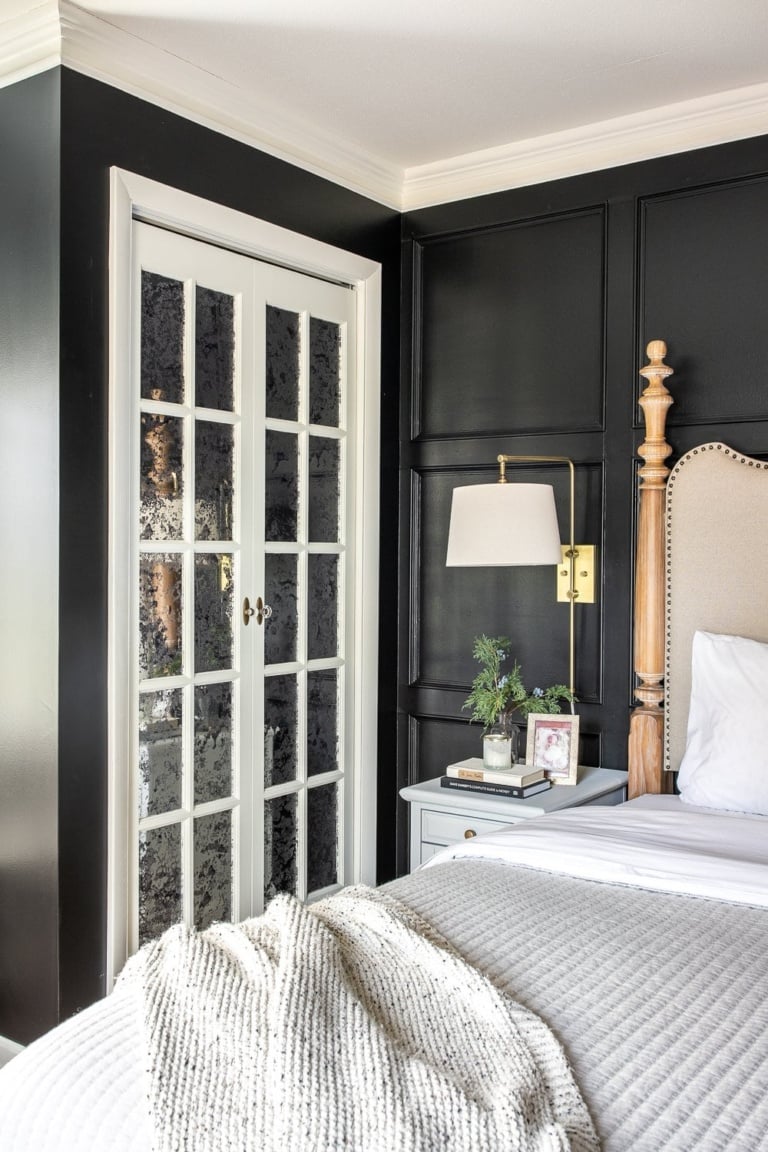
When I hashed out our hall bathroom design plan (which you can see more about design planning tips for your own home here), the very top priority on my list was getting rid of these reddish wood cabinets.

So you ready for it? Here’s everything I did, and two things I would have done differently.
Supplies: (Affiliate links are listed below and noted by asterisks. I only recommend products I trust. For more information, see my full disclosure here.)
- Plastic shower curtain liner or drop cloth
- Painter’s tape*
- Razor or utility knife*
- Sand paper assorted in medium to fine grit*
- Liquid deglosser
- Chemical resistant gloves
- Respirator mask*
- Wood filler*
- Paint roller tray
- 1.5″ economy grade paint brush
- 1.5″ angled Purdy paint brush* (my favorite)
- Cabinet paint foam roller* (2- one for primer, one for paint)
- Primer (See note below.)
- Interior enamel semi-gloss paint (See note below)
Approximate total: $75.00 (This amount covered cabinets in 2 bathrooms.)
I learn something new after every project, and I wouldn’t be doing this blog justice if I didn’t share my trials and errors. I used Kilz Original Primer on our cabinets, and it worked great. But, next time, I would choose a primer that is low VOC. The fumes of the Kilz Original were intense. I’d rather buy the odorless version in the future.
I used Valspar Reserve semi-gloss paint, and even though the finish turned out beautifully, it took weeks to fully cure and wasn’t self-leveling. I really didn’t see a difference between the pricier Reserve Valspar line versus the cheaper Signature line. I’ve heard excellent reviews about this paint from Ace and this paint from Sherwin Williams. I’m okay with spending more, if the final results are better and faster.
I used the color Winter Gates by Benjamin Moore mixed into Valspar Reserve paint.

The Steps:
1. Remove all of your drawer fronts and cabinet doors. Make sure you label each drawer/door with their matching hinges too. Mixing them up when you’re ready to reattach them later can be a big headache.

2. Tape down your drop cloth. I like using a plastic shower curtain liner because they cost less than $1. And, if you’re not confident in your edging abilities, use painter’s tape. (Like me, Shakey McGee, over here.)

3. Use chemical resistant gloves to wipe down all cabinet doors, drawers, and box with a rag using liquid deglosser. (I don’t sand all over in the prep process because the liquid deglosser can really handle it, but if you want to take that extra step, go for it.)
I didn’t need to fill any hardware holes with the knobs and handles I’d chosen, but use wood filler to fill any hardware holes after the deglosser is dry. Once the wood filler is dry, sand the old hardware spots until smooth. Wipe away any sanding dust.

4. To help with clean-up, and because I don’t want to wash oil-based paint down a drain anywhere, I wrap my painter’s tray in a plastic grocery bag before pouring in my primer.

5. Use the economy grade brush to apply primer to any corners, edges, and hard to reach areas. Use a cabinet roller to smooth the primer on the box, drawer, and doors. Start on the backside of the doors first. Sand between coats for a really smooth finish.

6. Once the primer has dried and you’ve tossed out your grocery bag, repeat step 5 with the semi-gloss paint, your second roller, and Purdy paint brush. I applied two coats.
7. After the paint has dried, score the edge of your painter’s tape with your utility knife, and slowly peel up the tape. This should preven any paint from peeling up with it.
8. Attach your hardware and admire your handiwork!

I found these handles and spigot-looking knobs at Hobby Lobby at 50% off. (I’m hooked on their hardware.) Aren’t they the cutest?

Yay! We’re getting there! Sorry about the icky lighting in this bathroom, but this space has no natural light at all.

Have you painted any cabinets lately that you’re booty-shaking-excited about? Or do you have any good-to-know tips you’ve learned in your own process? I’d love to hear them! That cherry wood kitchen of ours is asking for it.

Follow:
Facebook | Pinterest | Instagram | Twitter | Google+ | Bloglovin | Hometalk


Thanks for sharing your experiences. I’m doing some research on painting. I have an old coffee table and I want to paint it. Now I know how to do that.
Glad it could help, Natalie! Have you tried chalk paint or Fusion Mineral Paint? I love using that the most on furniture makeovers. Much less prep work and it’s still very durable.
Curious, would you use Chalk pain on cabinets?? thanks. Love your work!
Thanks, Diane! I personally wouldn’t recommend it just because I know other people who have experience horrible results with chalk paint on cabinets, especially in kitchens. On the flipside, I know some people who absolutely loved their experience with it. But I didn’t want to chance it, so I chose a tried and true latex. I’m currently painting our kitchen cabinets using Benjamin Moore Advance which is formulated specifically for cabinets and it’s worth every penny. I can already tell it’s going to be durable for many many years just by the way it’s drying.
How has the paint on the cabinet held up? Have you had any pealing?
None at all! It still looks just as great today as it did when I first painted them. 🙂
Thgreat! How much paint did you use on the cabinet?
Thanks, Mary! I did two coats. It only took about a pint of paint for this cabinet.
I have a couple questions –
1) did you follow the same process for the end piece that is almost never made out of real wood?
2) for kitchens, I read another comment where you said that process is a little different, for example using TSP first to clean and then degloss. After that step, how much would you recommend sanding and with what grit sand paper? Would this be absolutely necessary or can we trust the deglosser?
Hi Meredith! I did. I used the same process for the entire cabinet. Kitchens are different just because you have cooking grease and extra grime to deal with. I don’t have a tutorial for kitchen cabinets, but this one is really great from Young House Love: http://www.younghouselove.com/2012/01/how-to-paint-your-cabinets-aka-hallelujah/ Hopefully, that will answer some questions for you. 🙂
ahhh!!! My bathroom cabinets are midway through and so far, so god EXCEPT that a small portion pealed off when I took the tape off. Luckily it is a spot where it won’t see much traffic so I touched it up but I plan to do my master bathroom and kitchen cabinets. What do you think I did wrong? Not enough deglosser?
Oh no! I usually peel off the painter’s tape immediately when the paint is still wet and that eliminates the peeling problem. (Learned the hard way on our master bathroom cabinets.) The paint also takes sometimes up to a month to completely cure. It will be dry within a few hours but you’ll still be able to press with your fingernail into the paint and see an indention for up to a month. Just be careful around it for a couple weeks until it’s fully hardened. Hope that helps! Glad it’s only one spot though.
OK, good to know. For the rest, I will likely do a light sanding with the D Glosser just to make sure I’ve got everything and I’ll probably run a razor blade along the tape before I peel it off. Sounds like that should solve my problems. Thanks!!
Thanks for sharing the cherry cabinets in my kitchen are sucking up the lighting on that end of my kitchen. My windows are on the opposite end of the kitchen so I need to do something soon. The cabinets are a good quality.
I have the EXACT same problem. I’m dreading painting our cabinets, but that dark wood with very little sunlight is like a cave. Glad it could help!
I really want to tackle my kitchen…I have those old honey gold oak cabinets from the 70’s and want to change them to an antique white with black hardware. I’ll be reading this over and over, making lists to make sure I get all the supplies required. I just wanted to Thank You for these instructions.
Awesome! Glad it could come in handy!