Update: Check out the Final Reveal!
Now, after a very long weekend of cutting and building the stonework, laying down the hearth, and painting, our living room is sporting this!

- Primer (We used Kilz Original because we didn’t know what kinds of paint were in the layers on our very old recycled mantel.)
- White semi-gloss paint (We used Sherwin Williams Pure White)
- 1-1/2 inch angle paint brush (I loooove my Purdy one. It’s survived many DIYs)
- Paint bucket
- A cup or two of water (if you choose to do a whitewash on the stone)
- Clean, lint-free rag
- 3 boxes of Air Stone
- 2 buckets of Air Stone Adhesive
- Hack saw
- Putty knife
- Matte black paint (I just had this chalkboard paint on hand and it worked great.)
- 7 concrete patio stones (Or however many you need for your fireplace’s measurements.)


I just used the same paint that we used on the mantel with one part paint and one part water.

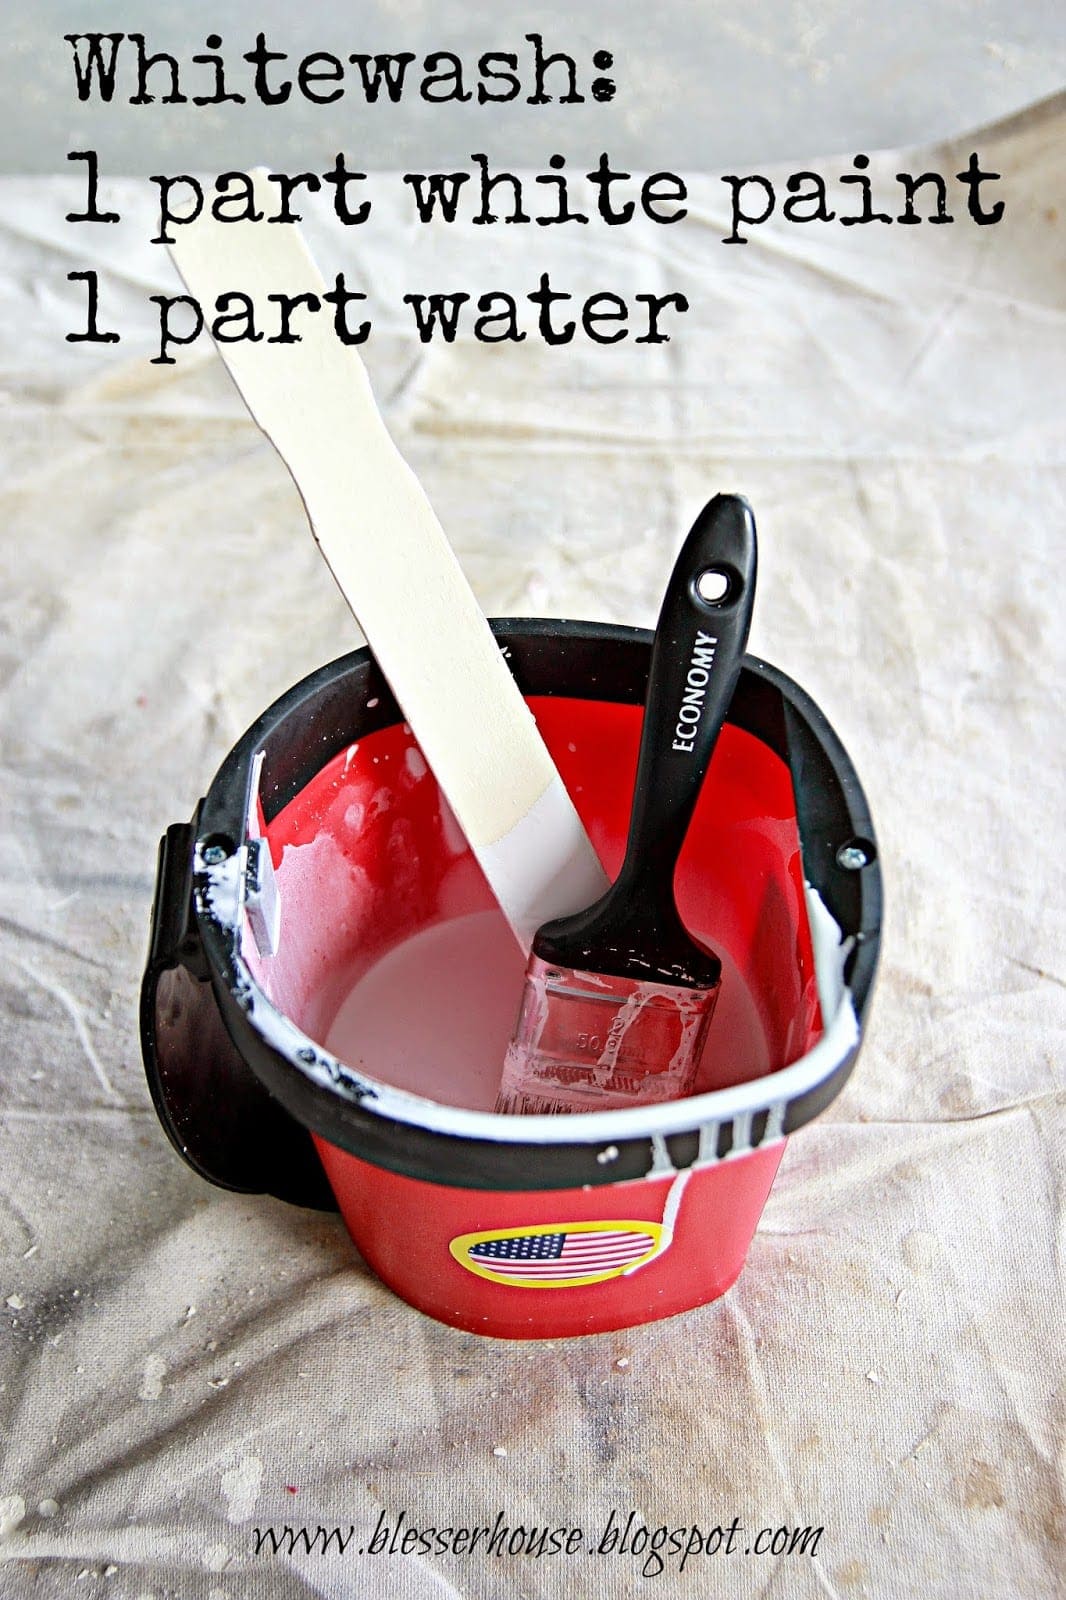
Then, I swiped on the whitewash with a paint brush.

Let it set in for a minute or two since the stone will absorb quite a bit. And dab any excess with a rag.

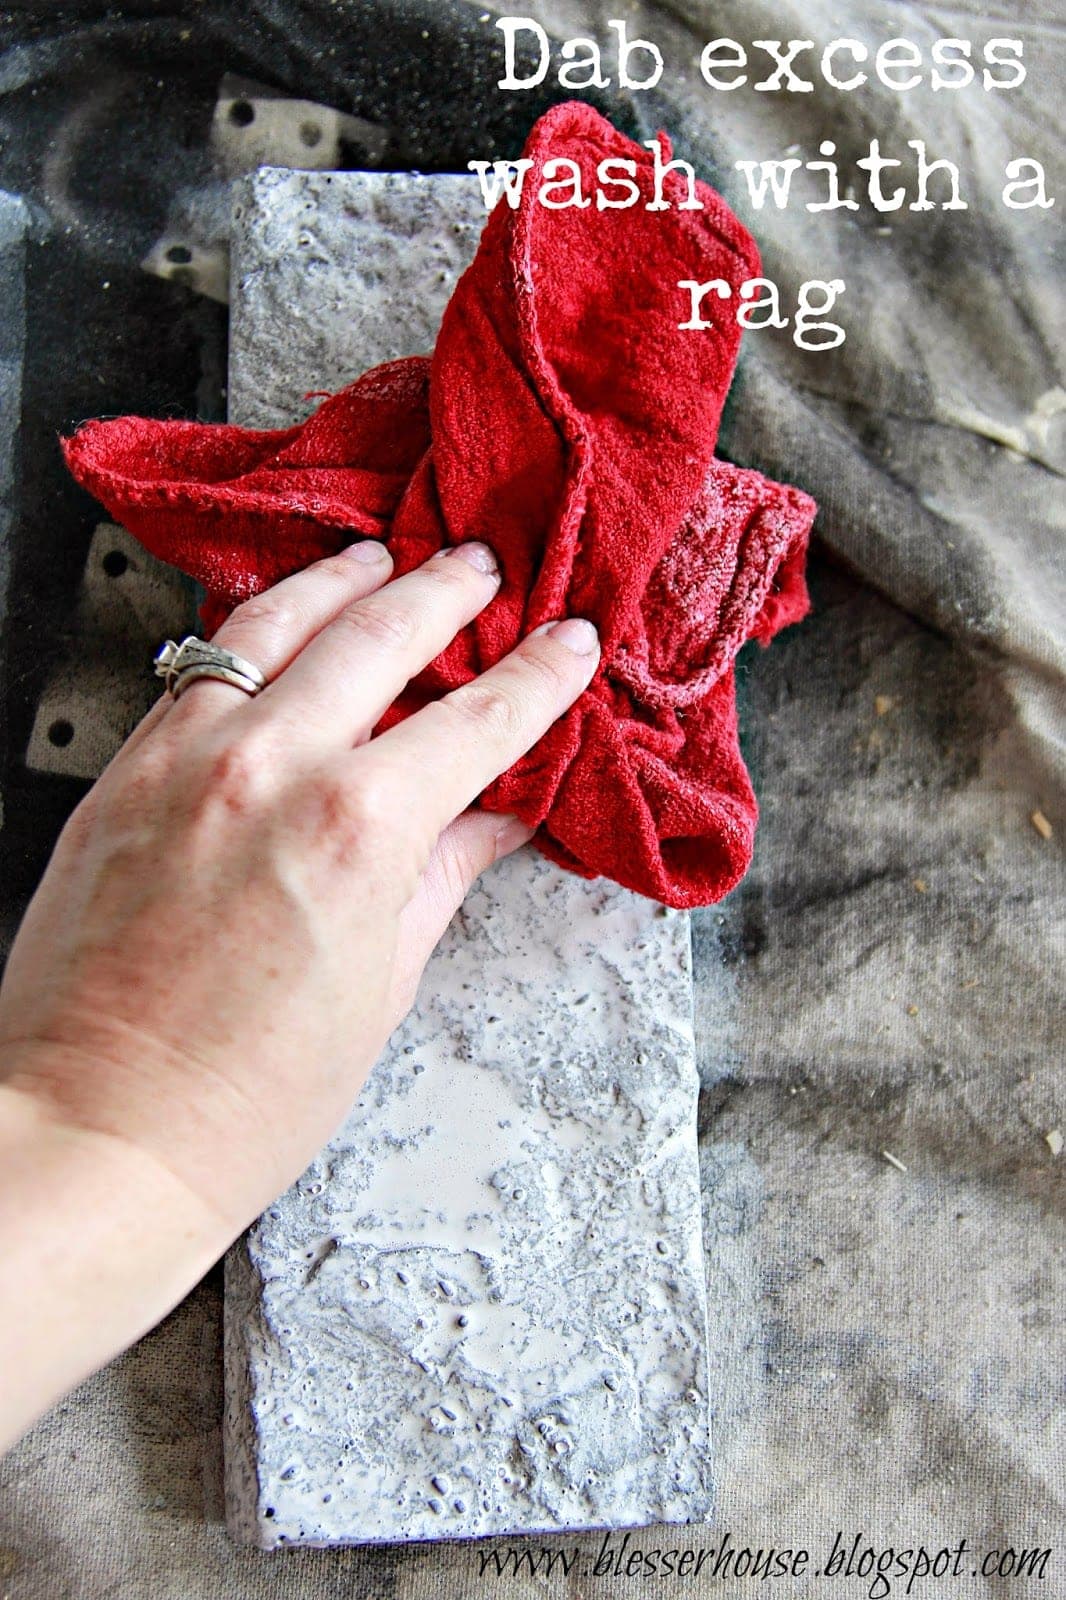
Here is what it looked like after I dabbed off the excess and let it soak in the wash a little more. There was just enough gray tone coming through the white.

Then, Robert and I started adhering the stone to the hearth. We applied the adhesive like frosting on a cake. Applying the adhesive like butter on bread isn’t really enough. Any extra can always be scraped off with a putty knife once you press it on.

Ta da! 30 stone pieces done, a million more to go!

The Airstone was really easy considering all of the other stone veneers out there. So…okay. I wouldn’t say easy, just easiER. The whole fireplace still took all weekend. I think we clocked about 15 hours on this sucker.
Poor Robert worked the hacksaw 99% of the time…mainly because I’m a total girl and it took me twice as long to cut a stone. I guess he wanted to show off his macho skills. (Just so ya know…that hairy hand below is not mine.)

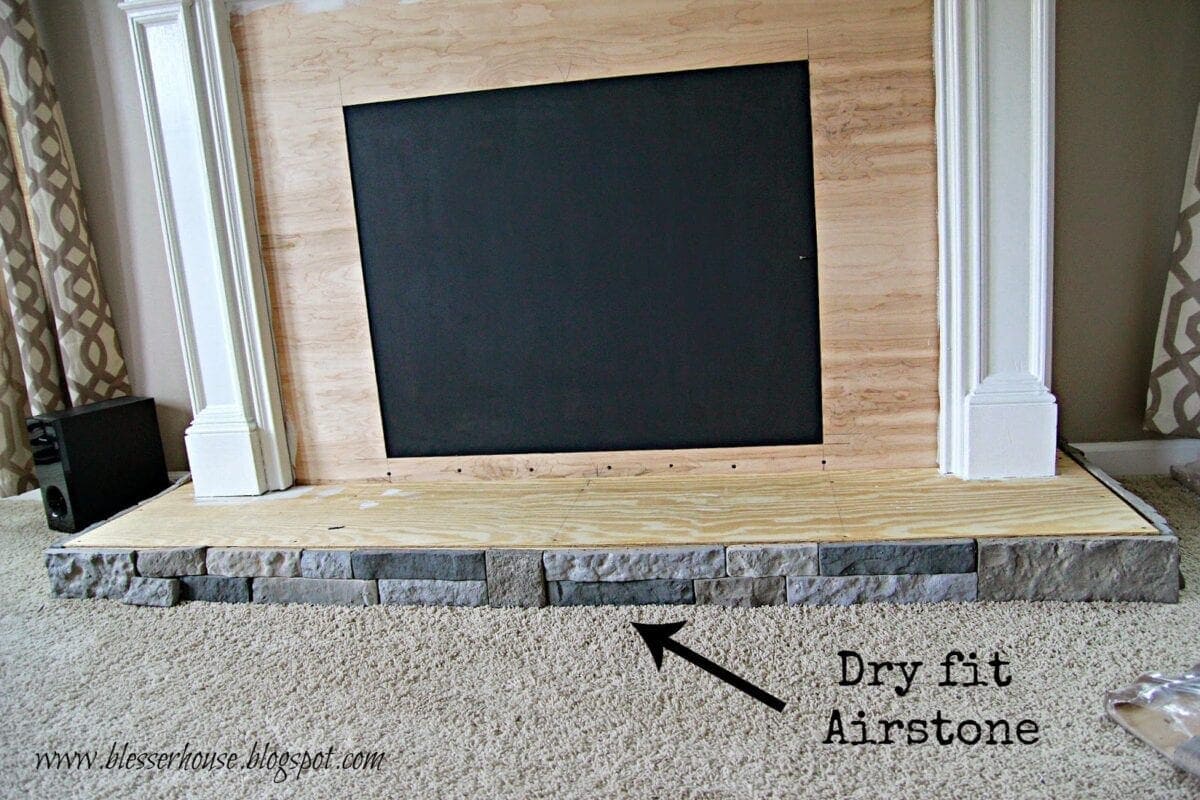
We attached the Airstone to the bottom of the surround first so we could add to the top of the hearth.

This part required a lot of debate, but in the end, the cheapest and easiest and most durable route for the hearth was repurposing stepping stones from the garden department of Lowe’s for only about $2 each. Those things are heavy! And we used adhesive on them too. They’re not going anywhere.


Once we started adhering the stone, it got a little tricky at the top of the surround, and we discovered that we were half a stone’s height short.
There was no way we could cut 6-8 stones lengthwise with a hacksaw because they would completely crumble to pieces, so we put a strip of wood trim at the top of the surround to paint white, and we spaced out some of the stones with popsicle sticks.
The sticks create just a small enough gap to make a difference so that we wouldn’t end up with a space of bare wood at the top of the surround.


This morning, after we took the sticks out, we had a stone fireplace! I was really tempted to keep the stone gray, but since I had already whitewashed part of the hearth, I had to keep going with it. And the gray wouldn’t have completely worked with the rest of the room anyway.


 For the stepping stone hearth, I painted it with a sample pot of Valspar paint called Rugged Suede.

So now we have a ginormous just-about-finished fireplace in our living room! Hallelujah!


As I’m sitting here typing this and I’m seeing the difference between the wash on the hearth base and the wash on the surround, I’m definitely thinking it needs another coat. And I might try to warm it up a little by putting in a small bit of our wall color Sherwin Williams Perfect Greige and testing it on a spare stone.
Update: Â See the final reveal here!
Follow:
Facebook | Pinterest | Instagram | Twitter | Google+ | Bloglovin | Hometalk
Oh WOW! Your fireplace is just stunning, love all the details, great job! Thanks for linking up to Inspire Me Monday
Thanks, Kristin!
Oh man, you’re totally talking me into the Airstone. I just showed this to the Mr and he looks intrigued. We have absolutely NO tiling experience…would some rookies like us be able to pull this off or are a lot of tools needed to do the project?
You can definitely do it! I have never tiled anything in my life. If you can cut a loaf of French bread (with a mighty powerful knife), frost a cupcake, and stick it to the wall, you can handle this. 🙂 Weird analogy but that’s what it’s like.
I love this project, how perfect. Such a fabulous focal point. Thanks tons for linking to Inspire Me.
Thanks, Marty!
Looks gorgeous! What is Airstone? Is it from Lowes? Also, why did you choose to paint the surround stone a different color than the base stone? It all looks great! …just curious Thanks!
Hi Suzanne! Sorry I should have clarified. I’ll go back and add that in to the post. Airstone is sold at Lowe’s and it is a stone veneer that requires no mortar or special tools other than a hacksaw and a tub of adhesive that allows you to stick the stone to practically any flat surface. It is stone made from concrete out of molds and have air bubbles mixed in to the concrete so the stones are lighter. It’s $50 per 8 square feet, so it was the most cost effective for us. As for the different colors, I have been playing with the wash mixture a bit and have already changed it to be more of a greige-wash for both the surround and the hearth. The two match now. It’s still in progress, so I’ll show it when it’s all finished I’m hoping next week. 🙂 I was dying to show what we had done so far though so I went ahead and posted this update.
OOh Wow! This looks fabulous! I have eyeing those Airstones at Lowes for weeks now trying to figure out what I can do with something like that! You made them look awesome with the whitewashing! LOVE It!
Deb
Thanks Deb! Your beautiful fireplace nearly convinced me to go with a gray mantel. I love yours!
Lauren, it is just gorgeous! Nicely done!
Thanks, Kristin!
Get out of Town! That is an awesome fireplace! Great job with the tutorial{s}!
Pinning! Please share this project at my Show-Licious Party on Saturday morning!
{big hugs}
~ Ashley
Thanks, Ashley! Woohoo for the pin! And I definitely will. 🙂
Holy cow! I am impressed. That is a big and very beautiful project! We are lucky enough to have a gas fireplace installed but it is U.G.L.Y. I intend to cover the whole thing in faux stone floor to ceiling with a wrap around mantle. I love the boards behind the tv on yours though. The airstone seems like a really good choice. We have been looking online and I wonder how it compares to the premade pieces we have been looking at. T
Thanks, Rachel! We looked at other types of stone too and we almost went with a manufactured stone veneer but all of the ones I found required more advanced skills and special tools, and I wasn’t up to the challenge of learning masonry work. Plus it would have created a giant mess. After all of that, the Airstone was definitely cheaper and easier to install. We almost did a floor to ceiling style too but the plank wall was cheaper in the end. I’d love to know what you choose! I’ll have to follow it on your blog if you post it. 🙂
Love!! That looks amazing! Great post!! We have tackled a few fireplace remodels but haven’t tried the white wash yet! Love the look!!
Thanks so much! I did a little tweaking with the white wash since I felt it was a little too much of a blue gray, so after this post I did a really light warm gray wash to make it work better with our greige wall color. I plan to update soon. I just have one more step to do that I have to wait on. So glad you like it! The wash process was super easy.
Lauren, I love the stack stone on your fireplace! Every time I’m at Lowes I stare longingly at the Airstone display and I am always SO tempted to buy it! Your fireplace looks fantastic, well done!
Thanks, Holly! You know what’s funny? I drool over carrera marble all the time and your fireplace makes me long for it all over again. Haha
just curious..how tall is the fireplace and wide? and how tall are your ceilings? we are wanting to attempt this and I am in love with how yours turned out!
Hi Lily! I busted out my measuring tape for ya. 🙂 I’ll have to go back and add in my dimensions for anyone else wanting to know. The widest part (the hearth) is 78″ wide and 25″ deep. The mantel shelf sits 58″ from the floor. And the firebox is 12″ from the wall. I hope that helps. I would love it if you sent me a photo when yours is finished!
Hi!
I was wondering the measurement of the mantel, for a reference point!
Hi Murphy! The widest part (the hearth) is 78″ wide and 25″ deep. The mantel shelf sits 58″ from the floor. And the firebox is 12″ from the wall. I hope that helps!
Love the idea of the stepping stone hearth! Did you use anything between the stones (like grout?) or just stuck them closely together?
Thanks, Jeanette! We didn’t use any grout. We just put them up against each other, but I’m sure you could use grout if you wanted to.
HI Lauren,
I’ve been eyeing this post for sometime now and am finally getting geared up to tackle something similar to this. On the 1×6 that covers the face of the shiplap you wrote that you placed molding along the sides to completely cover the shiplap. I apologize if you cover this somewhere in the blog as I might have missed it. Can you tell me what you used because the end photo looks seamless on the corners and Id love to know how you executed this so well. Thank you!
Hi Kelly! We just used quarter round on the sides to make it look finished there. 🙂