
DIY Storybook Art
Since sharing the big playroom reveal last week, some of y’all asked me about a tutorial for our DIY storybook art (which is basically the darn cutest project on this blog ever, I think).

I knew I wanted a pop of color on our playroom wall but nothing too wild and crazy. I wanted it to have sentimental meaning, and I wanted to make it for as inexpensively as possible. In the end, I made each sign for all of $28. Yay! You definitely can’t buy them for that.
So here’s the skinny.
Supplies Used: (Affiliate links are provided below for convenience. For more info, see my full disclosure here.)
- 1 sheet of 1/2″ 4’x8′ hardwood plywood (if you only want one sign, you can buy smaller pieces in the lumber aisle)
- 5 1″x2″x8′ boards (approximately 1 and 1/2 of these boards per sign)
- Circular saw
- Stain of your choice (I used General Finishes Gel Stain in Gray)
- 2 sponge brushes
- A couple of clean, dry rags
- 3 colored engineer prints (1 per sign… Captain Obvious over here.)
- Tape measure
- Approximately 30 1-5/8″ wood screws (10 per sign)
- Approximately 42 1-1/2″ finishing nails
- Old credit card / library card / old hotel key card
- Power drill
- Hammer
- Hanging kit
- JPG file of storybook page images
- A partner to help
You can download the printable files of the storybook page images here:

We’ve made a couple of these signs now, like our DIY Oversized Sheet Music Art and our DIY Irish Blessing Sign, and each time we make them, we get a little better at it. Practice has helped a good bit with this one.
For the main part of the sign, we measured 24″x36″ on our plywood piece and cut it with our circular saw.

You can get about 4 pieces of this size out of one standard sheet of plywood. You could make your signs bigger or smaller, depending on what size engineer print you buy.

Before I cut the 1″x2″s, I gave them a coat of General Finishes gray stain, rubbed off the excess with a clean rag, and let dry.

Then got hoppin’ on my engineer prints. I found out that Staples now has COLORED engineer prints, so these huge sheets cost less than $4! (I’m excited to try these babies out on more projects with color, but that’s a subject for a different day.)
I ended up designing the storybook text I wanted in Picmonkey, which is the easiest program to use if you want a large print since it exports in a high resolution. I used the font Caslon Antique, if you like that look.

To attach the engineer print to the plywood piece, it’s really important to have a patient partner helping you.
I like to line up the engineer print exactly as I want it on the plywood piece, lift up one end of the engineer print, and use a sponge brush to apply a little Mod Podge on one edge of the plywood, a strip of glue 2-3 inches wide.
I carefully lay the edge of the engineer print down and press and smooth it in place with a plastic card to act sort of like a squeegee. I work out the bubbles in the paper before moving further down to the next few inches on the print to apply more Mod Podge.
As I glue/press/squeegee my way down, Robert holds up the non-glued end of the engineer print so it doesn’t fold or crumple up as I work. Slow and steady wins the race on the gluing step.

I still ended up with a few tiny creases on the print, but it’s very hard to tell unless you’re really looking for them up close.
To frame the signs, Robert measured and cut the 1″x2″ boards I had stained earlier, attaching the top and bottom to the print / plywood piece for the frame first using wood screws to make them extra sturdy.

Then, he measured the sign on the sides with the newly added top and bottom frame pieces to cut the 1″x2″ sides. He attached the sides of the frame with finishing nails so they would be less visible. (We used wood screws only on the top and bottom because they’re not visible but they’re sturdier.)
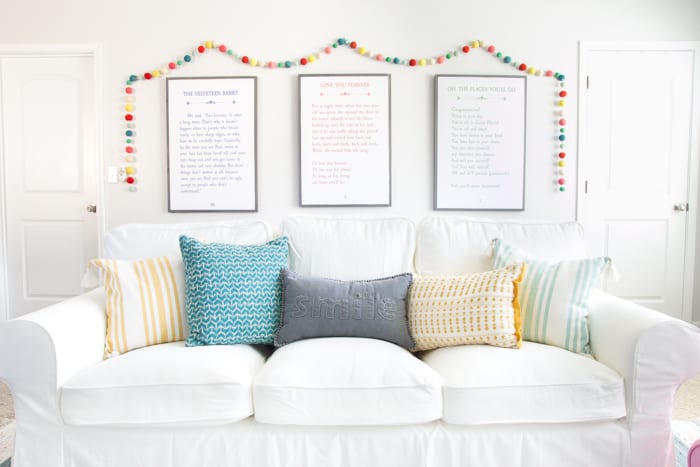
After that, we just attached our hanging kit, placed it on the wall, added some whimsical pom pom garland on top, and we were done!
I chose these three excerpts from these children’s stories in particular because they each convey a unique message that I wanted Olivia to grow up knowing.
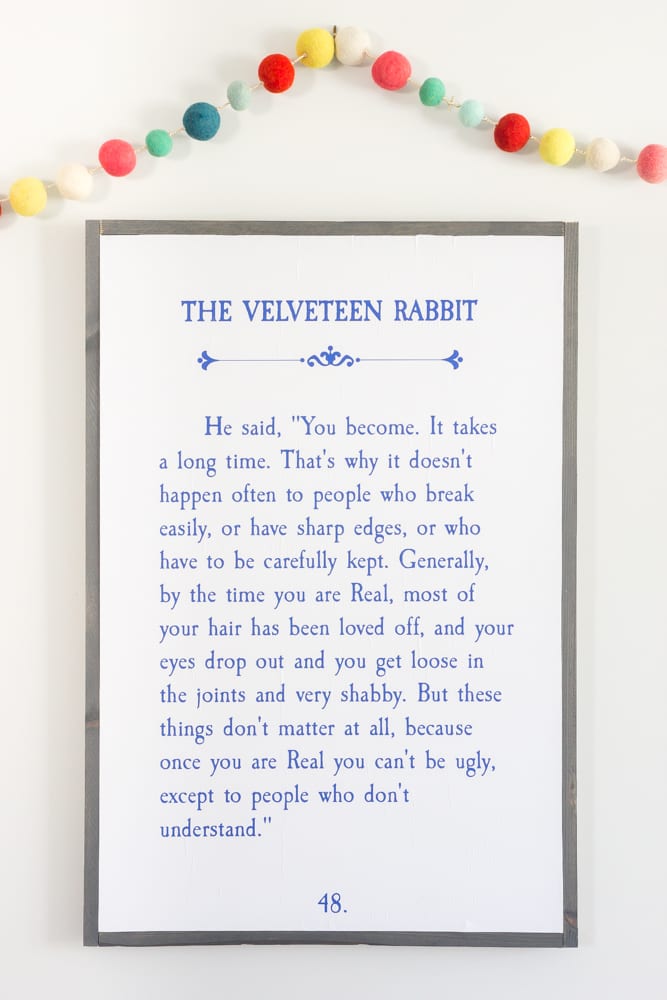
So that she will always know true beauty lies within from The Velveteen Rabbit.

So that she will always know she’ll be our baby, no matter how old she gets from Love You Forever.
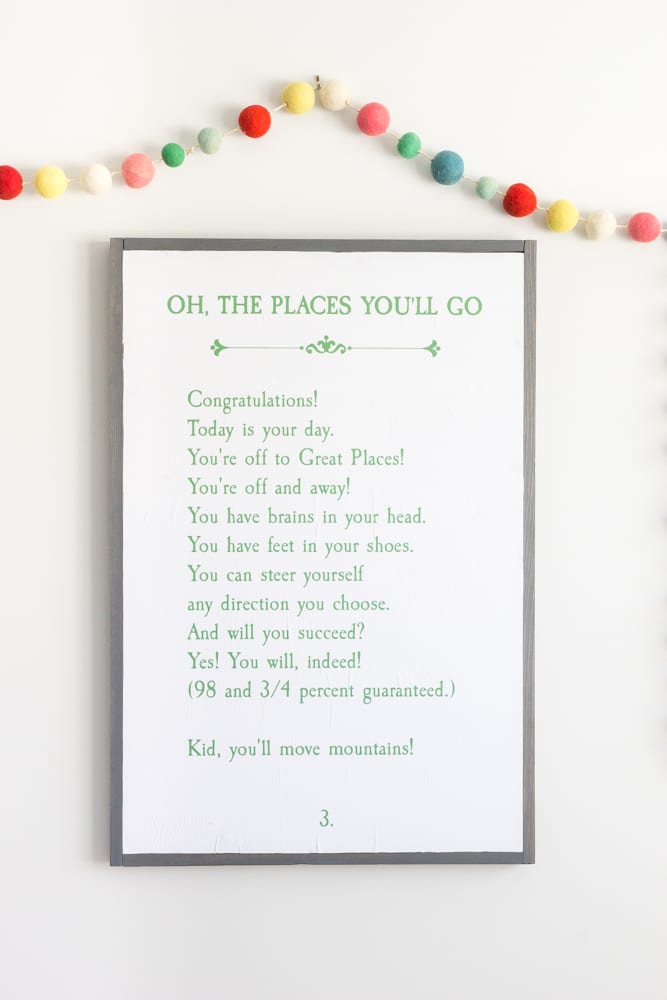
So that she always feels empowered to conquer her dreams with a little hard work and determination from Oh, the Places You’ll Go.
Because even though this room is meant for coloring and playing with dolls and banging those noisy percussion instruments that make me wonder why I ever thought it was a good idea to buy them in the first place, I want this space to communicate so much more.
Sometimes it’s a scary world out there, but I want her to know the best way to change any of it is with love and compassion. To be real, to achieve great things, but to always appreciate her past that wrote her own story.

Whew! Did it get dusty in here all of a sudden? I’m all weepy over a sign tutorial. How did that happen?!
So I’m curious. If you were to make a storybook sign, which story would you choose? There are way too many good ones out there… says the book-wormy former English teacher. 😉


Hi there! I am So in love with these sweet story book art frames. I’m subscribed to your newsletter and am trying to download the free printable but the link isn’t working. Could you help me out please?
I’m sorry you’re having trouble! Is the link to the art not working or the password to get in?
This whole playroom is my inspiration! I am trying to create the story book pictures now. I am having such a problem with Staples. When I go to upload one of your files and I even tried to make my own in pic monkey it says low resolution. I can only find the size for 24 by 36 in the poster section. I know you said you paid 4.00, can you tell us specifically where you printed them from staples website.
Thank you for everything!
There’s a Staples print section of their site. Just uploaded it there and had it printed out.
Love these signs! I have some brown particle board I was going to Modge Podge the paper to. Do you think I should paint the board white before applying the paper? Wasn’t sure if the brown would show through. Thanks!!
Hi, Emily! Good question. I had to google it. If you have extra paper of the same as your storybook print, I would test a small piece and see if the brown shows through. From there decide if you need to use paint. Let me know how it turns out.
Thanks for the reply! That’s what I was thinking as well. I’ll let you know!
Love everything about this. Where’d you find the cute pom garland?
Those cute strings of fun came from Target. However, the current version is a bit different. I think they are just as cute!! The link to them is https://rstyle.me/n/dbthpab5ky7. There are single strand garland here https://rstyle.me/n/dbthm2b5ky7 at World Market.
I’m so excited to make these for my playroom! I am downloading the documents to Staples & it looks really small on the 24 by 36 option. What size paper do you print these on? It looks like better on the 24 by 18, is that right? It says to cut the boards to 24 by 36, so I assumed that would be the size of the paper as well?
Yes! Ours were the 24×36 size, but you could print them smaller, if you preferred. It should work as the larger size though.