
How to Hang a Gallery Wall Perfectly Every Time
Gallery wall DIY tricks to get your wall decor right like a professional interior designer every time + simplified gallery wall layout ideas.

How to Hang a Gallery Wall Like a Pro
For the past decade, Robert and I have hung quite a few gallery walls. And I have figured out a few tricks that work every single time (without resulting in Swiss cheese walls with a million “oopsie” nail holes).
Whether you want to display a collection of family photos, a selection of your favorite artwork, a mix of both, or even a display of items not in picture frames at all, creating a gallery wall adds tons of personality.
While the prospect of hanging multiple pieces of art may seem daunting, fear not! In this step-by-step guide, I’ll walk you through the process of hanging a gallery wall like a pro.
Supplies
- Picture frames and artwork: Collect the pieces you want to hang. Make sure they complement each other in terms of style, color, and theme. (See further down this blog post for more ideas.)
- Measuring tape: A must-have for precise measurements.
- Pencil: For marking on the wall and tracing frames for templates.
- Level: To ensure your gallery wall is perfectly straight.
- Hammer and nails or wall anchors: Choose the appropriate hanging hardware based on the weight of your frames and the type of wall.
- Transparent tape: Helpful for planning and arranging your gallery wall layout.
- Wrapping paper or kraft paper and scissors: For making frame templates.
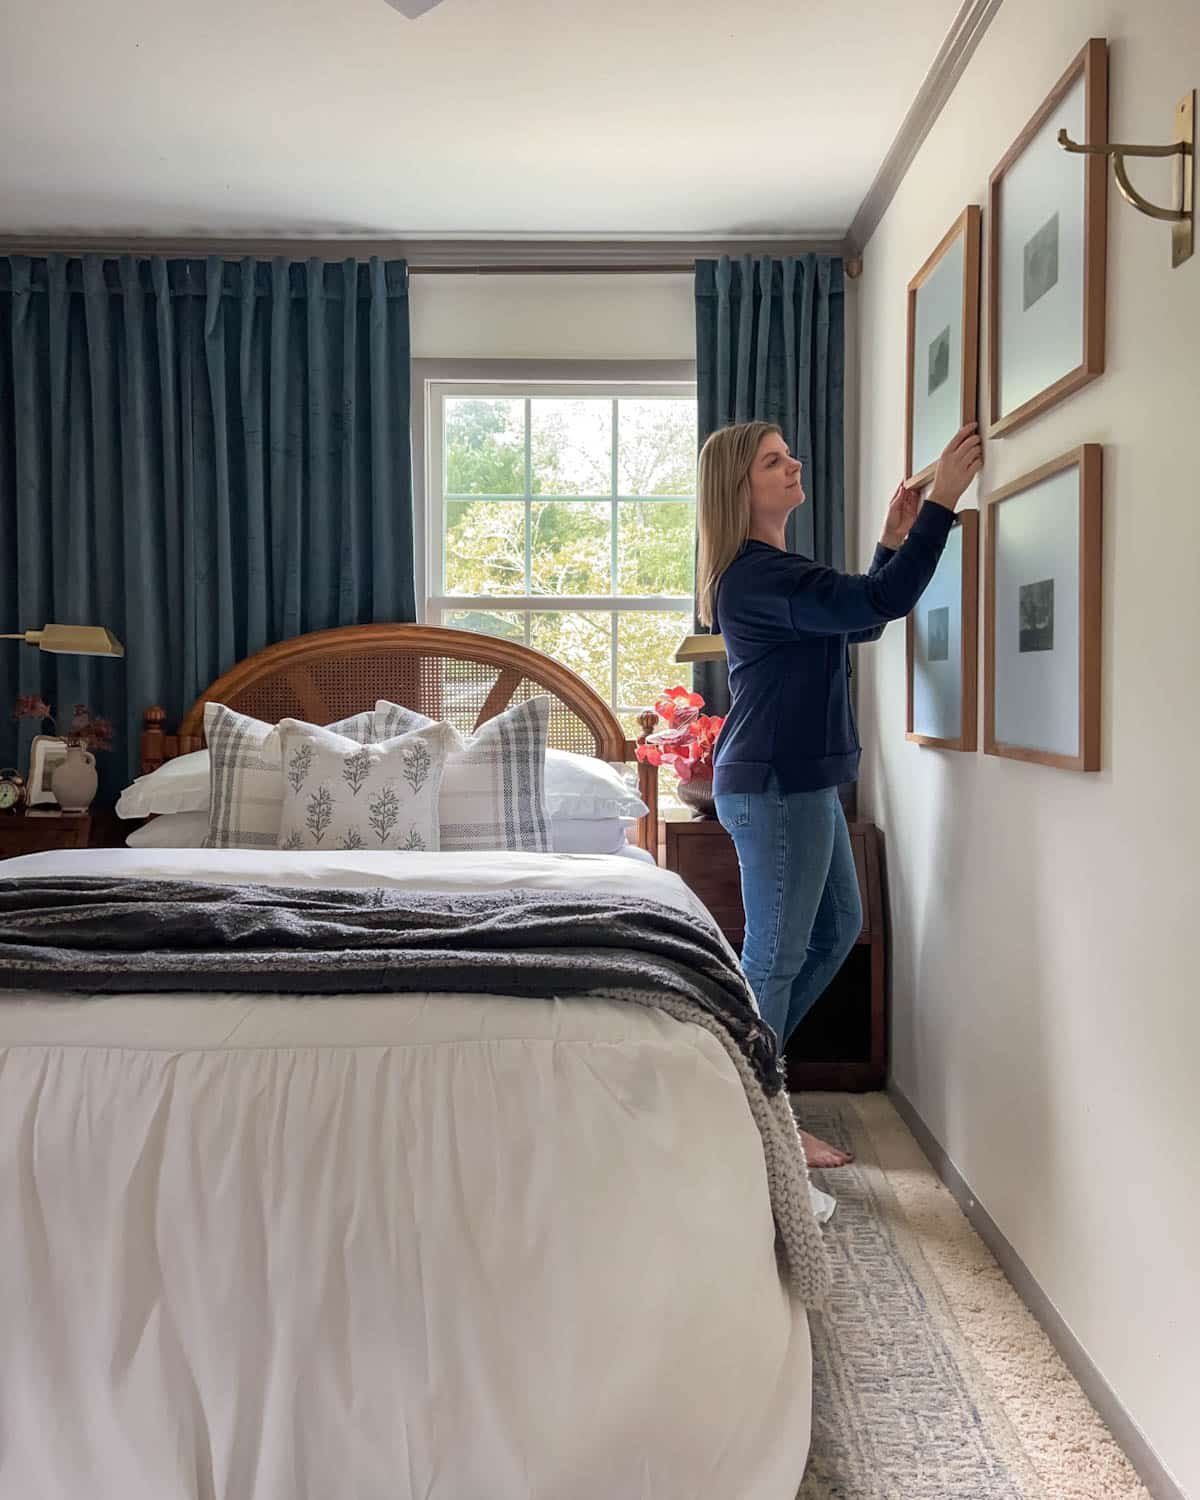
Step 1 – Make Frame Templates
Before I knew better, I used to make a gallery wall at first by just trying to eyeball it. Big mistake, HUGE. (Said in a Julia Roberts a la Pretty Woman voice.)
Our wall started to look like Swiss cheese thanks to all of my nail hole mistakes. So here’s the old faithful trick I always use (and should have used all along).
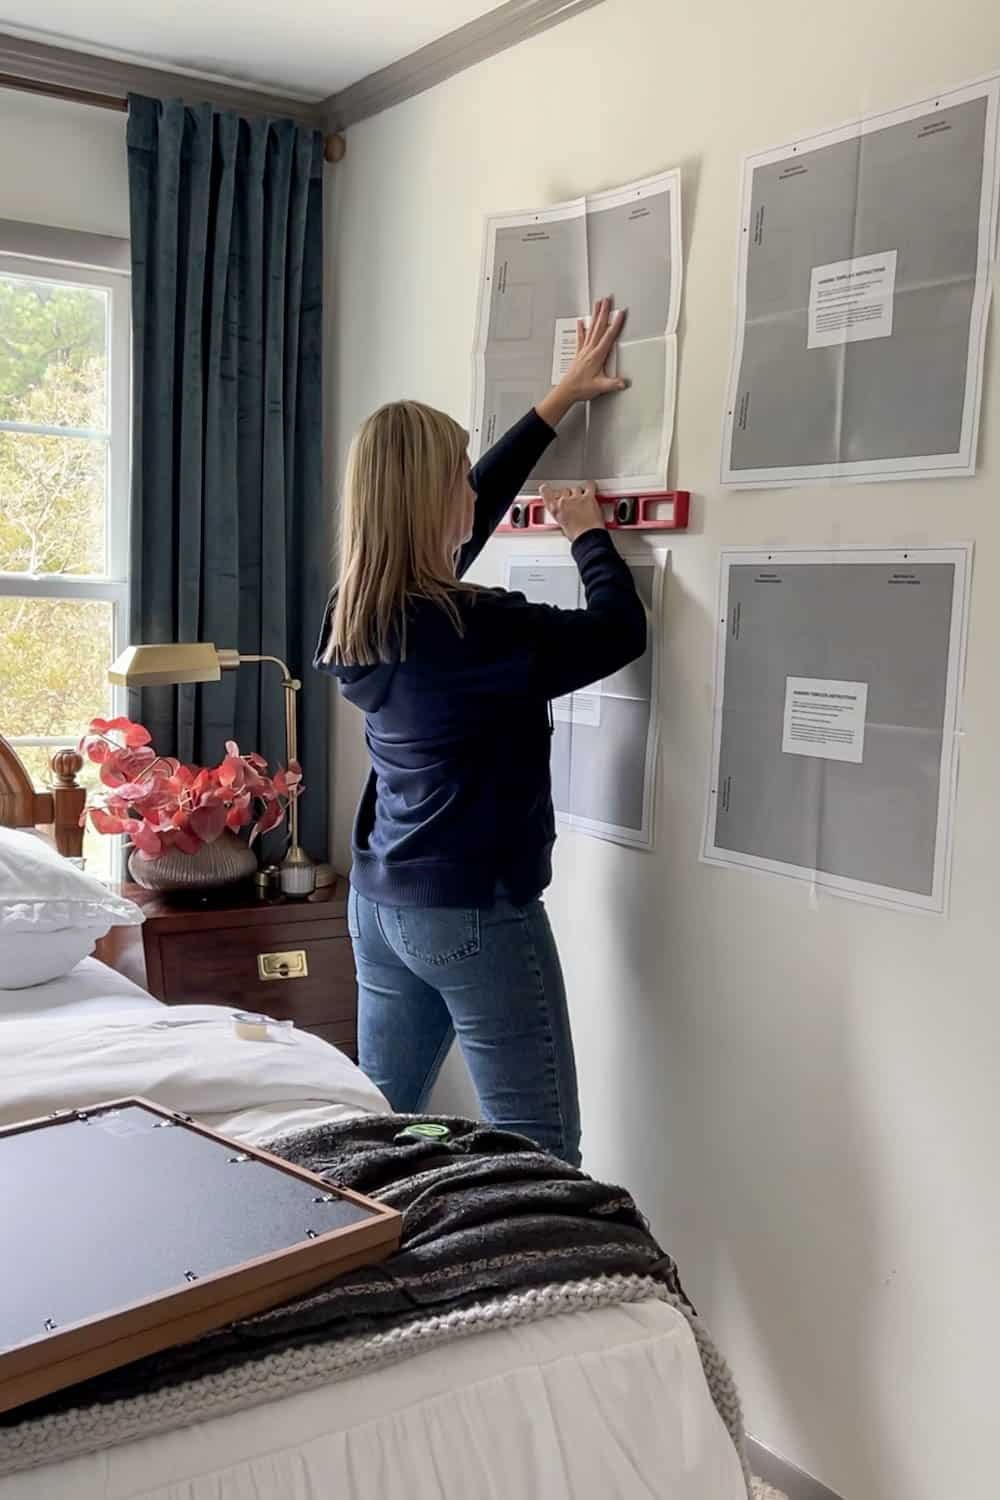
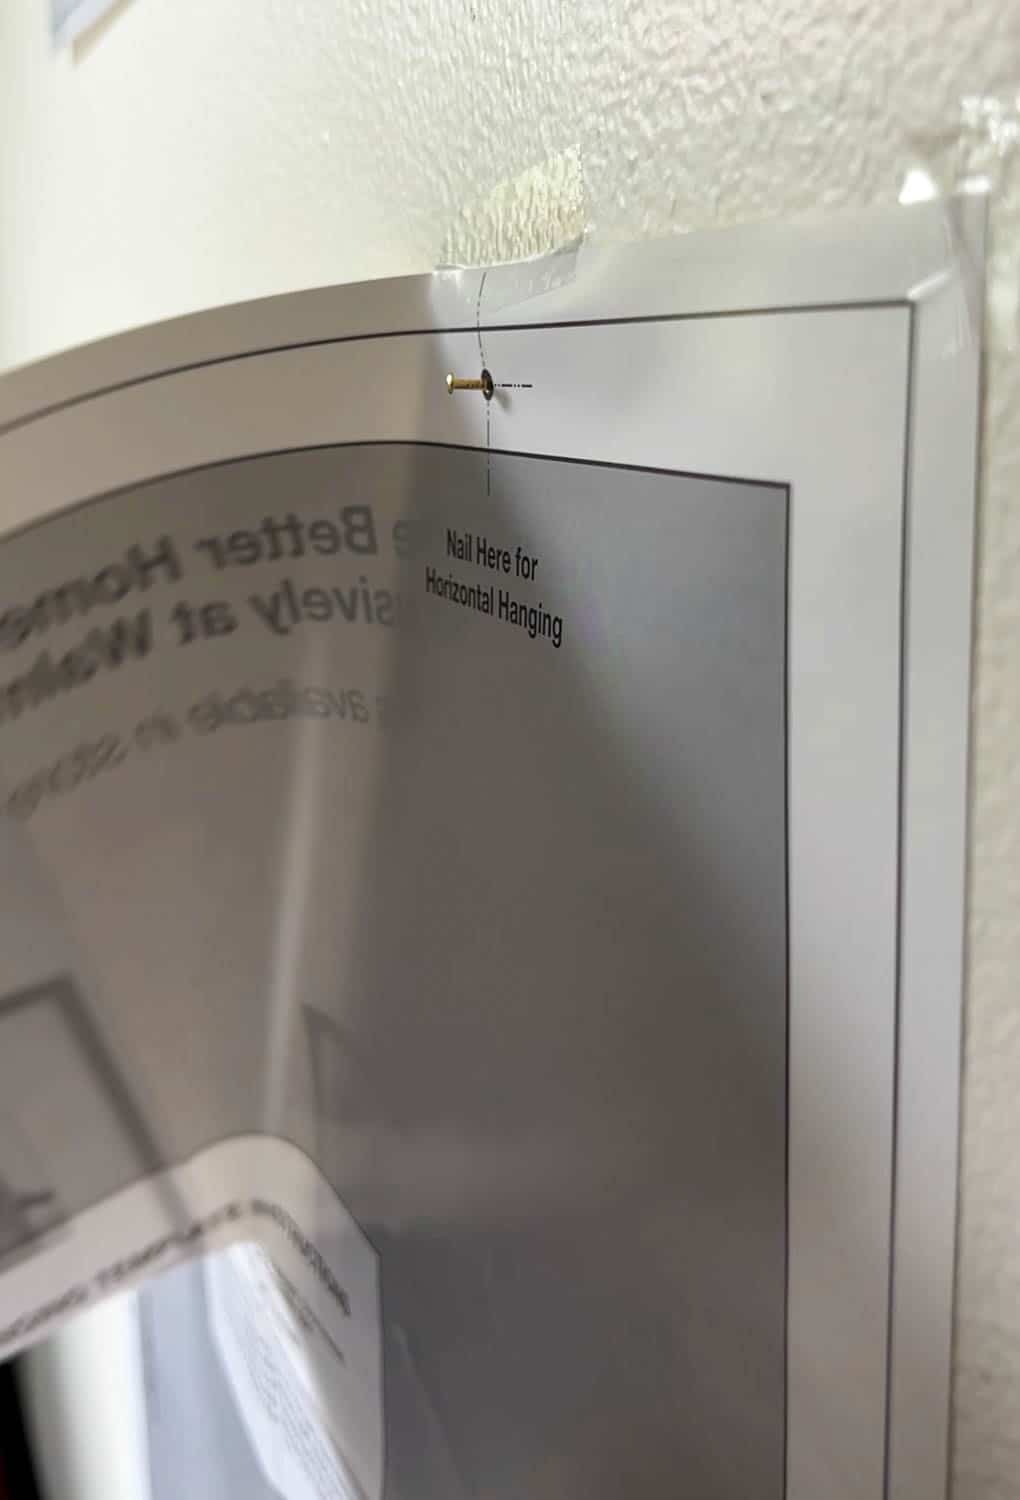
Make paper templates by tracing your picture frames or gallery wall objects onto wrapping paper or kraft paper. Be sure to mark on the paper where the hangers are on the back of the frames as well.
Picture Frames With Templates for Hanging
These are my favorite gallery wall picture frames from Walmart because they have the templates already supplied with them! Such a time saver.
Nowadays, you can even buy pre-designed gallery wall system with templates provided from companies like PictureWall and Framebridge.
But if I’m using thrifted picture frames (which is usually the case), tracing the frames on paper does the trick.
Related: Where to Buy Vintage Art and Picture Frames Online and How to Print Digital Art

Step 2 – Tape Up Templates to Test Gallery Wall Layout Ideas
This is where I definitely recommend using transparent tape rather than painters tape, if you can help it.
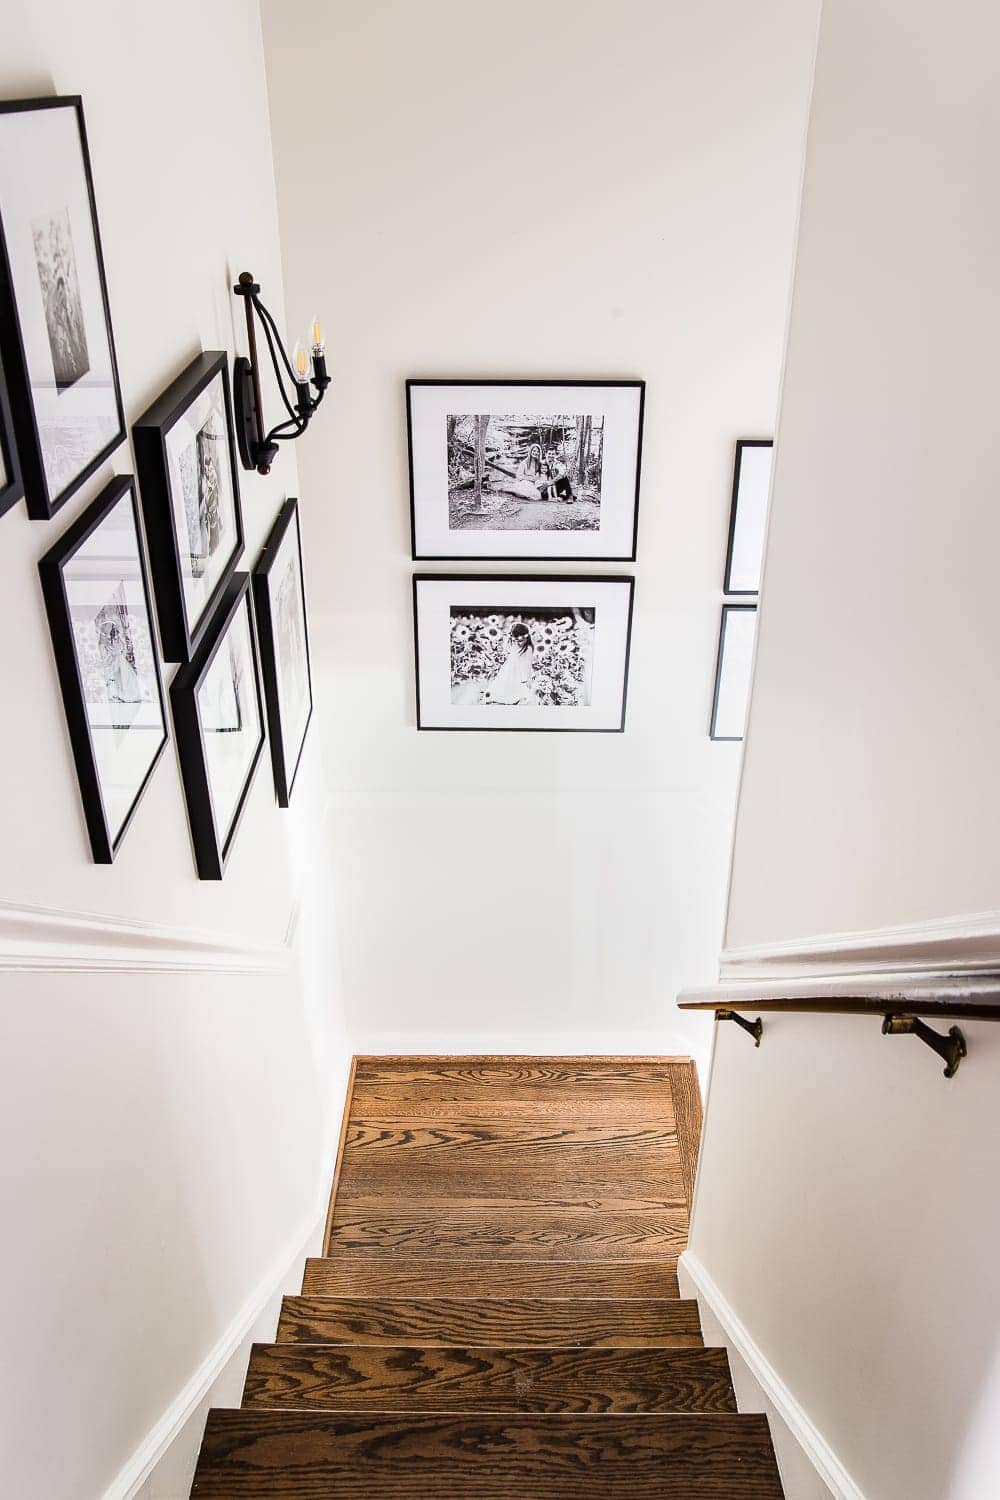
When planning our staircase gallery wall, I used painters tape on wrapping paper templates, which was a little distracting.
Tip: When planning a staircase gallery wall though, taping up a long diagonal line along the base of your layout does help as a guide for placing the corners of picture frames.

But when I made a mirror gallery wall in our dining room, I used transparent tape on kraft paper templates to test different configurations.
It was much easier to focus on the picture frame layouts using transparent tape rather than be distracted by the bright green or blue painters tape.


Tips for Choosing the Right Gallery Wall Layout
Start Bigger
There’s a fine line between a well placed gallery wall and one that just looks cluttered. If you stick to hanging a bunch of 5×7 frames and smaller, the gallery wall is going to look chaotic and messy.
Larger pieces ground the layout, especially if you have tall ceilings. 11×14, 16×20, and 20×24 frames are the best to start with, depending on the size of your wall.

Fill In With Smaller Frames
Place where you want your large frames first, and then fill in with smaller sizes.
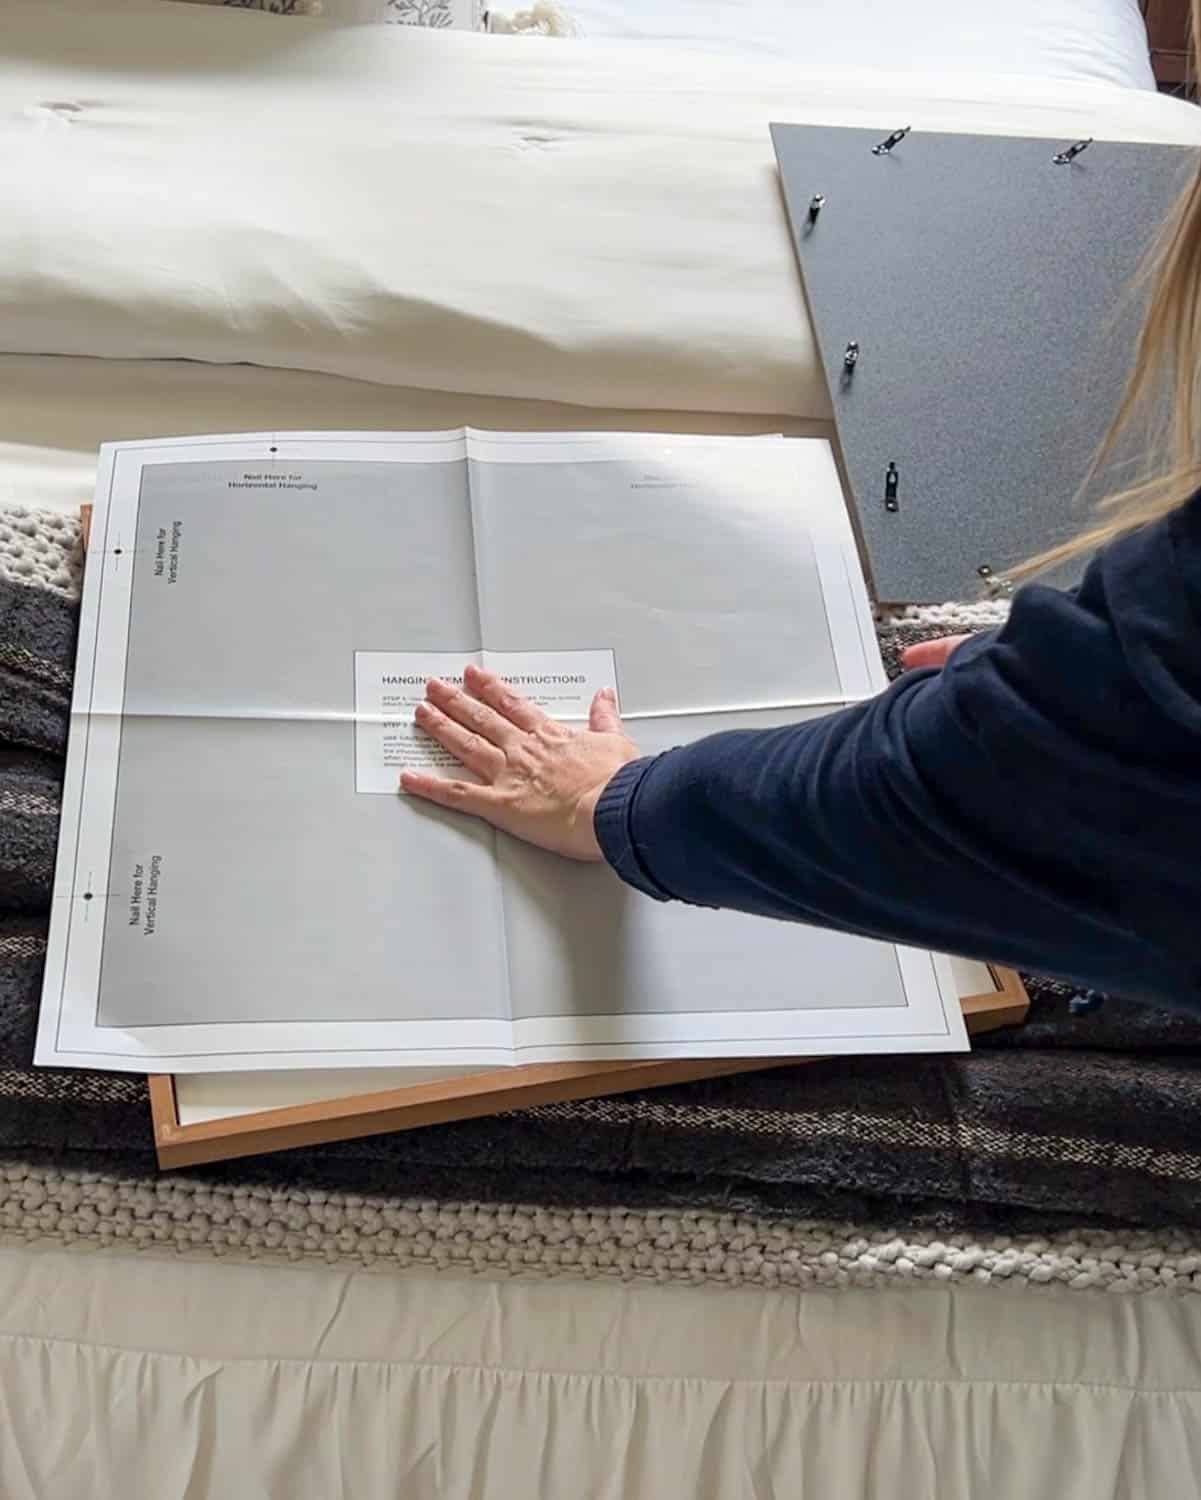
So for our stairway, I started by placing a cutout of this larger 16×20 frame at the top of our landing.

Add Unframed Objects to Make an Eclectic Gallery Wall
Especially when hanging art in kids’ rooms, it’s so much fun to add items that aren’t your typical framed art to add some personality. Use those as the finishing touch.
In this gallery wall we did for two teen girls, I hung up a hat and basket of flowers to soften the rigid rectangular frames.

In this beachy bunk room we did for three girls, I hung up a ukelele, pennants, and ribbon for extra whimsy. Using unframed objects in gallery walls is a great way to add an eclectic style to a room.

Focus on a Color Scheme
Stick to monochromatic or a consistent color scheme.
The more frames you have, the more cluttered it will look if you use lots of colors in your gallery wall. So I try to stick to a “theme” of colors.
I love black and white because it’s simple and classic. But you can stick to a pastel color palette or primary colors or a scheme of different shades of blue, whatever your style.
Consistency helps make the collection intentional.
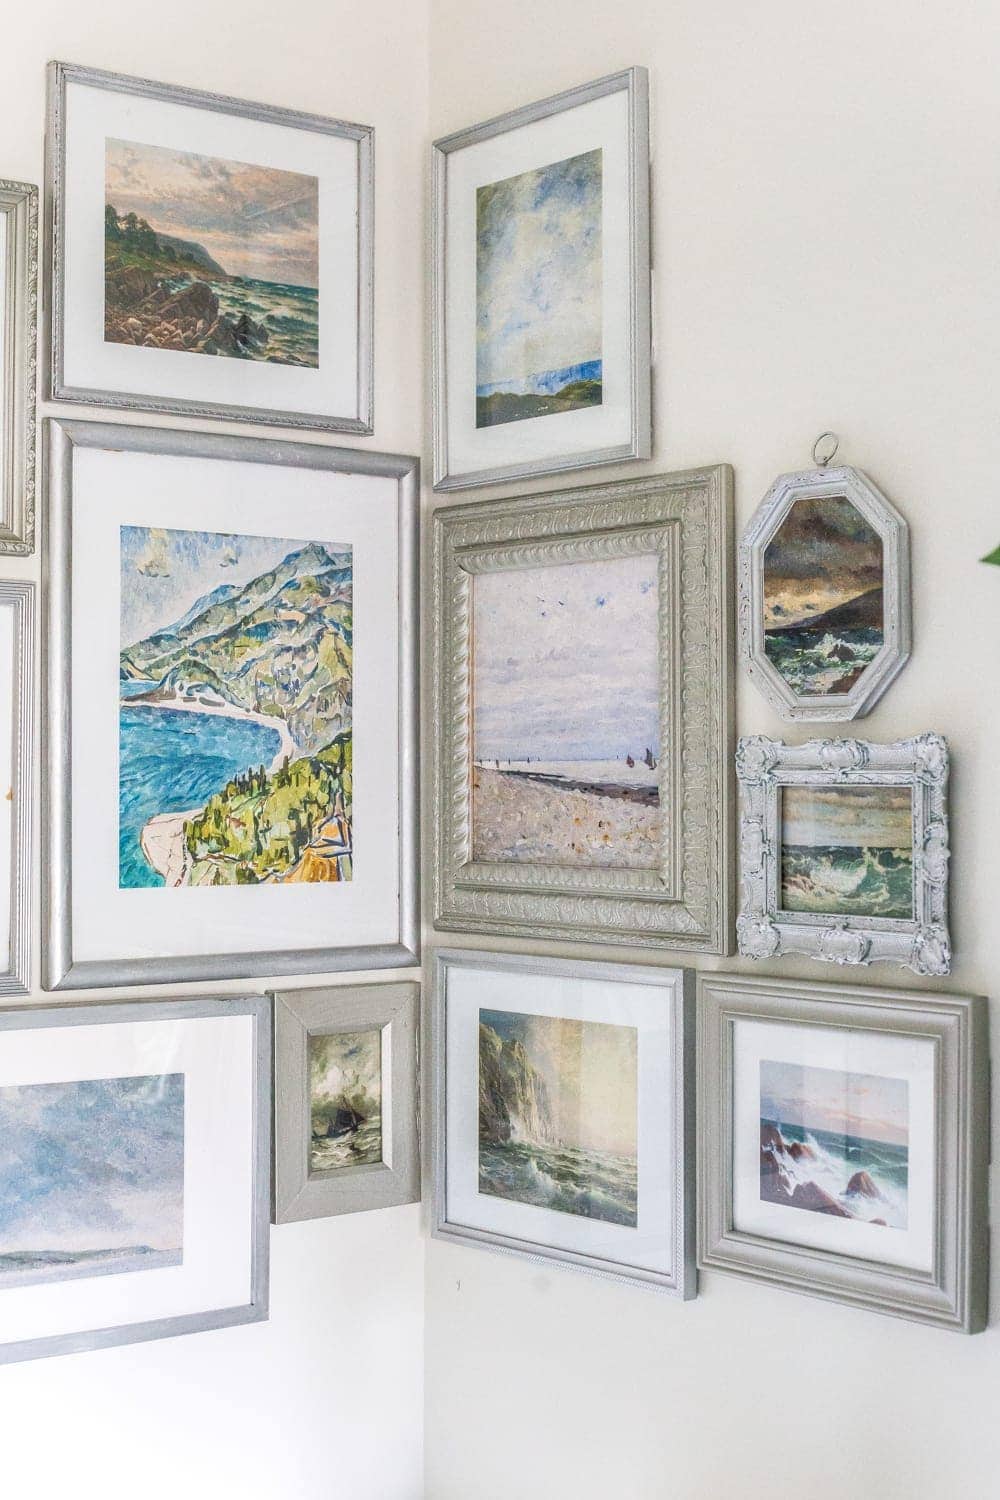
Consider Matting
Mat your art/photos if you want it to look more high-end.
A photo or a piece of art just feels more important if you stick it in a crisp, white mat. Couple them with black frames and you have an instant classic. So if you want your wall decor to feel more upscale, mat what you display. (For a more traditional look, choose ornate frame styles instead.)
I like to buy frames already matted from IKEA, Target, or Walmart, but if you want to mat any thrift store frames you stumble upon, you can usually get pre-cut frame mats for around $5 with a coupon at Michael’s
Some of my frames were originally silver and gold, but I spray painted them matte black to look like nearly identical Pottery Barn frames. (Mine were a quarter of the price though. Ha!)
Gallery Wall Layout Ideas
Here are a few gallery wall decorating ideas for arranging layouts that could help.

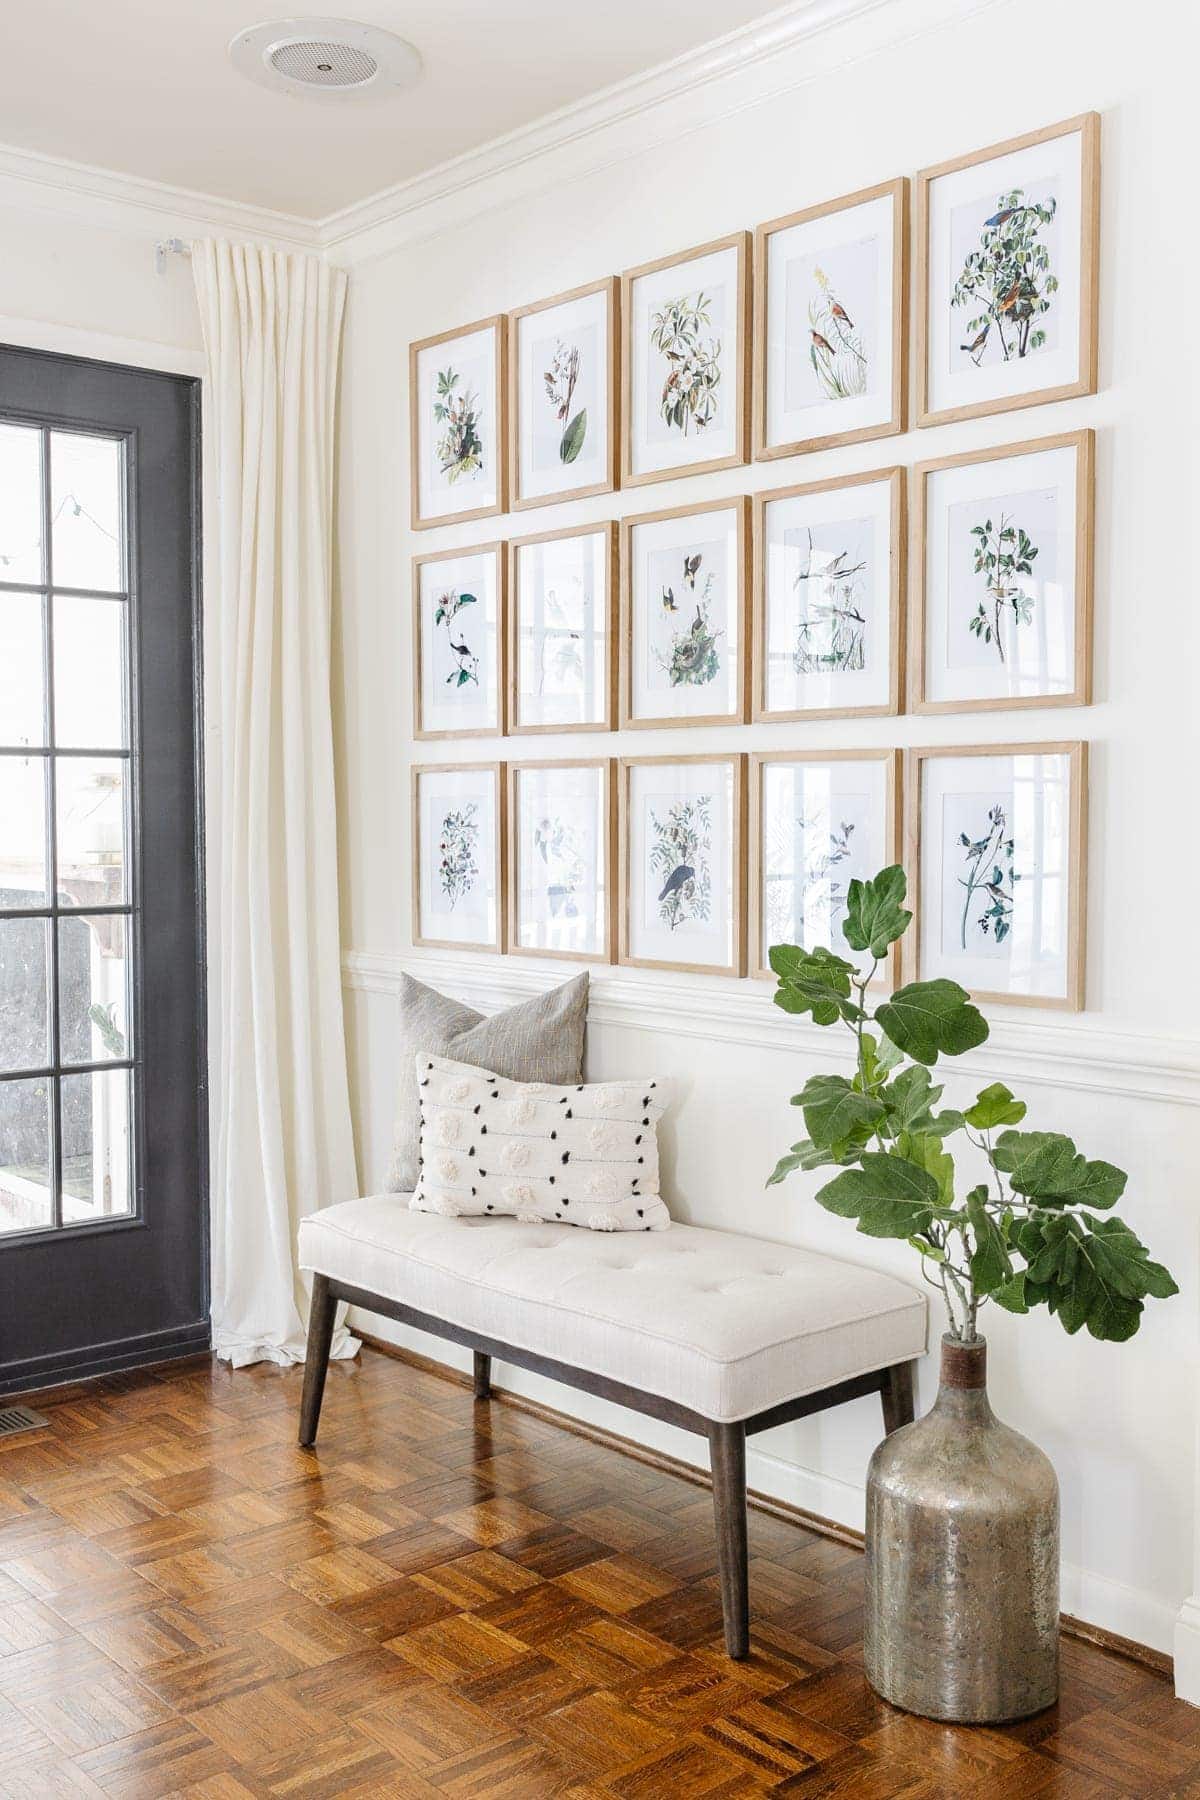
When in doubt, a simple grid is always a great way to get a clean, minimalist gallery wall. This Audubon gallery wall in our living room is a classic.
Related: 20 Creative DIY Wall Decor Ideas for Your Blank Walls
Step 3 – Measure and Level
The general rule is keep your frames between 2-6 inches of each other so they look like an intentional grouping.
It’s best to keep the center of the gallery wall about eye-level (approximately 60″ from floor to center for most people).
Related: Mistakes Most People Make When Hanging Picture Frames

Right before putting any nails in the wall, check your layout with a level to make any final adjustments.
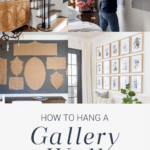
Step 4 – Hang Your Frames
Here’s where having paper templates really comes in handy! Use the hanger markings on the paper to hammer nails right through into the wall. Then, just rip the paper and tape right off the wall.
Your nail will be in the exact place you need it to be to hang the frame.
Related: How to Install a Picture Light Without Hardwiring
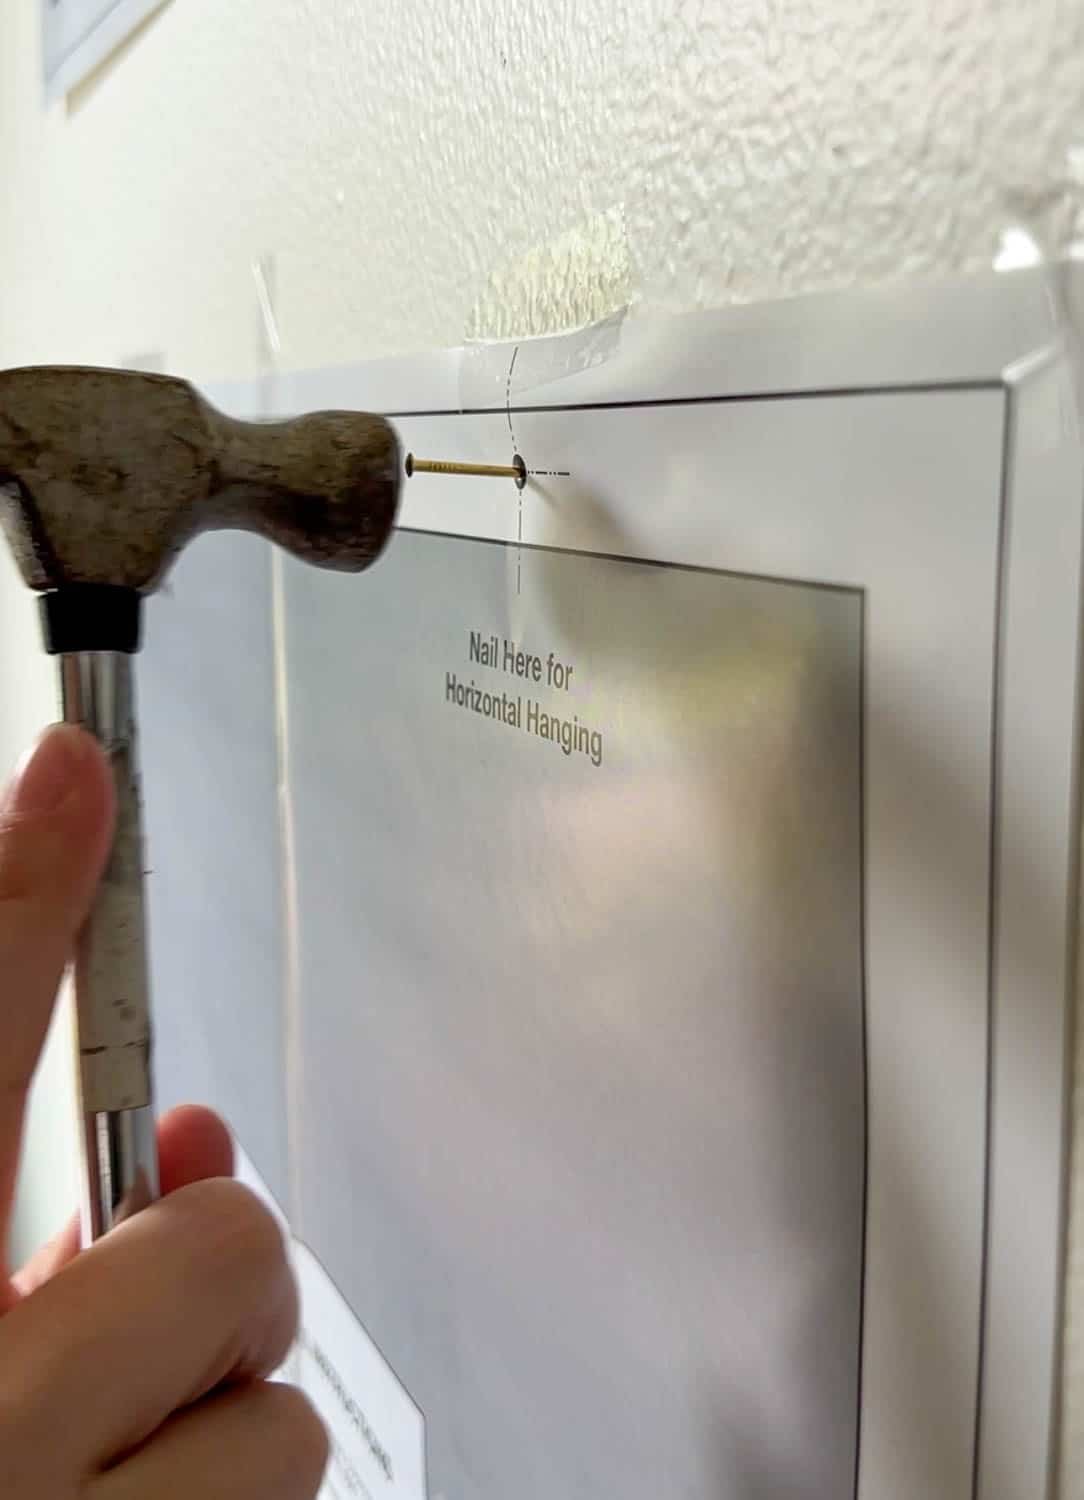
This is what the Walmart picture frame template looks like, but you can replicate the same concept on your own DIY gallery wall templates made from wrapping paper / kraft paper.
More DIY Wall Decor and Gallery Wall Ideas with Art Prints
- 20 Creative DIY Wall Decor Ideas for Your Blank Walls
- Audubon Bird Art Gallery Wall and Free Printable Set
- Pressed Leaf Gallery Wall and Fall Entryway
- Mirror Gallery Wall from Thrifted Frames
- Where to Buy Vintage Art Online and How to Print Digital Art
- DIY Large Wall Art Magnetic Memo Board
- DIY Large Scale Wall Art from a Shower Curtain
Every time I walk up our stairs, I find myself lingering around all of the sweet photos on our staircase wall from my and Robert’s past 12 years together. Snapshots from our engagement, our wedding day, Olivia and Regan’s firsts as babies, all of their little changes and growth spurts.
It’s amazing how a space can be completely transformed and some of life’s favorite moments can be captured in a gallery wall.

I never ever want to take a single memory for granted, and I love that this stairway keeps what’s most important at the very center of our home. It’s a reminder I need sometimes in the busy day-to-day hustle.
Do you have any tricks of your own to hang a gallery wall? Or do you have a gallery wall space with some of your favorite art pieces already hanging in your house?
Once you start, it’s hard to stop.
You can get more DIY design help with a free Style Finder Binder guide and access to more resources here:


Hey! I love the look of your gallery wall. I am wondering if you might be willing to share the exact dimensions of each of the frames that you used in the gallery wall?
Unfortunately I never took down that information and we have moved. However, If you you take the area of your wall and take the dimensions of your frames, you could create a similar look to fit your space. I look forward to hearing how it turns out.
Hello Lauren,
Just discovered your site and feel at home as my entry is a duplicate of yours, same left turn step set up, same hand rail with similar spindles and lots of oak, white chair rail. My style is more ornate or “fru fru” as my mother called it. (I love all things French and was in heaven at Versaille.) Mother was an interior designer mostly restoring old farm homes, so of course I did my own thing. Your site is wonderful, really like all you have done and how warm and friendly your style is. Thank you for the wonderful printables. Will use a few in my kitchen which leans more towards country. So interested to follow your decorating adventures and learn from your findings. Your home is so warm and presents such a warm and happy feeling. You are on the right path, trust your judgement. Considering your picture placements up the stair walls, had not thought to do that. Will let you know how that goes! Like the idea of paper first to get the feel of it. Wow, I learned a lot this evening! Bless you for sharing.
This space is so elegant! I’m subscribing and following all your social media spots and anxious to get caught up on your beautiful home.
Thank you so much, Rebecca!
Beautiful, Lauren. It is lovely to see your wedding photo and baby Olivia is to cute for words. I have mine (gallery wall) matted, in black and white too, but after seeing your thinner frames like yours better lol. Oh well, at least we have them on the walls to enjoy. Thanks for sharing another wonderful inspiring space with us. Can’t wait to see your new house decked our in her christmas finery. I have been thinking alot about mine and have to confess, I have spent just a bit cough cough ahem, alot to much on new christmas decorations and won a bidding war tonight on a christmas tree. I’m blaming it on needing to write my first christmas blog post, cause it couldn’t be any other reason. Right? Right, thanks.
Yes, yes, a thousand times yes. I love the way your gallery wall here looks so cohesive, but it still tells your story. Kudos to you for doing it in an affordable way!
My only current gallery wall is in my bedroom. I was stumped for artwork for above a large dresser, and I finally decided on a gallery wall of mirrors. Some of the mirrors I purchased, and a couple I created! I used the paper cutout trick for hanging the mirrors (you’re right; it’s so helpful!). Several years later, I’m still enjoying it. You can see it here if you like: http://www.impartinggrace.com/2012/10/gallery-wall-of-mirrors.html