How to create Pottery Barn and Restoration Hardware knock off no sew dining chairs using 1970s castoff chairs.
I thought this day would NEVER come. If there has ever been a post where I wanted to do cartwheels across my front yard from revealing the “after” of a challenging makeover, this would be it.
I have a tendency to bite off more than I can chew. I see a fixer upper project, my wheels start turning with ideas to make it something amazing, I hit a major snag, I realize that my dreams often exceed my abilities, and I end up shoving it to the bottom of my to-do pile in my garage never to see the light of day again. (Am I alone in this? Please tell me you have a when-I-get-the-nerve pile too.)
But y’all. Oh my GOSH, I am so ecstatic to show you that my abilities finally caught up to my wild DIY-driven imagination…this time at least. So I’ll save you the time of scrolling to the bottom of this post to see the final reveal:
Just so you know where this big undertaking started, this was how it looked before my upholstery-inexperienced self could get a hold of it.
Well hello, Harvest Gold. Haven’t seen you in a while.
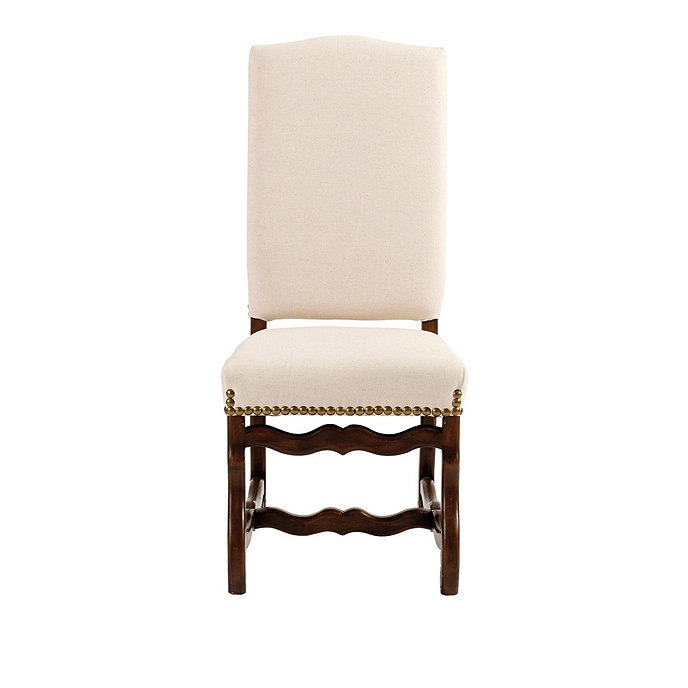
When I first started envisioning what I wanted in our still very bare dining room, I kept coming back to the same criteria in dining chairs- light linen/canvas, statement-making nailhead trim, and interesting weathered oak legs.
This one from Restoration Hardware was an absolute dream:
Restoration Hardware Baroque Upholstered Side Chair- $449
And this one from Pottery Barn:
Pottery Barn Calais Chair $349
And this one from Ballard Designs:
Ballard Designs Capistrano Dining Chair- $429
But there was one minor little problem. There was no way on God’s green earth that my stay-at-home-mom one-income household could shell out $2400 for a set of 6 chairs. So I swooned and dreamed until I stumbled upon these babies for $20 each on Craigslist. (Which was all the way back in March and then sat in my garage as I tried and failed at this project multiple times.)
They needed some lovin’ and a good bit of updating, and they looked nothing like my inspirations. But they had good bones. I simply couldn’t walk away from them. So my wonderful dad, who has worked in the furniture business for over 30 years, made the trek with me to pick them up.
Not only did they have good bones, they were made by American Drew, a very high quality company, and they were incredibly sturdy. Huge plus!
Supplies used: (Affiliate links are provided below. For more information, see my
full disclosure.)
Thankfully, I had a lot of the supplies already on hand in my workshop and could borrow the staple gun. In the end, I only had to pay for the nailheads, drop cloth, spray adhesive, cardboard, and egg crate foam.
My final cost: $40 per chair! (Craigslist cost included)
Even without having a lot of the supplies, it’s still a bargain. My entire set of 6 chairs combined cost way less than even 1 Pottery Barn chair.
Here’s what we did:
Since I wanted to upholster the entire backs of the chairs, I knew the curves were going to be tricky. So Robert and I cut off the finials first.
From there, my father-in-law, the woodworking master, gave us a few pointers, and we decided to cut straight edges marked with a level.
We avoided cutting into the caning.
Then ran the jigsaw over the straight marks.
We sanded the edges down for good measure. (Side note: I love this hardworking man.)
Yay! No more tricky curvy top! From there, I primed the bottom half of the chairs.
Then I painted on two coats of Valspar Montpelier Ashlar Gray.
Once the paint was dry, I used a sponge brush to put on a coat of the stain. I let the stain sit for about 10 minutes before wiping it off with a rag, and I worked in sections.
And I was left with this rich wood tone with just enough gray peeking through to give it that weathered look. The wood grain texture on these chairs are amazing!
Once the chairs were dried, this was where the hard part began.
By the way, mattress foam toppers are way cheaper than specialty upholstery batting. And so so comfy!
We went ahead and traced the back of the chair onto a piece of cardboard with a Sharpie. (I promise I did way more work than stand around taking pictures of Robert.)
And cut out the traced shape.
Using the cardboard as a template, I traced the egg crate foam as the batting.
And cut it out with scissors.
Then we sprayed the front of the chairback with upholstery adhesive.
We pressed the batting onto the adhered chairback.
And it was ready for fabric! (We stapled the drop cloth fabric to the seat while the chairs dried before.)
To decide on the amount of drop cloth fabric we needed, we measured the width and height of the chairback and added 4 inches all around to be on the safe side. Our chairs were 16″x28″, so we marked the fabric to be 24″x36″ for the front piece.
And cut them out.
To create a panel for the back of the chairs, we used the cardboard template and traced around it, leaving an allowance of about 2 inches. We put these back fabric pieces aside for later.
Once we started positioning the front piece of the fabric, it took some time to work with. We started by stapling the bottom center first.
For the sides, I started by folding the bottom flap under to make it straight and stapled it around to the back of the chair.
This was definitely a two-person job. As we worked our way up to staple the sides, I stretched the fabric up while Robert pulled the fabric tightly around the side and stapled, making sure the front was smooth with no puckering.
Tricky stuff, I tell ya but it worked.
At the top, I was thanking my lucky stars that we went with cutting straight edges. We started on the sides by folding the corners and cut a little at any places we needed to pull more tightly.
And then we breathed a sigh of relief because the hard part was done!
We went over the staples with a hammer and cut off any excess fabric on the back.
To make a back panel, I hot glued the edges of the cardboard cut-out and pulled the fabric tightly, starting at the bottom.
For the top I cut the corners and pulled them to glue down.
The edges of the panel and the stapled edges of the back of the chair got a good brushing of contact cement.
After waiting about 10 minutes, I pressed the panel to the back of the chair. I applied hot glue under the edges too.
Hey, look! An upholstered chair! Not bad for someone who is making this up as she goes along. I pressed out the wrinkles afterward too (this photo was a dead giveaway that it needed it).
For the nailheads, we used a tape measure and a pencil to mark every 1.75 inches.
Since the wood of these chairs was so hard, we had to use a small drill bit first.
Then, we hammered away on the nailheads.
Lucky for us, my parents and grandmother offered to take Olivia on an outing while we knocked out this project. But she got to help for the last step. 🙂
She insisted on handing the nailheads to her daddy the entire time.
And that was it!
It’s definitely not perfect, and I have a lot of learning to do in the upholstery department, like how to wield a needle and thread for once. But I’m so proud of how it turned out.
So now my dining room is looking a little more furnished.
2 chairs down and 4 more to go. The rest have arms so those will be a little more tricky. The goal is to have them all finished by Thanksgiving so our family can fill them. 🙂
UPDATE: They’re all finished! And they’re mahhhhvalous.
I still can’t believe how far we came on this project.
What do you think? Convincing?
If you’re a Restoration Hardware junkie like me too, here are a few more: (Just click the image to find the post.)
I think I have an addiction. 😉
Blessings,
Follow me on
Or find me on


This project turned out totally awesome! I am so jealous! I, also, have a chair similar to this one in need of a makeover. Maybe you inspired me to get moving on it? Great job!
Yay! So glad it could provide some motivation. Hope the tutorial helps!
In. Love. Your chairs turned awesome! What a project, but the results were worth it. Have a lovely week!
Blessings, Deborah
Thank you so much, Deborah! It was a long road but the results were definitely worth it. 🙂
AMAZING! Know what’s CRAZY?? I have the SAME harvest gold cane back chairs in my garage, waiting to be refinished!!!! Seriously. I couldn’t even believe it when I saw yours. I have two as well 🙂 Looks GREAT Lauren!
Ha! Too funny! I have no doubt you’ll make yours amazing, Heather. I’m still blown away by your last chair makeover. You’ve got skills, girl!
Gorgeous, gorgeous, gorgeous! Did I mention I think those chairs are GORGEOUS!! You knocked it out of the ball park with this one, sister!!
p.s. She’s the cutest little helper I’ve ever seen 🙂 -Amy
Thank you, Amy! I have to agree about our helper. I’m just a tad biased. 😉
You, my friend, are a ROCK STAR! I could not love this chair update any more!
Pinning and sharing everywhere!
~ Ashley
Thanks so much, Ashley!
Girl, Girl amazing, stunning, fantabulous, you’ve encouraged me today, having a antique store I’m finding pieces but reluctant to try reupholstering, but you were the person to help me try something I’ve never done before, thank you so very much
I am so excited to read you jumped out of a comfort box!! AWESOME!! Where is your antique store?
They look amazing, thanks for the tips and explanation of what you did.
I’m getting the courage up to start on some used chairs I just purchased.