Bless'er House

  • Home
  • About
    • Contact
    • Advertise / Privacy Policy
  • Projects
    • Room Reveals
    • Budget Decor
    • Home Improvement
    • Organizing
    • Furniture Makeovers
    • Seasonal
  • Tour Our Home
    • Our Current House
    • Our First House
  • Shop Our House
    • Shop Our Current House
    • Shop Our First House
  • Shop Bless’er House
    • Shop Our Instagram
    • Shop BH Style
    • How to Install Lightroom Presets
  • Blog
    • Facebook
    • Instagram
    • Pinterest
    • Twitter

Modern Farmhouse Bathroom Makeover Reveal

October 20, 2015 ~ 179 Comments

Sharing is caring!

29714shares
  • Share
  • Tweet

A modern farmhouse bathroom makeover reveal jam packed with ways to give rustic charm to a builder grade bathroom on a budget.

Boom shakalaka! It’s one of my favorite kind of days. Reveal day!Modern Farmhouse Bathroom Makeover | Bless'er House - So many great ideas to create charm in a builder grade bathroom!I have a tendency to string you guys along through every room makeover it seems. Every single time, it takes longer than I expect to get to the reveal. But it always pays off to take my time.

When we first moved in a little less than two years ago, this bathroom looked like this:

Modern Farmhouse Bathroom Makeover | Bless'er House - So many great ideas to create charm in a builder grade bathroom!

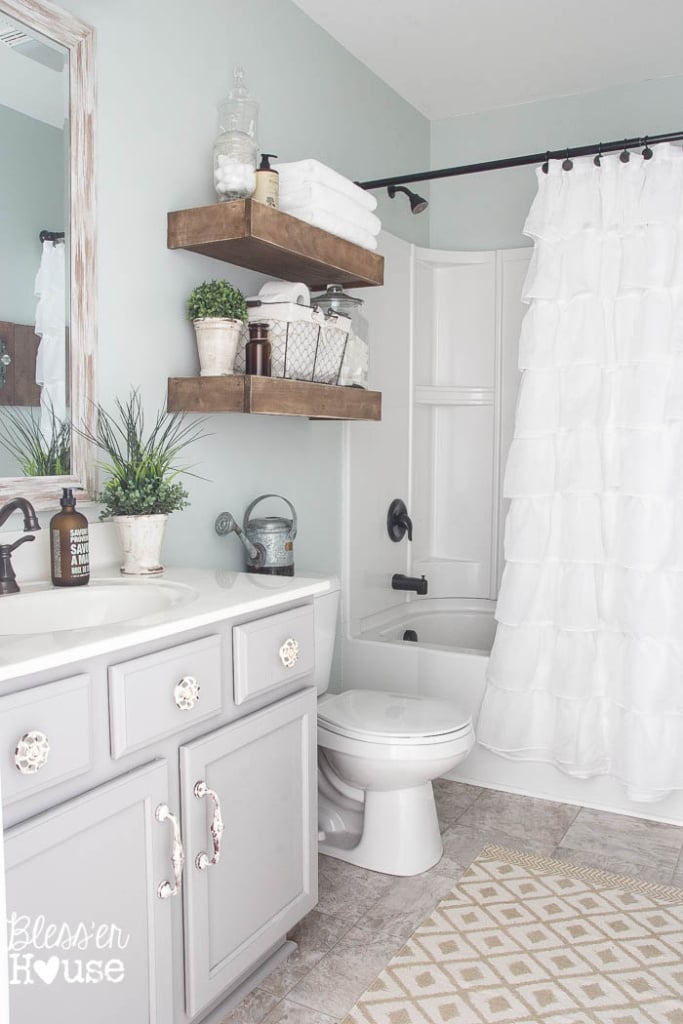
This space is technically Olivia’s bathroom, but since it’s also the one our guests use when they visit, I didn’t want to girlify it up too much. Still, it needed something besides the bare minimum we had going on in here.

Modern Farmhouse Bathroom Makeover | Bless'er House - So many great ideas to create charm in a builder grade bathroom!

My absolute favorite thing to do in most of our makeovers is mix lots of textures to make everything feel more cozy and balance soft, feminine features with the more rough, masculine pieces.

I love how this one came together! My pictures really don’t do this space justice since it’s quite a challenge photographing in a room with no windows.

Modern Farmhouse Bathroom Makeover | Bless'er House - So many great ideas to create charm in a builder grade bathroom!

A lot of leftovers really ended up in here by accident. I hung up that ruffled shower curtain that I once used a few years ago as a photography backdrop when Olivia was a baby. We had fun photoshoots all the time with it.

Modern Farmhouse Bathroom Makeover | Bless'er House - So many great ideas to create charm in a builder grade bathroom!

I put together a towel rack using scrap wood pieces from our garage that were leftover from our master bathroom plank wall. Those doorknob hooks make me smile every time I walk in here.

Modern Farmhouse Bathroom Makeover | Bless'er House - So many great ideas to create charm in a builder grade bathroom!

Even our cabinet paint was reused from a leftover quart. Yay!

Modern Farmhouse Bathroom Makeover | Bless'er House - So many great ideas to create charm in a builder grade bathroom!

Modern Farmhouse Bathroom Makeover | Bless'er House - So many great ideas to create charm in a builder grade bathroom!

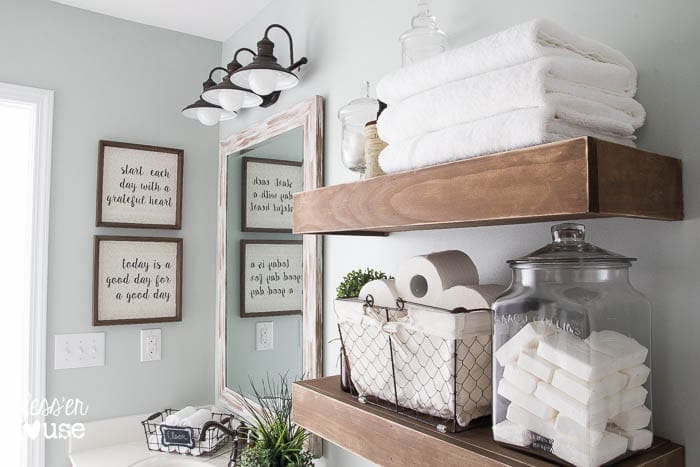
I knew I wanted some chunky rustic shelving in here too, so Robert whipped these up in an hour or two from plans I found on Shanty 2 Chic. They’re so great for beginners!

Once they were up, I stained them with a coat of Minwax Walnut, went crazy with the mouse sander to rough them up, and sealed them with a matte polyurethane. I absolutely love how functional they are for keeping all of the guest amenities in plain sight while still looking farmhouse-y.

Modern Farmhouse Bathroom Makeover | Bless'er House - So many great ideas to create charm in a builder grade bathroom!

And do you want to know a dirty little secret? That brown apothecary bottle is a Halloween decoration I found at Homegoods. It has a “poison” label on the front. I just turned it around and planned to fill it with bath salts. It’s too cute to hide away for winter, spring, and summer anyway, right?

Modern Farmhouse Bathroom Makeover | Bless'er House - So many great ideas to create charm in a builder grade bathroom!

Modern Farmhouse Bathroom Makeover | Bless'er House - So many great ideas to create charm in a builder grade bathroom!

Lately, I’ve been finding so many great organization containers at Walmart, and I couldn’t resist scooping up that chicken wire basket and glass jar for soaps. I’ve learned I can’t shop for groceries at Walmart. I get too tempted to venture to the home side of the store.

Modern Farmhouse Bathroom Makeover | Bless'er House - So many great ideas to create charm in a builder grade bathroom!

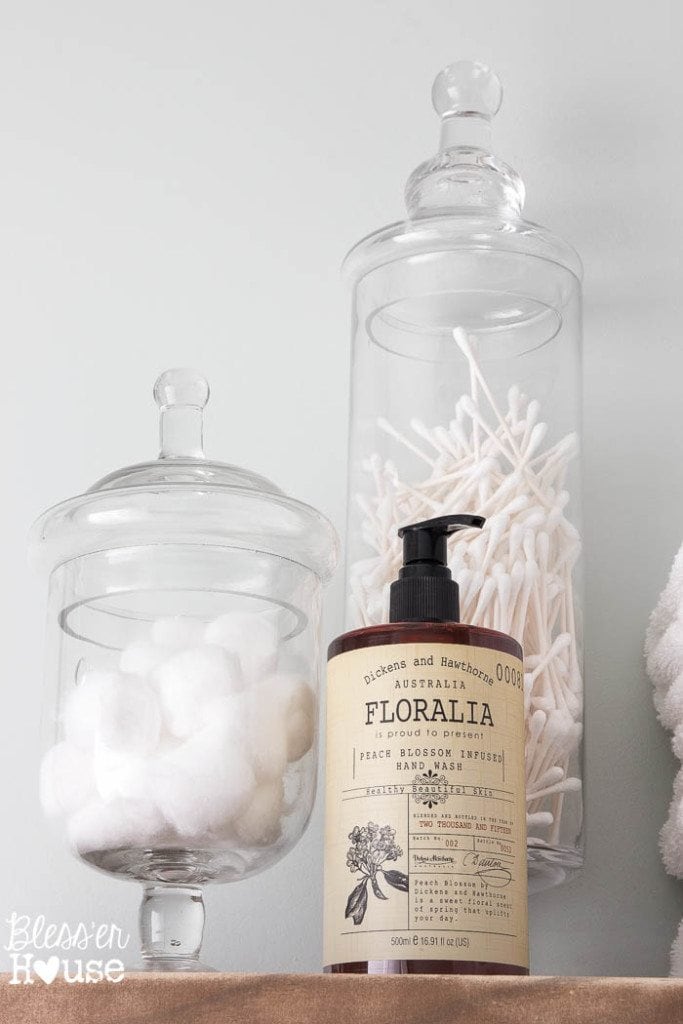
Since we madeover our master bathroom, I’ve realized how much I like storing things in apothecary jars.

1. They make a dollar bag of cotton balls look uber fancy. (How is that possible?) And 2. It helps me keep things out of Olivia’s reach. Several times, she’s made a game out of throwing our Q-tips ALL over our bathroom floor. Yay. Glass jars up on shelves all day every day!

If she Houdinis her way up to this shelf, I’ll be shocked and amazed…and in major mommy freak-out mode.

Modern Farmhouse Bathroom Makeover | Bless'er House - So many great ideas to create charm in a builder grade bathroom!

One of my favorite finds in here was this bathroom mirror I picked up for $24! You can see all about that in this post. I don’t think I’d be able to frame our existing builder grade one for that!

Modern Farmhouse Bathroom Makeover | Bless'er House - So many great ideas to create charm in a builder grade bathroom!

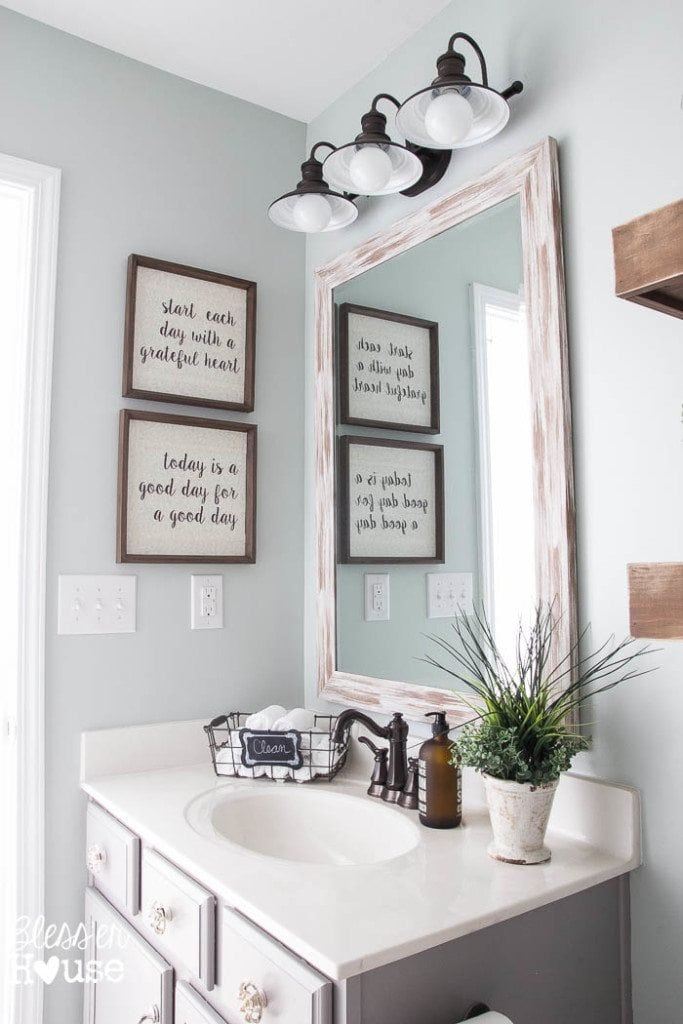
I was thrilled to find this vanity light to replace our basic one too for a pretty good price. Those shades set a really pretty ambience in here when it’s on.

Modern Farmhouse Bathroom Makeover | Bless'er House - So many great ideas to create charm in a builder grade bathroom!

Side note:  I pretty much always make it my rule to stick to bright white towels and sheets in our house. White just feels clean to me. I can bleach all of our linens in hot water and keep them smelling fresh. Plus, white towels are better for your skin anyway.

Modern Farmhouse Bathroom Makeover | Bless'er House - So many great ideas to create charm in a builder grade bathroom!

Modern Farmhouse Bathroom Makeover | Bless'er House - So many great ideas to create charm in a builder grade bathroom!

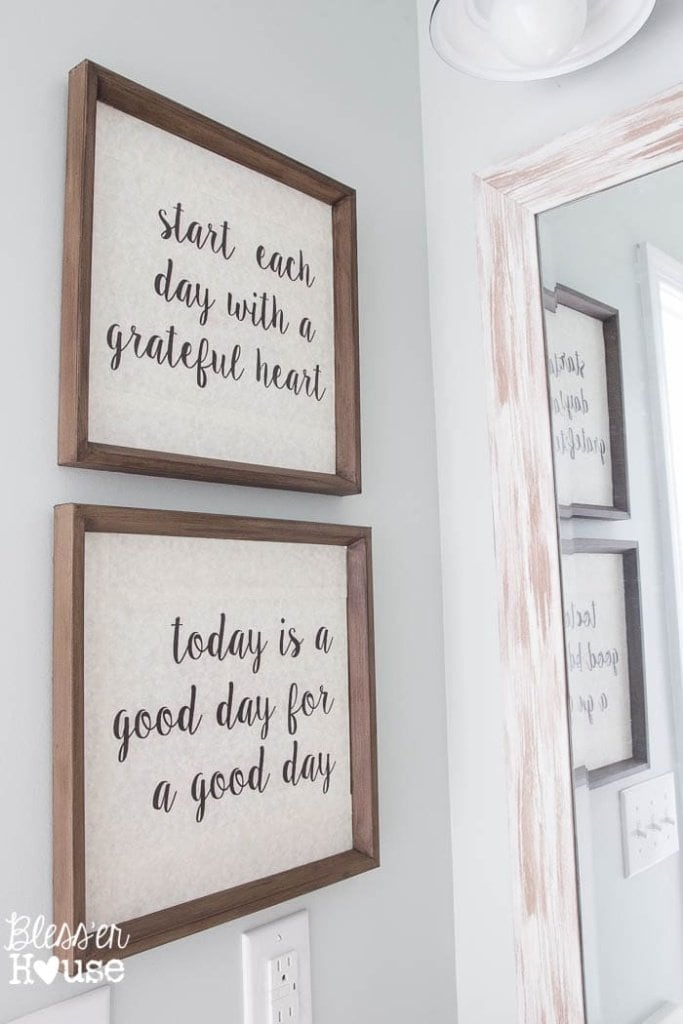
If you followed along on our Trash to Treasure project this month, I pulled these art pieces out of our thrift pile for a little typography makeover. It was totally free!

Modern Farmhouse Bathroom Makeover | Bless'er House - So many great ideas to create charm in a builder grade bathroom!

I am still soooooo excited about our faucet in here that Moen provided. I just want to pet it. Is that weird? Don’t answer that.

Modern Farmhouse Bathroom Makeover | Bless'er House - So many great ideas to create charm in a builder grade bathroom!

Modern Farmhouse Bathroom Makeover | Bless'er House - So many great ideas to create charm in a builder grade bathroom!

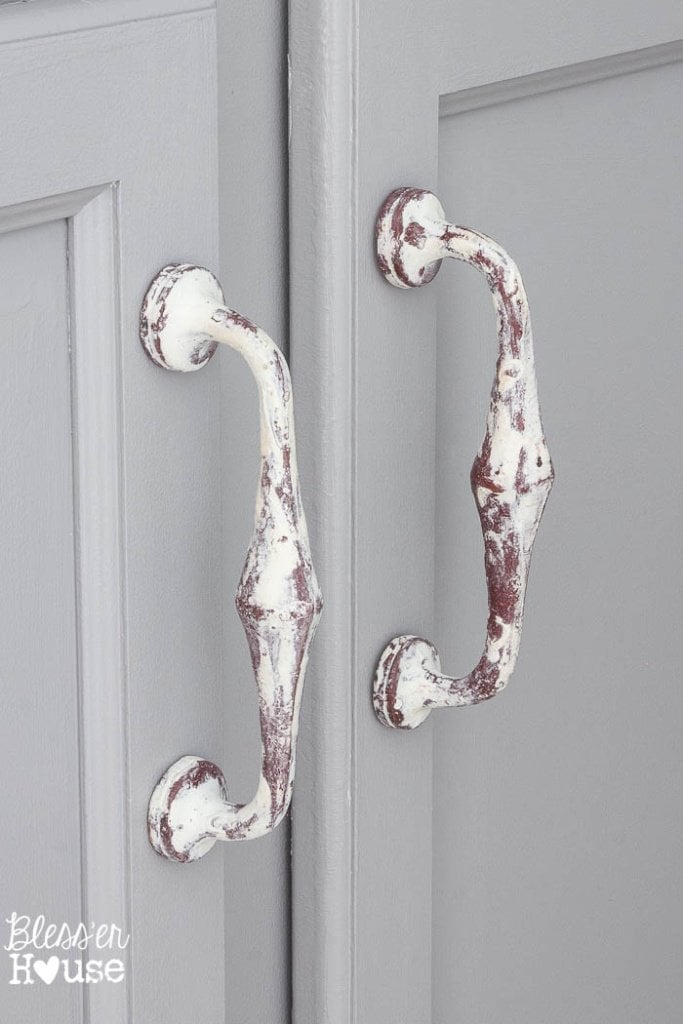
Another huge change in here was painting these cabinets using the same cabinet paint from our master bathroom. It’s Benjamin Moore Winter Gates in semi-gloss. Also aren’t those spigot knobs darling?

Modern Farmhouse Bathroom Makeover | Bless'er House - So many great ideas to create charm in a builder grade bathroom!

Modern Farmhouse Bathroom Makeover | Bless'er House - So many great ideas to create charm in a builder grade bathroom!

These handles I picked up along with the knobs at Hobby Lobby work beautifully with the mirror too.

Modern Farmhouse Bathroom Makeover | Bless'er House - So many great ideas to create charm in a builder grade bathroom!

Modern Farmhouse Bathroom Makeover | Bless'er House - So many great ideas to create charm in a builder grade bathroom!

Modern Farmhouse Bathroom Makeover | Bless'er House - So many great ideas to create charm in a builder grade bathroom!

There were some things I didn’t stick to in my original bathroom makeover plan like adding subway tile and board and batten in here, but I’m really glad I didn’t make things more complicated with those. It might have been too much if we had gone that route.

Modern Farmhouse Bathroom Makeover | Bless'er House - So many great ideas to create charm in a builder grade bathroom!

And here’s the entire budget and source break down. Believe it or not, this one cost more than our master bathroom makeover! But we had our lighting and faucet to contend with in here, and that’s always a bigger chunk of the budget. Still, we managed to pack in a big transformation for a fairly small price tag.

Source List:  (Affiliate links are provided below. For more information, see my full disclosure here.)

  • Wall Paint –  Sherwin Williams Sea Salt color mixed into Valspar Signature satin paint $29 (after a $5 off rebate)
  • Cabinet Paint- Benjamin Moore Winter Gates color mixed into Valspar Signature semi-gloss paint $37.50 for all supplies  (DIY tutorial here)
  • Cabinet Hardware- $18 for all knobs and handles together (On sale at 50% off at Hobby Lobby)
  • Sink Faucet- Moen Vestige Centerset Faucet $216 normally (Provided by Moen)
  • Light Fixture- Allen + Roth Hainsbrook Vanity Light $70 (Bought on sale at Lowe’s)
  • Typography Art- Free! (Tutorial here)
  • Shelves- Built for $15 and stained with Minwax Walnut (Using these plans I found on Shanty2Chic)
  • Spray painted shower fixtures- $35 (DIY tutorial here)
  • Bath mat- $8 (Bought on clearance at Hobby Lobby)
  • Towel Rack- $44 (DIY tutorial here)
  • Mirror- Distressed White Driftwood Mirror $24 (Bought with a coupon at Kirkland’s)
  • Shower curtain- already owned (Similar one here)
  • Boxwood plants- $6 each – clearance aisle of HomeGoods
  • Towels- Walmart 4 for $16
  • Washcloths- Walmart 8 for $4
  • Apothecary jars- Homegoods $12 and $10  (Similar ones here)
  • Brown glass jar- Homegoods $4
  • TP chickenwire basket- $7.50 Walmart
  • Glass soap jar- $12 Walmart
  • Wire basket – already owned
  • Galvanized watering can – already owned (Similar one here)
    Total:  $584

If I forgot anything in that long list, let me know and I’ll add it in. Hopefully, that covered it.

What do you think?! That’s a big ol’ check off the to-do list! If you want to see any of the other makeovers we’ve done, you can find all of our room reveals here.

signoff


Follow:

Facebook | Pinterest | Instagram | Twitter | Google+ | Bloglovin | Hometalk

Related

Filed Under: Budget Decor, Room Reveal
Tagged With: Bathroom, Budget Decor, Room Reveal, Room Reveals

« How to Spray Paint Shower Fixtures
Our Vintage Lakeside Wedding and What Started It All »

Comments

  1. [email protected] says

    October 20, 2015 at 5:30 am

    Oh I love it! It’s cozy and country and really a little bit of everthing in there! Love the wire baskets, I had no idea Walmart sells them! And the cabinet colour is so so nice! You have a great taste & talent Lauren! Cheers & enjoy!!

    Reply
    • Lauren says

      October 21, 2015 at 5:15 pm

      Thank you so much, Katrin! Walmart has come up in the world lately it seems. 🙂

      Reply
      • elsie says

        February 7, 2018 at 12:38 pm

        Hi Lauren! I love what you did with your bathroom. I was doing some research online as I’m thinking about spray painting my faucets and shower. How did it end up holding up?

        Reply
        • Lauren says

          February 14, 2018 at 12:34 pm

          It held up great! We moved out of this house last year, but it was still going strong when we left.

          Reply
      • donna says

        August 5, 2018 at 8:52 am

        what did you use on the bathroom floor
        Donna

        Reply
        • Lauren says

          August 6, 2018 at 11:30 am

          Hi Donna,

          we kept the same builder grade flooring that came with the house since it was only 2 years old.

          Reply
  2. Lanita Anderson says

    October 20, 2015 at 7:48 am

    Oh my goodness….I love it! I think this might be one of my favorite transformation reveals!! I’m a “sucker” for anything farmhouse and just love everything that you incorporated to add to the space. It is light and airy, the colors are soothing & calm and it has so much farmhouse charm. Great job!
    Thanks for sharing – it was definitely worth the wait!
    Blessings,
    Lanita

    Reply
    • Lauren says

      October 21, 2015 at 5:20 pm

      You’re so sweet, Lanita. As always. 🙂 Thank you!

      Reply
  3. Mary-In the boondocks says

    October 20, 2015 at 8:33 am

    The whole room looks lovely and a big change from grader build. My favorite aside from that gorgeous faucet it the humble towel rack that is so rustic and gives so much character to the room along with the shelves. Oh and speaking of those shelves, put the jar with the soaps higher…always higher… My boys used to climb up on the sink to get at those things.

    Reply
    • Lauren says

      October 21, 2015 at 5:22 pm

      Thanks, Mary! Good tip. That lower shelf is still really high and out of her reach, but if she gets to that point, I’ll most definitely be moving it. Thankfully, shelves don’t seem to interest her. She leaves the ones in our living room alone usually. Drawers on the other hand she LOVES dumping onto the floor. Oh joy. Haha!

      Reply
  4. Cindy says

    October 20, 2015 at 2:55 pm

    Well Shakalaka Boom Bam – that is fantabulous! I think my faves are the wall paint color and the cabinet hardware. Seems like everything you do is adorable. But…that is why you blog and why I read it everyday! 😉

    Reply
    • Lauren says

      October 21, 2015 at 5:25 pm

      Haha! Aw thanks, Cindy! You’re too cute.

      Reply
  5. Sherri says

    October 20, 2015 at 4:17 pm

    Girl, you’ve done it again!!! It looks super amazing and so well put together. You’ve totally captured that fresh farmhouse feel. I am so crushing on those spigot knobs and the handles. Cute, cute, cute!!!

    Reply
    • Lauren says

      October 21, 2015 at 5:27 pm

      Thank you!!! This one was so much fun to do. 🙂

      Reply
  6. AngieM says

    October 20, 2015 at 5:39 pm

    Beautiful transformation!

    Reply
    • Lauren says

      October 21, 2015 at 5:31 pm

      Thank you!

      Reply
  7. Jennifer T. says

    October 20, 2015 at 7:05 pm

    It’s so lovely! My favorite is the doorknob towel rack too!

    Reply
    • Lauren says

      October 21, 2015 at 5:31 pm

      That’s one of my faves too. 🙂

      Reply
  8. Gina says

    October 20, 2015 at 7:31 pm

    Oh it’s so pretty!!!!! I love it!!!!!!!

    Reply
    • Lauren says

      October 21, 2015 at 5:31 pm

      Thank you so much, Gina!

      Reply
  9. Michele says

    October 20, 2015 at 8:31 pm

    Relatively new to your site and absolutely awed! Lovely job with the bathroom. Hubby and I are slowly working on getting our 90 year old farmhouse back to period. It is a part time ‘work in progress’ since we don’t live there yet and it is 4 hours away. I am pinning some of your ideas to use. Thanks!

    Reply
    • Lauren says

      October 21, 2015 at 5:32 pm

      Wow! That is definitely not for the faint of heart! Thank you so much for the love. I hope I can help out in some small way. 🙂

      Reply
  10. Gilly @ Colour Saturated Life says

    October 21, 2015 at 7:39 pm

    Lauren I really love this bathroom….all the little details come together perfectly! It really inspires me to finally do something with ours….it is soooo boring!

    Reply
    • Lauren says

      October 27, 2015 at 9:31 am

      Thank you, Gilly! I had a lot of fun pulling this space together. 🙂

      Reply
  11. Margie says

    October 21, 2015 at 11:03 pm

    It could not be any cuter, you did an amazing job. I would love being a guest in that bathroom. You may never get them to leave!

    Reply
    • Lauren says

      October 27, 2015 at 9:33 am

      Thanks, Margie! I have a hard time leaving this room too. 🙂

      Reply
  12. Heather says

    October 22, 2015 at 4:19 pm

    It is so beautiful. I love how the feminine (like the shower curtain) is balanced out by the masculine/rustic. Love!!

    Reply
  13. Katie Nathey says

    October 26, 2015 at 12:07 pm

    Talk about an incredible transformation! You took a standard bathroom and added so much style and personality and warmth. I think I may be obsessed.

    Reply
    • Lauren says

      October 27, 2015 at 9:54 am

      Thank you so much, Katie! I’m a little obsessed with it too. 😉

      Reply
  14. Amy W says

    October 26, 2015 at 11:27 pm

    What an update! I love a good makeover project. I am so smitten with gray vanities, love it!

    Reply
    • Lauren says

      October 27, 2015 at 10:00 am

      Thanks, Amy! Me too. Much easier to keep looking clean than white vanities too. 😉

      Reply
  15. Jean says

    October 27, 2015 at 8:53 am

    Great job ! you have excellent taste and talent to go along with it. Tell us about White towels are better for us ???? Thanks for sharing.

    Reply
    • Lauren says

      October 27, 2015 at 10:06 am

      Thanks, Jean! I’ve heard from a lot of dermatologists before that white towels are better for your skin because you can bleach them in hot water and get them very clean. And for me, my face wash often discolors any colored towels anyway with a bleach effect in it, so I don’t ruin towels by buying the white ones. I stick with white sheets too.

      Reply
  16. Debbie Hastert says

    October 27, 2015 at 11:44 am

    I saw this project on the HomeTalk website. After seeing it on there, I had to come on your page and see it all. You did a really beautiful job in there. On the Hometalk site, you said you painted your shower facet and spout. Can you tell me what paint you used?
    Thanks for the inspiration.
    Debbie

    Reply
    • Lauren says

      October 28, 2015 at 4:57 pm

      Thank you, Debbie! And yes, I painted the shower faucet and spout using several steps to make sure it is durable. Here’s the tutorial post for how I did it: https://www.blesserhouse.com/2015/10/how-to-spray-paint-shower-fixtures.html

      Reply
  17. Kelly says

    October 27, 2015 at 1:18 pm

    It turned out great, Lauren! #nailedit

    Reply
    • Lauren says

      October 28, 2015 at 4:57 pm

      Thanks girl! I had fun pulling it all together.

      Reply
  18. heather says

    October 27, 2015 at 3:51 pm

    Love it Lauren! Looks so nice 🙂

    Reply
    • Lauren says

      October 28, 2015 at 5:00 pm

      Thanks, Heather! I LOVE your kids’ bathroom too. My favorite ever!

      Reply
  19. Shonee says

    October 28, 2015 at 12:20 am

    Lauren, wow! What an incredible transformation! That paint on your vanity really brightened up the whole space. Everything works so well together and I love love love the hardware on your vanity! Thanks for sharing 🙂

    Shonee
    http://www.hawthorneandmain.com

    Reply
    • Lauren says

      October 28, 2015 at 5:05 pm

      Thanks, Shonee! I winged it with that cabinet color using our paint leftovers but I was so glad how it turned out. It was a happy little surprise. 🙂

      Reply
  20. Krista @ the happy housie says

    October 28, 2015 at 11:15 am

    Absolutely incredible Lauren- amazing job. I love it!!

    Reply
    • Lauren says

      October 28, 2015 at 5:44 pm

      Thanks, Krista! 🙂

      Reply
  21. Janet says

    October 28, 2015 at 12:24 pm

    Beautiful, simple makeover! I love the farmhouse feel of it all. I also love all the white, but I must not do something right with white towels. They get very dingy very fast in my house, no matter how much I bleach and wash in hot water. Not sure what I’m doing wrong, so I’ll just enjoy them through other people’s blogs.

    Reply
    • Lauren says

      October 28, 2015 at 5:47 pm

      Hmm…maybe it’s the brand of towels you have? Or something in your water? I just wash them on the white cycle in hot water with 1/2 cup of bleach and the Tide detergent with Febreeze in it. I just buy the cheaper Walmart towels because we use and abuse ours. They’ve lasted 3-4 years but if I have to throw them in the rag pile and buy more, I don’t feel so bad about it.

      Reply
  22. Terry Moore says

    October 28, 2015 at 11:10 pm

    Perfect, Perfect, Perfect! All it takes is some effort and imagination. Beautiful room now! Reminds me of my bathroom makeover in our guest bath. Lovely.

    Reply
    • Lauren says

      October 29, 2015 at 12:38 am

      Thank you, Terry! I totally agree. Effort and imagination goes a long way. 🙂

      Reply
  23. H says

    October 29, 2015 at 4:33 pm

    How did you get the floor to lighten up? Or is it just because of the different lighting?

    Reply
    • Lauren says

      November 2, 2015 at 4:44 pm

      It’s the same floor just different lighting and looks different because of the paint color on the walls and cabinet. 🙂

      Reply
  24. Kim Wright says

    October 29, 2015 at 8:49 pm

    I absolutely LOVE this makeover – you did an amazing job!
    Question – did you paint the shower? If so, can you tell me how you did it. It’s such a beautiful clean white, I’d like mine to look like that 🙂

    Reply
    • Lauren says

      November 2, 2015 at 4:50 pm

      Thank you, Kim! I didn’t paint the shower, just the shower fixtures. The lighting probably just makes it look more yellow in the before shot.

      Reply
  25. Sarah @ Little Red Brick House says

    October 29, 2015 at 10:47 pm

    It’s stunning, Lauren! Everything works so well together and I am still in love with your towel rack. Olivia is such a lucky girl!

    Reply
    • Lauren says

      November 2, 2015 at 4:53 pm

      Thank you so much, Sarah! She definitely seems to get a lot of the makeover love around here. 😉

      Reply
  26. Jackie says

    October 30, 2015 at 9:14 am

    Hi,
    Beautiful makeover!
    I was wondering what this means Sherwin Williams Sea Salt color mixed into Valspar Signature satin paint $29?
    Does that mean you used Valspar paint and the Sherwin Williams color? Or if you did mix, how did you mix the two paints?
    Thank you so much!

    Reply
    • Lauren says

      November 2, 2015 at 4:56 pm

      Hi Jackie! Thanks so much! To make the paint cheaper, I just went to Lowe’s and asked them for Valspar Signature satin paint with a Sherwin Williams color. They can typically give you any brand’s color in whatever paint you want because all of the colors for all of the brands out there are listed in a database. It’s a good little trick if you have a specific brand you prefer to paint with but have a particular color you want from a different brand.

      Reply
  27. Alexis says

    October 31, 2015 at 1:59 pm

    Just gorgeous! What an amazing makeover. Congrats on an amazing job!

    Reply
    • Lauren says

      November 2, 2015 at 4:59 pm

      Thank you so much, Alexis! 🙂

      Reply
  28. Tish says

    November 5, 2015 at 12:04 pm

    Hi Lauren!
    You have no idea how much I love your blog! I’m obsessed with it! We have the same décor style and I’m seriously drooling over all the spaces in your home! I am going to re-create my version of this bathroom, and some things will be the same , some will be different, but I do need your help with the PAINT! paint is something so particular, that one shade over can totally ruin a project.
    I know you name the paints you used, for the cabinets and for the walls, but you said you mixed vaspar into them!?!? Do you know how much of each? I would like to get as close as possible to the colors you have because I love them…and paint colors here at my house are a hit-or-miss kind of thing.

    Thank you!!!!
    ps: IM COUNTING DOWN THE DAYS FOR YOUR KITCHEN MAKEOVER! SO EXCITED FOR THAT!

    Reply
    • Lauren says

      November 10, 2015 at 2:28 pm

      Oh my goodness, Tish! You just made my day! Thank you! So about the paint, I’ll probably write a separate post about this one day because a lot of people don’t know this. You can go to pretty much any hardware store and ask them to put a color from any brand into whatever brand of paint you choose. They have an entire database for pretty much all of the paint colors that exist. So for instance, if you really like Glidden paint but you have your heart set on a Sherwin Williams color, you can just go to Home Depot and ask them for say Sherwin Williams Sea Salt in a gallon of Glidden Duo Matte paint. It’s often cheaper that way. 🙂 Believe me, I’m SO READY to get my hands on our kitchen. I’m glad we didn’t do it this fall because it’s rained nonstop and that’s not good for cabinet painting. Fingers crossed for Spring 2016.

      Reply
  29. Joey Casey says

    November 13, 2015 at 11:31 am

    This turned out really well! It’s hard to tell from the pictures- is the paint a shade of blue, shade of grey, or an even blend? It looks really nice regardless. I also can’t tell if the cupboards are purple or gray? Ridiculous questions, I know. Really awesome space!

    Reply
    • Lauren says

      November 13, 2015 at 9:42 pm

      Thanks! The wall paint changes a lot with the light. It’s a very muted pale blue/green and looks a lot like some seaglass I’ve seen. And the cabinets are a light gray.

      Reply
  30. Kim says

    January 12, 2016 at 9:48 am

    Hi Lauren, I too love your bathroom. Our bathrooms are almost identical and I need to give it some Wow just like yours. I love your accessories and your black fixtures. I think if my fixtures were black it would really help to make the bathroom look decorated. I have some framed silhouettes that my mother gave me a long time ago, they have black painted frames. Hanging those pictures would go a long way as well. I love the colour you painted your walls. I love blue-grey. Your bathroom is picture perfect. Your lovely bathroom has given my inspiration for mine. Thank you.

    Kim

    Reply
    • Lauren says

      January 13, 2016 at 9:41 pm

      I’m so glad it could give you a little bit of inspiration, Kim! I agree. The dark fixtures really can make a bathroom look more expensive. That’s my take anyway. Paint is magical like that. 🙂 Good luck with your own makeover!

      Reply
  31. Kimberly says

    January 12, 2016 at 12:23 pm

    Absolutely BEAUTIFUL…You have totally inspired me. I know have built the shelves and the towel rack. Thank you for the help!!!

    Reply
    • Lauren says

      January 13, 2016 at 9:35 pm

      That’s awesome, Kimberly! I’m so glad I could help!

      Reply
  32. Wendy Bentley says

    January 22, 2016 at 6:11 pm

    Oh its just absolutely lovely Lauren!! Love everything you’ve done. Do you possibly have a direct link to the glass soap jar?? Im not seeing it on the walmart website. Thanks! xo

    Reply
    • Lauren says

      January 23, 2016 at 12:10 am

      Thanks, Wendy! I looked on Walmart’s site and couldn’t find it for some reason. I bought mine at my local store, but I haven’t seen any since. 🙁

      Reply
  33. Reema says

    January 27, 2016 at 5:21 pm

    I absolutely adore this bathroom! And we just bought a builder grade home too, I am so excited to have a blog to go to when I start decorating it. Currently we are just building our basement bath and I will be trying to replicate most things from this bathroom cause i just love it! I read that you created your own rustic shelves and towel racks but is there any similar ones that you have come across that i could buy?

    Thanks so much for amazing ideas and detailed info on where to buy stuff from ?

    Reply
    • Lauren says

      February 1, 2016 at 9:51 am

      I’m so glad to hear that, Reema! Thank you so much! You can try checking Etsy.com for the shelves and towel rack. There are usually a lot of DIY items you can buy ready-made.

      Reply
  34. Sandi says

    January 31, 2016 at 10:56 am

    I just found your blog site and love what you did in the guest bathroom. It’s very much my style too. You are very talented!

    Reply
    • Lauren says

      February 1, 2016 at 9:12 am

      I’m so glad you like it, Sandi! Thanks for the love!

      Reply
  35. Deanna says

    February 2, 2016 at 12:32 pm

    Hi,
    How did you achieve the weathered wood look with chalk paint for the picture frames?
    Thanks!

    Reply
    • Lauren says

      February 3, 2016 at 9:48 am

      Hi Deanna! You can see the full tutorial for those frames here: https://www.blesserhouse.com/2015/10/diy-typography-signs-from-cast-off-art.html

      Reply
  36. Sara Whiteley says

    February 5, 2016 at 3:50 pm

    I have an entirely OCD question! May I ask what color/finish is on your vanities hinges? I plan to paint my drab builder grade vanity, which currently has awful gold hinges and handles. They’ll obviously need to be replaced! Any suggestions?

    Reply
    • Lauren says

      February 9, 2016 at 9:59 am

      Not OCD at all! Our cabinets actually have hidden hinges, so it wasn’t something I had to be concerned about. If ours were visible, I know I would have had to choose different hardware in oil rubbed bronze and painted the hinges that color too so it would all match on the vanity.

      Reply
  37. Jessica says

    February 6, 2016 at 9:14 pm

    Was the flooring already in the bathroom before the renovation? It looks similar to the before pictures, but also appears to be a different color.

    Reply
    • Lauren says

      February 9, 2016 at 9:56 am

      Hi, Jessica! Yes, the flooring didn’t change at all. It’s the same vinyl tile, but the change in lighting and paint colors makes it appear more gray than beige now, which I LOVE!

      Reply
  38. Jodi Stratton says

    February 23, 2016 at 2:14 pm

    LOVE this whole bathroom!! Very nice job!! I have a funny question..where did you get the soap on the sink and the shelf..they add so much character to the whole look.

    Reply
    • Lauren says

      February 24, 2016 at 11:12 am

      Thank you, Jodi! I found the soaps at Marshall’s. 🙂

      Reply
  39. Kim McCarthy says

    February 25, 2016 at 11:07 am

    Love the transformation Lauren!! Really beautiful! I love your vanity lighting. Just wondering if they give off enough light? I don’t think you have a window in there, but maybe you do. I have a windowless bathroom with a ceiling light/fan but I need to get a vanity light and I love the farmhouse look, but want to be sure it gives off enough light. I went on Lowes website and the reviews for the light that you have say that it doesn’t give alot of light. Any information would be helpful! And great job!

    Reply
    • Lauren says

      February 29, 2016 at 10:36 am

      Thanks, Kim! It is not a super bright light but it is still plenty bright enough for our space. Maybe for a really big bathroom it wouldn’t be good though, but for one our size, it’s perfect.

      Reply
  40. Courtney Y says

    February 26, 2016 at 10:36 am

    This is beautiful! Did you redo the countertop at all? It looks super white in the reveal picture and yellowish in the before pictures. Thanks!

    Reply
    • Lauren says

      February 29, 2016 at 10:33 am

      Thanks, Courtney! I didn’t actually. The change in paint color and the lighting just made it look more white.

      Reply
  41. Megan says

    February 26, 2016 at 5:03 pm

    I love everything about this! We are getting ready to finish our basement which includes a bath and I just purchased this same light fixture. I love the size of bulbs you have in it; funny question, where do you buy them? I didn’t see them at Lowe’s with the light fixture. Thanks!

    Reply
    • Lauren says

      February 29, 2016 at 10:30 am

      That’s great, Megan! Honestly, I’m not 100% where to our bulbs came from. We just unscrewed them from our old light fixture the builder put in because they hadn’t burned out yet. Haha! I’m sure they’re at Lowe’s though. They’re called globe light bulbs and I think these we used are soft white.

      Reply
  42. aimee says

    March 20, 2016 at 7:45 pm

    This is so gorgeous! It has given me hope to change up our daughter’s builder grade bathroom! Thanks for sharing!

    Reply
    • Lauren says

      March 21, 2016 at 10:33 am

      Yay! I’m so glad, Aimee! Hope it turns out well! I’d love to see a photo when you finish.

      Reply
  43. Alix says

    April 12, 2016 at 12:12 am

    In love with this bathroom, Lauren! How many inches wide (or deep) are your wall shelves? I want to buy the chickenwire basket which is 10″ wide according to the walmart website but my shelves are 8″ wide.

    Thank you!

    Reply
    • Lauren says

      April 12, 2016 at 7:06 pm

      Thanks, Alix! Our shelves are 10.5″ wide, so I don’t think the basket would work on your shelves, unfortunately. I think there are smaller ones that are similar that could work though.

      Reply
  44. Ashley says

    April 29, 2016 at 4:22 pm

    I am modeling my bathroom after yours! I absolutely love it! Where did you get the lights above the sink? I have been looking all over the place with no luck or what I am finding is very expensive…

    Thanks!

    Reply
    • Lauren says

      May 5, 2016 at 12:28 am

      Oh wow! Thanks, Ashley! I’d love to see a pic of it later. I got the light at Lowe’s for around $70ish when it was on sale. They still have them though! Here is the link: http://fave.co/1rWnCZ7

      Reply
  45. Kassie says

    May 1, 2016 at 11:28 am

    You have inspired me to make my guest bathroom look just like this!! One problem, what if one of the drawers on your cabinet is fake? Will it still look good to just paint over it while still attached?

    Reply
    • Lauren says

      May 5, 2016 at 12:06 am

      Wow! Thank you, Kassie! I’d love to see it when you finish! One of mine is a fake drawer too. There should be a way to pry it off, paint it, and pop it back on, but you could paint it while it’s on the frame too if that’s easier. I pulled mine off so that I could add the knob to it.

      Reply
  46. Jess says

    May 8, 2016 at 4:26 pm

    I am in love with your blog!!! Can you tell me dimensions of your shelves? How long and the depth? Thanks!!

    Reply
    • Lauren says

      May 9, 2016 at 12:20 pm

      Aw thank you! Our shelves are 10.5″ deep and 24″ long. Hope that helps!

      Reply
  47. Lavinia says

    June 30, 2016 at 5:03 pm

    Hi Lauren! I love the “after” pictures. We are in the process of doing our bathroom and was wondering, what kind of tile is on the bathroom floor? It looks beautiful!

    Reply
    • Lauren says

      June 30, 2016 at 5:43 pm

      Thank you, Lavinia! I know it’s hard to believe but our floor is actually vinyl! Crazy, right? It’s the same flooring as the before picture, it just took on more of a gray tone when we painted the walls… total happy accident. I wish I knew what vinyl it was but we picked the color from whatever brand our builder selected for us, so unfortunately, I’m not sure of the source.

      Reply
  48. Michelle says

    July 2, 2016 at 9:20 am

    I love EVERYTHING about this bathroom makeover!! It’s perfect!! Can you tell me what size those frames are or what size the prints are?
    I just discovered your blog a few weeks back and I’m obsessed!!

    Reply
    • Lauren says

      July 2, 2016 at 11:29 am

      Aw thank you so much, Michelle! The frames are 10×10. Here’s the full post about them: https://www.blesserhouse.com/2015/10/diy-typography-signs-from-cast-off-art.html

      Reply
  49. Kelly says

    July 8, 2016 at 12:24 am

    I love EVERYTHING about this bathroom!! I’m redoing mine, too, and I was wondering where you purchased the light fixture from? It’s soo pretty, but unfortunately I can’t find anything even similar to it!

    Reply
    • Lauren says

      July 12, 2016 at 11:59 am

      Yay! Thank you, Kelly! I go the light fixture from Lowe’s. Here’s the link if you need it: http://fave.co/2956yaV

      Reply
  50. Lana says

    July 30, 2016 at 2:49 pm

    Hi Lauren, what a beautiful bathroom you have ! Great job ! I was wandering where did you get your small wire basket from? one that is on the sink with chalk paint label. Thank you!

    Reply
    • Lauren says

      August 3, 2016 at 12:18 pm

      Thanks, Lana! I found that little wire basket at HomeGoods, so I’m not sure where you could get an identical one. I found this one that’s similar though: http://rstyle.me/n/bwfqvrb5ky7

      Reply
  51. Shirlee says

    August 2, 2016 at 4:07 pm

    Hey Lauren! Love this in SO many ways!! Can you tell me what Walnut you used? I saw minwax had Dark Walnut and Special Walnut. Love the color whatever it is!!

    Reply
    • Lauren says

      August 3, 2016 at 11:56 am

      Thanks, Shirlee! I actually used these Minwax wipes I already had. I love using them for quick stain touch-ups on our furniture when we get scuffs. The wipes say just regular walnut, so that might be different from the canned stain they have. Here’s the link: http://amzn.to/2altoul

      Reply
  52. Rhonda C says

    August 7, 2016 at 9:56 pm

    Beautiful. I love everything about it. I am in the process of doing mine, very similar, and I am having trouble deciding on a window treatment. Does your room have a window, if so how did you dress it?

    Reply
    • Lauren says

      August 19, 2016 at 10:16 am

      Thanks, Rhonda! This particular bathroom doesn’t have a window, but our master bathroom does. Here’s the post about how we dressed that one: https://www.blesserhouse.com/2015/01/2-simple-steps-to-upgrade-basic-window.html

      Reply
  53. Candy Walsh says

    August 18, 2016 at 6:56 pm

    That is exactly the look I’d like in my guest bath, both bathrooms actually. Especially the floating shelves. My faucets are like yours but silver, do you think something like Rustoleum Hammered Spray would work if I put several coats of Poly on it since it gets so wet all the time?

    Reply
    • Lauren says

      August 19, 2016 at 8:46 am

      Thanks, Candy! I actually spray painted our shower fixtures, and they’ve held up great so far. But I sanded and used auto primer, Rustoleum spray paint, and spray lacquer to keep it durable. https://www.blesserhouse.com/2015/10/how-to-spray-paint-shower-fixtures.html#comments

      Reply
  54. Jessica says

    August 29, 2016 at 4:40 am

    I love everything about this!!! It gives me hope for my boring guest bathroom! Can you tell me the dimensions of the floating shelves? Thank you! So glad I found your blog!

    Reply
    • Jessica says

      August 29, 2016 at 4:43 am

      Oh…I should have read the comments before posting my question! I saw the dimensions in a previous comment answer.

      Reply
  55. Lauren Lampke says

    September 19, 2016 at 1:59 pm

    Hi! I love this. So curative and budget friendly!! Did you change the bathroom tile and counter or leave as original? Thank you!!

    Reply
    • Lauren says

      September 20, 2016 at 9:57 am

      Thanks, Lauren! I didn’t actually. But when we painted the walls and vanity, the counter and flooring ended up taking on a little more of a gray tone. Pretty cool how color can do that depending on what’s around it. 🙂

      Reply
  56. Amy says

    October 9, 2016 at 11:06 am

    Question… did you paint the vanity counter top? I couldn’t help but notice that it looks whiter than before?

    Reply
    • Lauren says

      October 17, 2016 at 6:49 pm

      I didn’t actually but it does look more white. Painting the walls the blue/green color made it look less yellow.

      Reply
  57. Lakota says

    November 10, 2016 at 2:53 am

    Beautiful transformation!! Did I miss what you did for flooring?

    Reply
    • Lauren says

      November 13, 2016 at 12:48 am

      Thanks, Lakota! We actually didn’t change the flooring. It’s just the same vinyl the builder put in. It looks different because of the paint color on the walls/cabinets though. 🙂

      Reply
  58. Kelly says

    December 5, 2016 at 5:03 pm

    I love the look of the new lights you put in. Does it give off enough light in the bathroom? We have a similar sized bathroom and I’m wondering if they will be too dark. Thanks!

    Reply
    • Lauren says

      December 7, 2016 at 12:31 pm

      Thanks, Kelly! The lights are not as bright as the other light we originally had in here. We have a light in the ceiling for the vent fan too, so that makes it bright enough in here. But if that weren’t there I think it would be too dim.

      Reply
  59. Michelle says

    January 3, 2017 at 10:28 pm

    This looks great! We are in the planning stage of remodeling two bathrooms. This is great inspiration.
    Did you replace the flooring in this bathroom?

    Reply
    • Lauren says

      January 4, 2017 at 2:39 pm

      Thanks, Michelle! So glad it could help spark some creativity! I didn’t replace the flooring but because of the changes in the paint color on the walls and cabinet, it does look more gray now. Crazy, right?

      Reply
  60. Ginni says

    February 2, 2017 at 12:15 pm

    So pretty! Getting ready to buy our first house and I am wanting to do our daughter’s bathroom (which is also the hall bath) in a similar design. Can you tell me what material the shower curtain is? A lot of the ones I have found are polyester. They are much cheaper but don’t look as nice as one made from 100% cotton.

    Reply
    • Lauren says

      February 6, 2017 at 11:48 am

      Ours is polyester too. I found a cotton one but it was over $80. I just couldn’t stand paying that for a shower curtain.

      Reply
      • Ginni says

        February 8, 2017 at 9:10 am

        Thank you! Yours looks beautiful. I will be getting polyester then. There is no way I would pay $80 for a shower curtain either. Also, I showed my husband this post and told him this is pretty much what I wanted the hall bath to look like.

        Reply
  61. Tracy says

    February 8, 2017 at 11:07 am

    I’ve just recently found your site and absolutely have fallen in LOVE with everything you touch!!! I check it every day and find something new to inspire me. I recently just redid my guest bathroom and followed your design almost to a “T”. I LOVE IT so much!! I was wondering, it’s the little things, you know…where did you find the soap that is displayed in the glass jar? I’ve looked at some homemade soaps and they can be quite pricey to fill a large jar.
    My bedroom is next and I’m totally taking your lead again! Thank you for being my inspiration and giving me a new found pleasure.

    Reply
    • Lauren says

      February 9, 2017 at 10:58 am

      Thank you so much, Tracy! The “fancy” soap in the glass jar is just good ol’ cheap Ivory soap from Walmart. My husband has a lot of former military buddies who visit, and they seem to take advantage of it when they’re staying as guests. If it works for them, it works for me. 🙂

      Reply
      • Tracy says

        February 9, 2017 at 12:17 pm

        GREAT! I thought it might be…gotta love that Ivory!! 🙂

        Reply
  62. Trina says

    February 9, 2017 at 12:21 am

    Beautiful! Love the soap jar! Is it just regular soap bars inside?

    Reply
    • Lauren says

      February 9, 2017 at 10:25 am

      Thanks, Trina! Yep, just plain soap bars for when guests need them.

      Reply
  63. Kj says

    February 11, 2017 at 12:54 am

    Love the bathroom. Did you buy a new sink?

    Reply
    • Lauren says

      February 11, 2017 at 3:09 pm

      Thank you! Nope, it’s the same sink; it just looks a bit more white and not as “almond” since we painted the walls the blue/green.

      Reply
  64. Kristin Baker says

    February 25, 2017 at 3:52 pm

    Just beautiful! So clean, fresh and relaxing. I am using this paint color in my kids jack-n-jill bathroom but that is as far as I have gotten. We are doing a little more renovating including new shower tile, flooring and countertop. I am going to “borrow” several of your ideas.

    Reply
  65. Cortney says

    March 3, 2017 at 3:09 pm

    Hello,
    I absolutely love how you pulled this together! It is absolutely beautiful. What were your measurements for the floating shelves. I’m thinking about doing some but not sure how big I should make them?

    Reply
    • Lauren says

      March 3, 2017 at 9:35 pm

      Thanks, Cortney! I believe they were 24″w x 10″d. Hope that helps!

      Reply
  66. Madonna Wheeler says

    March 5, 2017 at 2:07 pm

    Absolutely stunning!!! I’m looking for ideas for our basement bathroom that is down to the studs so have to put an entire bathroom together from shower to toilet lol You gave some beautiful ideas for finishes!

    Reply
  67. Susie says

    March 9, 2017 at 9:23 am

    Everything about this bathroom is great, and it looks like stuff I could totally do myself. Question – did you redo the top of the sink?

    Reply
    • Lauren says

      March 10, 2017 at 9:05 am

      Thanks! No, the top of the sink was untouched. It looks a bit brighter/whiter because of the change in the wall color and cabinet color though.

      Reply
  68. Alli Hutchens says

    March 10, 2017 at 9:46 am

    Oh my goodness! We are beginning a whole bathroom renovation and I was scanning Pinterest for inspiration. This bathroom is literally what was in my mind’s eye and you have shown me how to do it! We already had decided on Sea Salt as our paint, and painting our vanity gray. I am framing our builder grade mirror our in white 1x3s. Floating shelves and ruffled shower curtain. Your decorative touches are exactly what I’m looking for. Thank you for breaking it all down and posting!! The only difference is we are replacing our tub and toilet and I am adding board and batten. Our bathroom is long though, so I think our space can handle it and not feel overwhelmed. ?

    Reply
  69. Katie Weeks says

    March 28, 2017 at 2:42 pm

    I love the mirror and knobs. I just got my order and they are even more beautiful in person.

    Reply
  70. Tara says

    April 26, 2017 at 1:26 am

    Did you replace the countertop? Sink?

    Reply
  71. Elizabeth says

    May 7, 2017 at 2:10 pm

    Bathrooms are fun to do! It’s amazing what even a great shelf can do to spruce up and change the look of a dull bathroom.

    Reply
  72. Sara says

    June 9, 2017 at 9:21 am

    I love it! Did you do anything to the floors? They look tan in the before but gray in the after. I want to do this same style but have similar tile and am worried about all the brown in the tile.

    Reply
    • Lauren says

      June 9, 2017 at 11:13 am

      Thanks! No, it’s just the lighting. I want to do something to those floors one day, but we haven’t gotten to it yet.

      Reply
  73. Kim Snider says

    June 15, 2017 at 2:11 pm

    Love the towel rack! where did you find the antique door knob back plates?

    Reply
  74. Kathleen says

    July 3, 2017 at 4:18 pm

    I love that you did NOT use subway tile! Looks fabulous as is <3

    Reply
  75. Lucie says

    July 8, 2017 at 10:55 am

    Hi Lauren,

    I found this because of your tap make over post. May I ask how they have lasted? Sorry if you have posted already, but I can’t find the search feature!

    Reply
    • Lauren says

      July 8, 2017 at 2:30 pm

      Hi Lucie! It held up beautifully! We moved out of this house in March this year, but it hadn’t chipped at all even up to that point. 🙂

      Reply
  76. Megan says

    September 11, 2017 at 1:29 pm

    It looks like you updated the counter top here, too. How did you do that?

    Reply
    • Lauren says

      September 12, 2017 at 12:12 am

      Hi, Megan! Nope! The counter top just looks brighter because of the paint color reflected on the walls.

      Reply
  77. Lori Sims says

    September 21, 2017 at 2:33 pm

    Thank you so much your great ideas! I painted my cabinets and walls the same colors and found some of the same decor. It came out beautiful. Is there anyway to post some pics? Thanks again.

    Reply
    • Lauren says

      September 22, 2017 at 3:29 pm

      Yay! So glad to hear that, Lori! You can always post them on my Facebook page: https://www.facebook.com/blesserhouse

      Reply
  78. Courtney Quickstad says

    October 21, 2017 at 10:20 pm

    Hello! Is the shower curtain rod and hooks black or some sort of bronze color? Would you mind sharing where you got those? Thanks, and love this bathroom so much!!!

    Reply
    • Lauren says

      October 21, 2017 at 10:33 pm

      Hi Courtney! They’re oil rubbed bronze. I just spray painted ones I already had using Rustoleum spray paint.

      Reply
      • Adry says

        September 11, 2018 at 10:46 am

        Lauren, did you sand the shower rod down first? And when you move your shower curtain does the paint not peel off? Thanks

        Reply
        • Lauren says

          September 13, 2018 at 9:29 pm

          Yes, same steps. We didn’t have any issues with peeling.

          Reply
  79. Brittney Sue says

    December 14, 2017 at 7:55 am

    WOW! I have been in awe over this bathroom on Pinterest for awhile now. It is finally the time for us to remodel here, so I finally visited this site to find information. I have never been so pleased in my life with anything as I am with the way you have organized all of this. Not just the bathroom mind you, but your website/blog. I am more than thankful for ALL the details and work you have put into all of this. It makes me feel like I have the power to do this. Did I mention I’m pregnant and hormonal, LOL. I actually have a little confidence here, remodeling is always a hassle and stressful situation for me, but with this it really doesn’t have to be. BRAVO….KUDOS…..AWESOME!! I also realize it has been years since this post, lol. I couldn’t resist commenting to compliment it though.

    Reply
  80. Melissa says

    January 13, 2018 at 8:58 pm

    Love! I think this is one of the best things to which I’ve ever had Pinterest lead me! 🙂 Great job!

    Reply
  81. Charity says

    April 7, 2018 at 10:19 pm

    Just wondering how this DIY held up? Thinking of doing the same in my bathroom 🙂 thanks!!

    Reply
    • Lauren says

      April 8, 2018 at 10:39 pm

      Held up perfectly!

      Reply
  82. Jilly says

    April 8, 2018 at 12:05 pm

    Hi 🙂 it looks amazing!!! Did you keep your old vanity countertop??? We are looking for something cheap 🙂

    Reply
    • Lauren says

      April 8, 2018 at 10:38 pm

      Yes! Kept the existing countertop. It just looks brighter because of the paint color and lighting change.

      Reply
  83. Jennifer says

    July 3, 2018 at 10:36 am

    Can you tell me why it is beneficial to mix the paint with the other paints you mentioned? I am about to paint my house all interior walls and am just curious what this does. Thanks so much!

    Reply
    • Lauren says

      July 9, 2018 at 3:13 pm

      It’s just cheaper that way. I don’t mean mix paint as in pour paint together and stir it up. Sorry, if that was confusing. I mean you can go to Home Depot and ask for a Sherwin Williams paint color in a gallon of Behr or Glidden paint. You don’t have to pay for a gallon of more expensive Sherwin Williams paint just because you prefer their colors. 🙂

      Reply
  84. Heather says

    July 9, 2018 at 8:16 am

    Love this bathroom!! What stain did you use on the shelves & towel rack ?

    Reply
    • Lauren says

      July 9, 2018 at 9:03 am

      We used Minwax Dark Walnut. 🙂

      Reply
  85. Makenzi says

    November 21, 2018 at 1:18 am

    Absolutely love your bathroom! I am currently remodeling ours & ive looked everywhere for a mirror like this. I’ve had no luck, I really wish the Kirkland’s store shipped 🙁

    Reply
    • Lauren says

      November 26, 2018 at 6:45 pm

      I hate it when stores do not ship!! Keep looking! Do not underestimate Marshall’s, HomeGoods and places like that.

      Reply
  86. Christi says

    December 3, 2018 at 3:55 am

    What do you mean when you say “Sherwin Williams mixed into Valspar?” Who mixed it and why that method?

    Reply
    • Lauren says

      December 4, 2018 at 9:06 am

      Hi Christi! You can go to Lowe’s and ask for a gallon of Valspar paint in a Sherwin Williams color. So you can still get the “designer” colors for the cheaper price of Valspar paint. Their database lets you get any brand’s color you want in any brand of paint formula you want.

      Reply
  87. Roni F says

    January 30, 2019 at 12:27 pm

    Hi Lauren. I was looking on Pinterest for “bathroom makeovers on a budget,” and came across yours. ‘Nuff said! Well, almost. I have two builder grade bathrooms almost IDENTICAL to your “before” pics. We are planning to sell the house and need to upgrade to make them appealing. I am just going to basically use yours for a blueprint. Thanks for sharing!

    Reply
    • Lauren says

      January 30, 2019 at 8:30 pm

      Hi, Roni!! Do it!! I hope your house sells in your favor. 🙂

      Reply
  88. Dayna Bellieu says

    March 17, 2019 at 7:52 am

    What a wonderful bathroom. I just bought a vanity, now I want to paint it. I also love your towel rack. Dayna

    Reply
    • Lauren says

      March 17, 2019 at 9:08 am

      Thank you!! You will be amazed at what a change paint can make. 🙂

      Reply
  89. Dakota Shelton says

    May 10, 2019 at 11:58 am

    Hey!! I’m buying a house and the guest bathroom looks so much like the before pics and I LOVE this makeover!!! I actually already hopped over to Kirkland’s and bought the mirror! Can’t wait! Did you do anything to the floors? I couldn’t tell, but they looked more gray in the after pics! THANKS for the inspo!!!

    Reply
    • Lauren says

      May 10, 2019 at 8:31 pm

      Hi, Dakota!! We did nothing to the floor. I always so how amazed I am by what a little paint can do. By painting the cabinets, the floors look different. It is CRAZY!!

      Reply
  90. Stephanie says

    March 5, 2020 at 1:54 am

    Such an amazing modern farmhouse bathroom makeover. Thanks Lauren for revealing it with your visitors. I love that towel rack and the door knobs. And planning to install the same one in my bathroom.

    Have a good day dear!

    Reply
    • Lauren says

      March 5, 2020 at 2:39 pm

      Thanks so much!

      Reply
  91. Christine says

    May 19, 2020 at 11:03 pm

    The basket on the sink! You remember what the dimensions were or where I can find one that size? I can’t seem to find that small of one.. 🤔

    Reply
    • Lauren says

      May 26, 2020 at 10:18 am

      I’m so sorry, ours was from Walmart but it was also 5 years ago so I’m not sure. Maybe try Amazon or Wayfair?

      Reply

Tell me what ya think! I read every comment I receive. Cancel reply

This site uses Akismet to reduce spam. Learn how your comment data is processed.

We’re Robert and Lauren, a DIY-loving duo just fighting the good fight in making our house a home one renovation and thrifted decorating adventure at a time. Home wasn’t built in a day, but the journey is half the fun. We’re so glad to have you here, and we hope you feel inspired to love the home you have.

Subscribe

Pin With Me

  • Home Office Ideas
  • A round-up of 20 of the best DIY wall decor ideas plus tutorials and tips to pull off the look easily and get the designer look for less.
  • How to paint a sink, countertop, tub, and shower for $100 and how to make it last using Rustoleum Tub & Tile Refinishing Kit #bathroom #bathroommakeover #diyproject #homeimprovement #paintedsink #paintedcountertop #paintedtub #paintedshower
  • A guide for the best sizes of rugs for different rooms, the best rug materials for different uses, and ways to pair them in open floor plans.
  • Learn to how to make hobnail Easter eggs inspired by vintage McCoy Pottery and hobnail art glass and milk glass. Paint the eggs in pastel colors and display them alongside your favorite vintage collections.
  • A round-up of over 50 beautiful coffee table books filled with inspiration from art, travel, design, music, history, fashion, and more.

Privacy Policy & Disclosures

We are a participant in the Amazon Services LLC Associates Program, an affiliate advertising program designed to provide a means for us to earn fees by linking to Amazon.com and affiliated sites.

Read our privacy policy and disclosures →

Privacy Policy

browse by category

browse by date

Copyright © 2021 Bless'er House. Web Design by Viva la Violet.