
DIY Pea Gravel Backyard Fire Pit Built in a Weekend
A step-by-step tutorial for how to build a DIY backyard firepit + the best equipment for making the job faster and easier.
By far, one of the best gifts my husband and I have given to each other is our outdoor fire pit in our back yard.
Maybe some couples wrap jewelry or a new coat to to give each other as presents on special occasions, but we gifted ourselves a backyard DIY fire pit. It’s the gift that keeps on giving.
And the best news: This fire pit can be built in just 2 days!

We actually had this project knocked out completely in about 9 hours total, but we had to wait for our next day gravel delivery to finish on Day 2.
We busted out our STIHL Yard Boss again like we did on our flower beds makeover from last summer, and it made the job go way faster.
Honestly, we were SHOCKED that we knocked out this backyard firepit so fast. That never seems to happen with big projects.
If you have the perfect spot in your yard for a pea stone patio and fire pit location, this post will walk you through how to make it happen.
It’s the perfect outdoor DIY project if you can’t install a brick patio due to lack of time and expense. But a truckload of pea gravel is the easiest way to make a new patio without needing extra hours and budget to lay pavers in your hard.
Backyard Inspiration: 15 Gorgeous Fire Pit Decorating Ideas

Important Backyard Conditions for Pea Gravel Patio
If you’ve been around a while, you might remember when our backyard looked like this. Fence falling in, wooden pergola rotting, bricks scattered around, shrubs taking over… it needed some love.
It’s really important that you make the ground level and choose an area in your yard that doesn’t normally puddle with water.
It took a long time and additional cost for us to even get to that blank slate, allowing us space to make a conversation area.


Robert and a close friend of ours demolished the fence and pergola a couple of years ago, and we called in the pros for the tree/shrub removal and grading/seeding this fall to make it a wide open space our family can enjoy.

The grass is still working its way in, so it’s not cute back here yet. But come spring, this outdoor space is going to look brand new and green!

The DIY Fire Pit After
And now it looks like this with the awesome new DIY fire pit! I’ll dive into all of the nitty gritty steps so you can make one in your own backyard.
And now, here is how our backyard looks 3 years later since the grass has grown in. Adding string lights around it later made it even better.
We have made so many great memories out here with family and friends.
Tutorial: How to Hang Outdoor String Lights Anywhere in a Backyard

Backyard DIY Fire Pit Tutorial
Here’s how we knocked out the backyard firepit so quickly. It’s a relatively simple project, a little labor intensive, but it’s certainly something a beginner DIYer could handle.
Supplies
- Tape measure
- Can of spray paint
- Flag markers
- Heavy duty weed block fabric
- Landscape fabric staples
- Mallet
- Scissors and/or utility knife
- Wooden stake
- String
- Heavy duty construction adhesive
- Caulk gun (for applying adhesive)
- Landscape edging (not required but recommended)
- Fire pit stone kit (We used a Tremron Munich stone kit in the color Sand)
- Edging stone (We used Tremron Munich Sand wedge blocks)
- Pea gravel (We used Colonial Grits pea gravel)
Tools
- STIHL Yard Boss
- STIHL Yard Boss Edger Attachment
- STIHL Bolo Tines Cultivator Attachment
- Large shovel
- Wheelbarrow
- Rake
- Leaf blower
Step 1 – Plan and Mark the Fire Pit Perimeter
First, we planned out our space using flag markers to visualize our pathway and circular fire pit area. We chose to make it a 314 square foot patio by making the entire area a circle 20 feet in diameter.
During our planning, we kept our edging stone length in mind (6 inches), so that each walkway edge wouldn’t require any stone cuts.
Step 2 – Dry Fit the Fire Pit Kit Stone
At this point, we dry-fitted our stone fire pit kit (no adhesive) so that we knew for sure the area around it was large enough for chairs and foot traffic. Our fire pit is 4 feet in diameter.

Step 3 – Mark the Seating Area Surrounding the Fire Pit
To plan our circular fire pit area, we drove a wooden stake into the ground, tied a string to the end, and used it as a center point to form a perfect circle as we marked with flags.
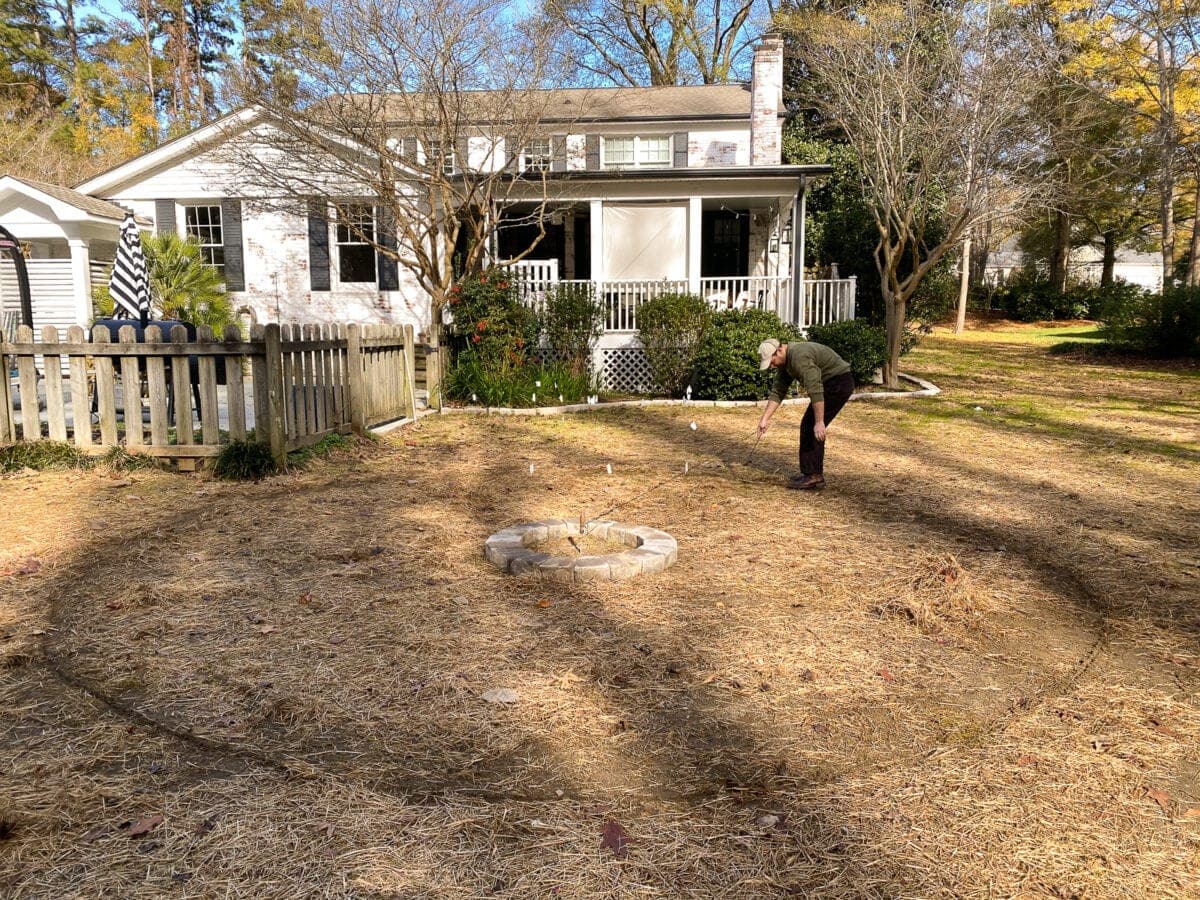
Step 4 – Spray Paint the Outline
Once we were happy with our fire pit layout, we spray painted the lines and removed the flag markers.

Step 5 – Edge the Painted Lines
To create an edge, Robert walked along with spray painted lines with the STIHL Yard Boss equipped with the Edger Attachment.


Step 6 – Remove Grass with Cultivator
Then to remove any grass, go over the area with the STIHL Yard Boss equipped with Bolo Tines Cultivator Attachment.
Brush the removed layer of grass out of the way to start with a smooth, dirt surface. Users should always wear all proper protective equipment and review the instruction manual before operation.

Step 7 – Roll Out Landscape Fabric and Secure
We then rolled out landscape fabric cut to the size and shape we needed and secured it to the dirt surface with landscape staples using a mallet.
Leave a hole in the fabric in the middle for the actual fire pit. (Since we already had an old canvas painting tarp, we used that underneath the landscape fabric too as an extra weed barrier.)

Step 8 – Place Edging Stones Around Seating Area
Next, we placed the edging stone all around the sides of the landscape fabric. Once happy with the layout, you can attach the stones to each other (including the fire pit kit) using heavy duty construction adhesive.
It’s a good idea to use metal edging to keep the stones in place longterm, but we didn’t do that step. In hindsight, I wish we had so the stones don’t shift over time.

Step 9 – Place Pea Gravel
Finally, we hauled the pea gravel with a wheelbarrow to pour over the landscape fabric surface and raked it smooth.
Ask your local landscape supply store or stone yard how much pea gravel you need for the number of square feet you have.
You want to aim for it to be approximately 2 1/2 inches of pea gravel. Our 20′ diameter fire pit area required 2.5 cubic yard of pea gravel. This gravel calculator can help.

Step 10 – Light a Fire and Enjoy Your Backyard Firepit!
And maybe decorate a little bit of course. 😉


Backyard Fire Pit Decor
We added black Adirondack chairs for comfy lounging and lit that newly built bad boy up! I turned over a wooden barrel planter as a little table for accessing s’mores supplies too. 😉


These little Christmas trees were a lucky backwoods tree farm find that we scored for $18 each! I put them in wooden barrel planters, but I’ll add some long-term boxwood shrubs later.

UPDATE: Here is how this fire pit and pea gravel patio has held up 3 years later!


Fire Pit Pea Gravel Patio Maintenance
UPDATE: 3 Years Later!
It’s been a few years since we finished this backyard fire pit, and we are so incredibly happy with this space! It is our absolute favorite place to gather with family, friends, and neighbors! It has proven to require very little maintenance.

Removing Debris
Whenever leaves fall in the pea gravel area in the fall, we just blow them out with a leaf blower. The gravel remains in place.
Weed Removal
In the spring, we spray the gravel once with weed killer and it usually remains weed free the rest of the year.
Gravel Dressing
A little gravel gets kicked out into the yard every now and then, but we have never needed to redress it with more gravel.
I’ve walked around on it in bare feet plenty of times and it doesn’t hurt since the gravel is round pebbles.

Y’all have no idea how thankful we are to have a backyard finally starting to take shape. We have mighty big plans for the rest of this backyard (crossing fingers for a work shed, play area for the girls, and a new fence).
UPDATE: See our full backyard transformation and cost breakdown here!


It’s been quite a journey, and the adventure’s over yet.
A backyard firepit really was the best gift ever for our family that we’re so excited to enjoy all year-round.


Home wasn’t built in a day. And this backyard is a witness to that.


It looks AWESOME!! Y’all are amazing!! Good work. Just would like to come hang out with you! But I live in Texas! LOL
It looks great! One question though, when you walk on the gravel, do you sink through the gravel to the landscape fabric? Did your chair legs sink down in it too? We are considering something similar, but don’t want the gravel to spread everywhere and make a mess on our existing patio. Thanks for your help!
Nope! It feels almost like walking on icy snow. You can wet it and tamp it down to help firm it up. It seems to stay well contained.
Where are the Adirondack chairs from.
Oh, really nice. You’re going to enjoy this I can see. A big improvement. Happy holidays!
That turned out really good Lauren! Such a cozy space. You are both so talented!
Where did you get your chairs