How to Build a DIY Bocce Ball Court in a Weekend
How to build a backyard DIY bocce ball court / horseshoe pit in a weekend for fun-filled outdoor gatherings.
Bring on the summer backyard cookouts and hangouts! And on into fall and winter and spring because we added a backyard bocce ball court!
It was not without a lot of hard work and sweat, I’ll tell you that. But gosh it’s worth every second for the fun family memories we have ahead of us.

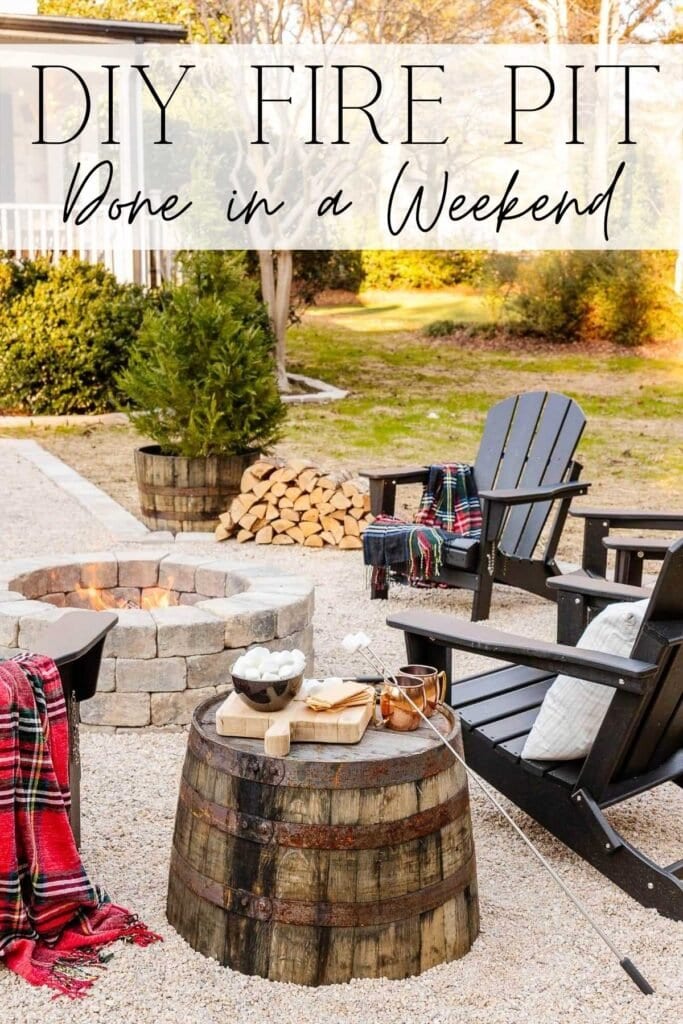
We definitely owe this idea of this bocce ball court to Robert’s sister. Just after we finished making our fire pit, she noticed that we had this area at the back of our yard that was just the right size and elevation for a small bocce court surface.
It’s one of our favorite games to play on the beach in the summer, so we took her idea and ran with it. (Thanks, Janet!)
The whole thing took us about 14 hours total (except for drying time), so it’s a fairly quick project that can be ready to enjoy on a pretty day in the backyard with a cold drink in hand.
Even though it’s a fairly new trend lately, like pickle ball, bocce is a social game that has been around for centuries. It’s an ancient game that originates as far as 5200 BC!
If you’ve ever wanted to have your own bocce ball court (that can also double as a horseshoe pit), the full tutorial is below in this post.

What to Consider Before Bocce Court Construction
- Make sure you have an area of your backyard mostly flat and level enough for a playing surface.
- Pick an area that has good drainage and doesn’t usually have standing water. (If you do have water issues, consider installing a French drain.)
- Place the court where it’s not in the way of regular foot traffic.
- Decide the size of the court you need. A regulation bocce ball court size, according to the United States Bocce Federation and Bocce Builders of America, is 86.92 feet long by 13.12 feet wide. (We made our bocce ball court dimensions 1/3 regulation size of official bocce ball courts.)
It’s a great use of empty space, especially in a narrow area like a side yard.

How to Make a DIY Bocce Ball Court
You can find most of the tools and supplies you need at your local hardware store or landscape supply store.
Tools
- STIHL Yard Boss®
- STIHL Yard Boss® Edger Attachment
- Bolo Tines Cultivator Attachment
- Drill with bits
- Miter saw
- Hammer
- Mallet
- Scissors and/or utility knife
- Wheelbarrow
- Shovels
- Rake
- Tamper
- All necessary safety equipment – brush shield protector, gloves, safety glasses
Supplies
- 16 – 4x4x8 boards
- Waterproofing deck stain
- Stain brushes
- Tape measure
- Flag markers
- White spray paint (or any light color will do)
- Weed barrier fabric
- Landscaping staples
- String
- 1/2″ x 1′ rebar
- #14 4 3/4″ wood screws
- Paver base (enough to cover 1 1/2″ depth of a 5′ x 32′ area)
- Decomposed granite (preferred) or screen washing (enough to cover 2″ depth)
- 2×4 board cut slightly less than 5′ long
- Crushed oyster shell (optional)
Total for all of our supplies was $660.
And of course, don’t forget your bocce ball set and scoreboard. 😉 You can change it up and use a horseshoe kit too.

Prepare a Level Ground for the Bocce Court
Step 1 – Apply Waterproofing Stain to Boards
Brush a couple of coats of waterproofing stain on your 4’x4′ boards on all sides first and let dry. You will use these later as your court’s wooden border.
Step 2 – Measure and Mark the Bocce Court Outline
While the boards dry, start measuring, planning, and marking your bocce ball court with a tape measure and flag markers. Once you’re happy with the court’s position, use string to outline the court, and spray paint the lines to mark the perimeter.

Step 3 – Use an Edger to Cut Around the Outline
Use an edger (in our case we have the STIHL Yard Boss® with an Edger Attachment) to cut into the white painted line around the entire court layout.


Step 4 – Till Up Grass Within Outlined Area
Using a tiller for this step (we changed out the Edger Attachment for the Bolo Tines Cultivator Attachment on our Yard Boss for this step), and begin removing grass and 1-2″ depth of soil from the middle of the marked area.

Step 5 – Remove Loose Grass and Soil
Robert was able to cultivate the ground while I worked on the opposite side of the court to remove the loose grass and soil.

Continue cultivating until you’ve removed 1-2 inches of dirt depth.
(Robert lives for this stuff. Do you see that smile?)

Step 6 – Roll Out Weed Barrier and Secure with Yard Staples
Once you haul off the grass and top layer of dirt, roll out, cut, and staple the weed fabric in place. This will help with future court maintenance. Placing scrap cardboard underneath works well too.

Build Bocce Court Frame
Step 1 – Attach Dry Waterproofed 4×4 Boards Around Perimeter
Use the miter saw to cut the stained 4×4 boards and begin assembling the wooden frame.

Step 2 – Secure Boards with Deck Screws
Screw the boards together at the corners using the deck screws. And screw the adjoining boards together along the sides at an angle.

Then you have your basic frame.

Would you like to save this?
Step 3 – Add Second Stacked Perimeter of Boards
Cut more 4×4 boards and place them on top of the existing frame. For an added detail, you can cut the ends of 4 of the boards at an angle with a miter saw so that it will create an “entryway” onto the court.

Step 4 – Anchor Frame with Rebar Spikes
To keep the frame from moving, you’ll have to anchor it to the ground. Drill a pilot hole first into the top of the frame.

And drive a rebar spike through it into the ground.

Repeat the rebar all around the frame until it feels secure.

Step 5 – Touch Up Any Bare Spots on Boards with Waterproofing Stain
Then touch up or add more deck stain to waterproof the wood.

Fill In Court
Step 1 – Spread Paver Base
Once the stain is dry, spread the paver base layer as evenly as possible with a rake or shovel in a 2-3″ layer. Use a tamper to pack it down.
Some bocce court designs use artificial turf, but we chose to stick with organic surfaces.

Step 2 – Spread Decomposed Granite
Spread the decomposed granite evenly in a 2″-3″ layer and tamp it down.
(Our local landscape supply company didn’t have any decomposed granite, so they suggested screen washing as an alternative. Still worked great!) Over time, it should settle and become more compact.

Step 3 – Level It Out
Use a 2×4 board cut to the width of the court to shimmy along the top of the newly spread soil to make it even. And, in our case, we found a big squeegee came in handy. Random but it worked.
Optional: Spread Crushed Oyster Shell
Normally, bocce requires traditional oyster shell covering to make the flat surface, but that wasn’t available in our area. To finish, you can spread a 2″ layer of crushed oyster shell on top, using the same process as before, tamping and leveling smooth.
Lightly spray the surface with a garden hose to help tamp down the material so bocce balls have minimal bounce.

That’s it! Bring on the bocce!
Update: It’s been 3 years since we completed this project and we are completely happy with it! We’ve had years of enjoyment at every backyard barbecue!
The placement beside our fire pit is perfect so if guests don’t feel like sitting around the fire, they can have a great time with a game instead. It’s been perfect for people of all ages and skill levels from ages 5 to 95.
This bocce ball court has required absolutely no ongoing maintenance other than the occasional bit of debris that blows in.
Bocce Ball Court Maintenance
After a couple of years, the 4×4 will likely need a refreshed application of waterproofing stain. And the decomposed granite and/or crushed oyster shell will possibly need a redressing every 3-4 years, but it’s all around very low maintenance.
Whenever needed, you can smooth out the top surface with a wide broom or the backside of a rake.
For spring maintenance, if you start to see weeds starting to peek through each year, spray the playing surface with weed killer.

Pretty soon, that old fence is coming down, and I can’t wait to see how it transforms the backyard even more! (Update: See the new fence here.)
I’m so glad we finished this court just in time for Memorial Day as we can hang out with friends and neighbors again. Our 8-year old Olivia has already schooled us at this game. Ha!