Bless'er House

  • Home
  • About
    • Contact
    • Advertise / Privacy Policy
  • Projects
    • Room Reveals
    • Budget Decor
    • Home Improvement
    • Organizing
    • Furniture Makeovers
    • Seasonal
  • Tour Our Home
    • Our Current House
    • Our First House
  • Shop Our House
    • Shop Our Current House
    • Shop Our First House
  • Shop Bless’er House
    • Shop Our Instagram
    • Shop BH Style
    • How to Install Lightroom Presets
  • Blog
    • Facebook
    • Instagram
    • Pinterest
    • Twitter

DIY Painted Bathroom Sink Countertop

September 24, 2017 ~ 59 Comments

Sharing is caring!

8329shares
  • Share
  • Tweet

An 80s beige cultured marble sink and countertop get a bright white makeover using super durable paint meant specifically for sinks, tubs, and showers.

As promised, I’m back with all of the progress and answers to questions about our hallway bathroom’s painted sink and countertop.

Some of y’all saw my sneak peek I shared a couple of weeks ago on my Instagram Stories about the beginning stages of the process. And the response was a mix of excitement, denial, and downright skepticism.

I was right. there. with. y’all.

But I can tell ya… I’m amaaaaaazed, you guys! We have a painted bathroom sink, and it looks a gajillion times better than the 80s beige cultured marble we had before.

Yeah, remember that snazziness?
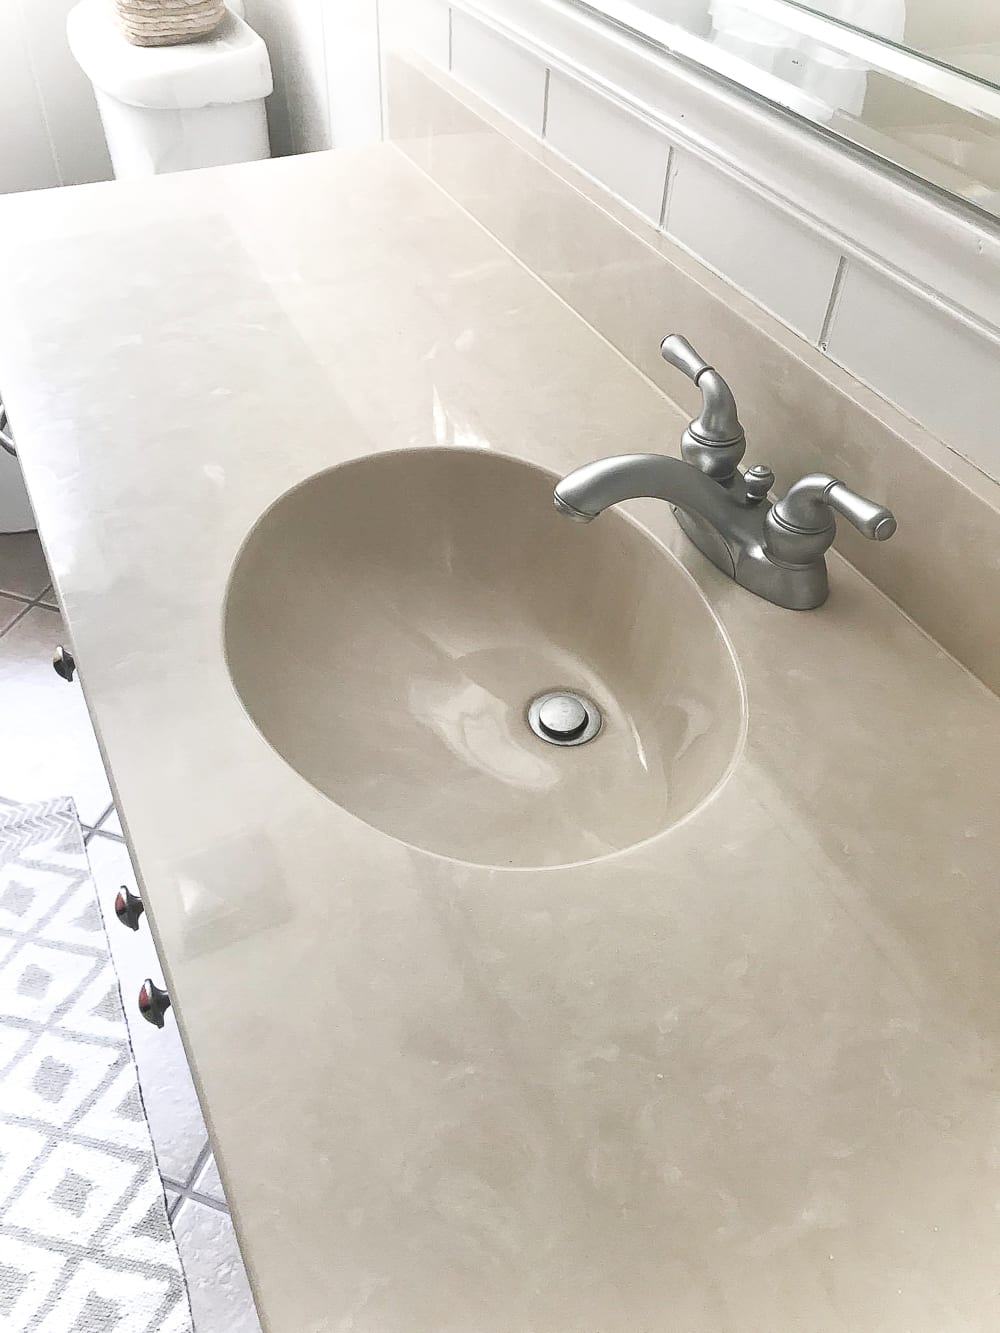
DIY Painted Bathroom Sink Countertop | blesserhouse.com - An 80s beige cultured marble sink and countertop get a bright white makeover using super durable paint meant specifically for sinks, tubs, and showers

And then bam!

DIY Painted Bathroom Sink Countertop | blesserhouse.com - An 80s beige cultured marble sink and countertop get a bright white makeover using super durable paint meant specifically for sinks, tubs, and showers

I guess that before shot isn’t entirely fair since I took it at night with the lights on using my cell phone. Blame it on laziness. But come on! That change is huge!

If you’ve missed some of the makeover madness so far, we’ve had one goal in this bathroom- to make it look totally different for as little mulah as possible, which means paint, lots and lots of paint. (This is our full room makeover plan and paint progress so far.)

Here’s the whole skinny for painting your sink (or tub/shower)…

Supplies Used: (Some affiliate links are provided below for convenience.)

  • Rustoleum Tub & Tile Refinishing Kit (1 box covered my entire sink and countertop.)
  • Abrasive scrub cleaning pads
  • Comet
  • Lime-A-Way
  • 400 grit sandpaper
  • Tack cloth
  • Window scraper and utility knife with plenty of fresh blades
  • Mineral spirits
  • Spray bottle with water
  • Clean, dry towel
  • Frog Tape
  • 1.5″ angled pro quality paint brush
  • Foam roller and extra roller covers
  • Small roller tray
  • Ventilation mask (do NOT attempt without this)
  • Chemical resistant gloves
  • Safety glasses
  • Box fan (optional but highly recommend)
  • Drop cloths
  • White silicone caulk and caulk gun

I should tell you right up front, before you’re ready to buy a box of this sink refinishing paint, that I rate this stuff 4 out of 5 stars. It’s not a walk in the park, I’ll tell ya that. Because this paint stinks to high heaven. Robert, Olivia, and I ended up having to spend the weekend at my parents’ house nearby because there was no way we could sleep here with the fumes taking their own sweet time to air out.

But I’m still SO happy we did it! (Good excuse to spend time with family anyway, right?)

1. Using the window scraper and utility knife, I removed all of the old silicone caulk first, changing out the blades often to scrape it all away. For any remaining caulk residue, I wiped down the cracks of the countertop edges with the mineral spirits.

DIY Painted Bathroom Sink Countertop | blesserhouse.com - An 80s beige cultured marble sink and countertop get a bright white makeover using super durable paint meant specifically for sinks, tubs, and showers

2. Then, to make sure it was well cleaned, I scrubbed the sink and countertop all over with Comet using an abrasive cleaning pad and rinsed with water using the spray bottle and dried.

DIY Painted Bathroom Sink Countertop | blesserhouse.com - An 80s beige cultured marble sink and countertop get a bright white makeover using super durable paint meant specifically for sinks, tubs, and showers

3. To make sure all residue was removed, I sprayed the sink and countertop again with the Lime-a-way and wiped clean.

DIY Painted Bathroom Sink Countertop | blesserhouse.com - An 80s beige cultured marble sink and countertop get a bright white makeover using super durable paint meant specifically for sinks, tubs, and showers

4. The directions suggested for the best prep to sand the entire surface first with 400 grit sandpaper, followed by a tack cloth to remove any sanding dust.

5. I let the countertop and sink air dry for a couple of hours after all of the prep just to be safe, and I used the Frog Tape on the faucet and drain. (We were originally just going to remove it, but we had a water line that was being a total pain, so I just decided to tape. If you have the capability, removing the faucet would be best.)
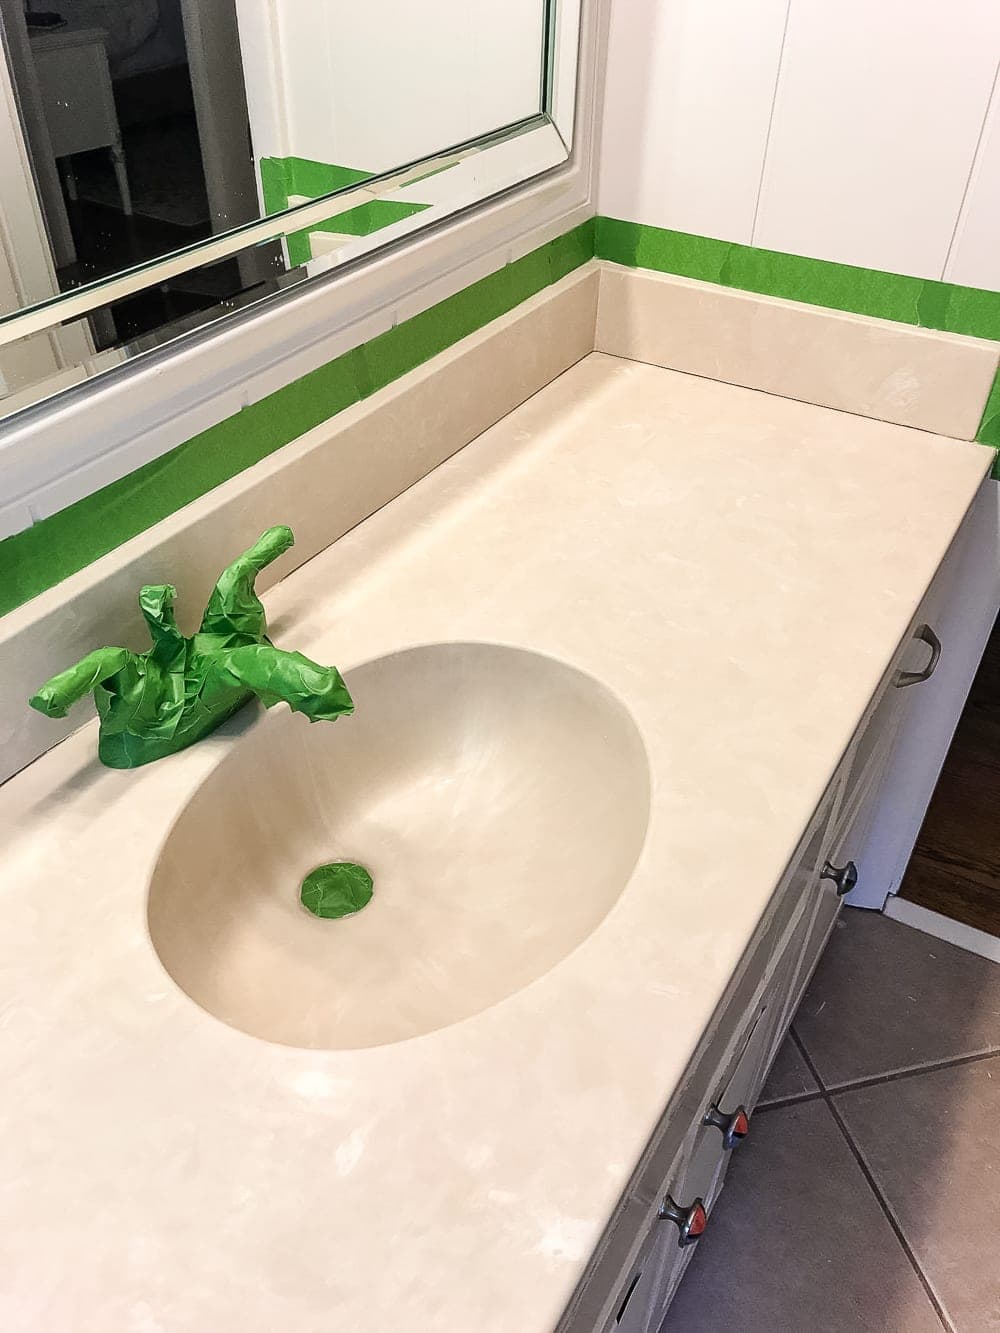
DIY Painted Bathroom Sink Countertop | blesserhouse.com - An 80s beige cultured marble sink and countertop get a bright white makeover using super durable paint meant specifically for sinks, tubs, and showers

6. The paint in the refinishing kit comes in two different cans that you mix right before you’re ready to use it, so follow the directions on the box to combine the two. Before you open anything, put on the ventilation mask, gloves, and safety glasses, open a bathroom window (if you have one), and turn on the box fan to full blast to help push any fumes out of the window.

And then rock your best Darth Vader impression.

DIY Painted Bathroom Sink Countertop | blesserhouse.com - An 80s beige cultured marble sink and countertop get a bright white makeover using super durable paint meant specifically for sinks, tubs, and showers

7. I used the 1.5″ angled brush to paint all of the edges, corners, and rounded places that a roller would have a hard time reaching.

DIY Painted Bathroom Sink Countertop | blesserhouse.com - An 80s beige cultured marble sink and countertop get a bright white makeover using super durable paint meant specifically for sinks, tubs, and showers

8. Then, I poured some of the paint into the roller tray and started painting the rest of the countertop and sink with the foam roller. Try not to over brush since roller/brush marks will be more visible the more you work the paint. This paint is self leveling if you resist the urge to brush too much (I learned the hard way in a couple of places.)

DIY Painted Bathroom Sink Countertop | blesserhouse.com - An 80s beige cultured marble sink and countertop get a bright white makeover using super durable paint meant specifically for sinks, tubs, and showers

9. Wait 1 hour between coats. It took me 3 coats to get a solid white finish since I wanted to go slow with thin, even coats.

DIY Painted Bathroom Sink Countertop | blesserhouse.com - An 80s beige cultured marble sink and countertop get a bright white makeover using super durable paint meant specifically for sinks, tubs, and showers

10. Once dry, remove the Frog Tape and seal all cracks and edges with white silicone caulk.

DIY Painted Bathroom Sink Countertop | blesserhouse.com - An 80s beige cultured marble sink and countertop get a bright white makeover using super durable paint meant specifically for sinks, tubs, and showers

DIY Painted Bathroom Sink Countertop | blesserhouse.com - An 80s beige cultured marble sink and countertop get a bright white makeover using super durable paint meant specifically for sinks, tubs, and showers

11. If you end up with any paint residue stuck on your faucet or drain that might have seeped under the tape, just dip a few Q-tips into a little acetone or acetone based nail polish remover and scrub the metal to get rid of the paint spots.

DIY Painted Bathroom Sink Countertop | blesserhouse.com - An 80s beige cultured marble sink and countertop get a bright white makeover using super durable paint meant specifically for sinks, tubs, and showers

Done! Wait at least 3 days for the paint to fully cure, and it’s ready for water.

After tackling the sink, I spent another weekend painting the tub/shower combo, and I was down to my last coat when I ran out of paint. Womp womp.

DIY Painted Bathroom Sink Countertop | blesserhouse.com - An 80s beige cultured marble sink and countertop get a bright white makeover using super durable paint meant specifically for sinks, tubs, and showers

So it’s still a work in progress.

DIY Painted Bathroom Sink Countertop | blesserhouse.com - An 80s beige cultured marble sink and countertop get a bright white makeover using super durable paint meant specifically for sinks, tubs, and showers

I’m sure I’ll report back once that’s done and, a few months down the road, I’ll try to update with how it’s holding up in durability.

DIY Painted Bathroom Sink Countertop | blesserhouse.com - An 80s beige cultured marble sink and countertop get a bright white makeover using super durable paint meant specifically for sinks, tubs, and showers

Considering this is a Phase 1 sort of makeover until we can do a hardcore Phase 2 demo and remodel in a couple of years, I’m a-okay with how it’s going so far.
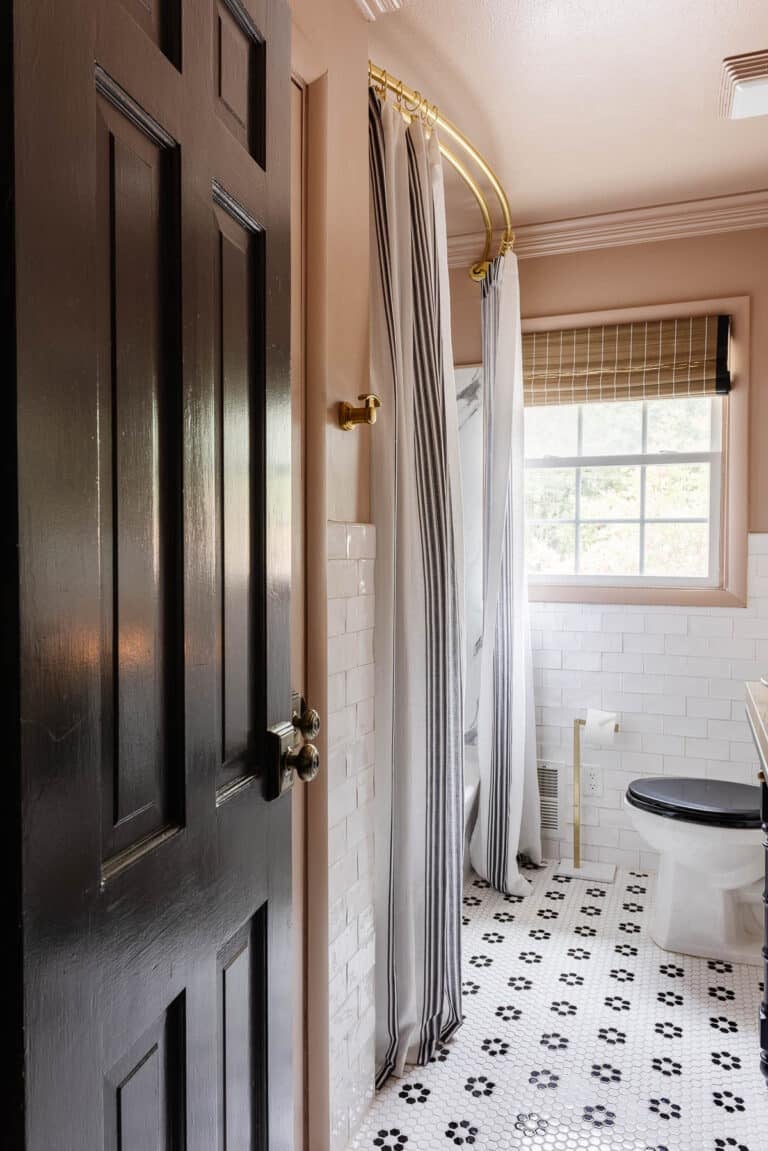
Hey, we’re not in a sea of beige anymore!

DIY Painted Bathroom Sink Countertop | blesserhouse.com - An 80s beige cultured marble sink and countertop get a bright white makeover using super durable paint meant specifically for sinks, tubs, and showers

DIY Painted Bathroom Sink Countertop | blesserhouse.com - An 80s beige cultured marble sink and countertop get a bright white makeover using super durable paint meant specifically for sinks, tubs, and showers

The last of Operation: Beige Banishment will be to paint that bathroom vanity cabinet that I’ll be doing in the next week or two, and we’ll have this space looking almost new for just the cost of paint. Woo to the hoo!

Olivia’s/Guest Bathroom Makeover To-Do:

  • Paint walls (Magnolia Home Paint Weekend)
  • Paint trim (Benjamin Moore Simply White)
  • Paint doors (Benjamin Moore Wrought Iron)
  • Paint sink
  • Paint tub/shower (alllllmost finished)
  • Paint vanity cabinet
  • Paint tile grout
  • Makeover vanity lighting
  • Hang wall decor
  • Decorate

So this begs the question, have you painted your tub/shower/sink and lived to tell the tale? Would you mind sharing how yours has held up, if you have? I guess there’s no going back now.

If you want to save this post for later, you can pin it here:

DIY Painted Bathroom Sink Countertop | blesserhouse.com - An 80s beige cultured marble sink and countertop get a bright white makeover using super durable paint meant specifically for sinks, tubs, and showers


Related

Filed Under: Bathroom, Home Improvement, Painting
Tagged With: Bathroom, Home Improvement, Painting

« 8 Fall Decorating Tips for a Budget and Fall Home Tour 2017
How to Create a Home Decor Capsule Wardrobe »

Comments

  1. Leslie says

    September 25, 2017 at 10:47 am

    Wow! Looks great. I have a yellow-ish top in my extra bathroom(from the 70’s I guess) and have been after my husband to redo it. This might be good, aside from the smell

    Reply
    • Lauren says

      September 25, 2017 at 11:50 am

      It’s definitely a great solution if you can manage to do it right before a weekend trip out of town maybe. 🙂

      Reply
  2. cheryl says

    September 25, 2017 at 10:54 am

    Love how it turned out and sounds like it wasn’t too hard. Thanks for all of the tips too. Can’t wait to see it when it is all completed. You are so talented!

    Reply
    • Lauren says

      September 25, 2017 at 11:49 am

      Not all that hard, just time consuming and smelly/messy. A job I’m SO glad is nearly over. 🙂 Thanks so much, Cheryl!

      Reply
      • Robin says

        February 2, 2021 at 1:59 pm

        Thank you for your very detailed directions. It looks beautiful. But I think I am going to attempt to eliminate a few of those including the smelly stuff and try just rust oleum paint for plastic after sanding down well and cleaning the area and then sealing it with the clear varnish. I have seen that completed on others sinks and it came out pretty well minus all the smell and headaches. I will let you know how it goes.

        Reply
  3. Lynda says

    September 25, 2017 at 11:23 am

    What a great job! I’ll be interested to see how this holds up. We need to redo our 2 bathtubs and were going to have someone come in and do them. His technique involves using acid to etch the finish so the paint holds better. Since we just had our septic system redone we are not anxious to go flushing acid down it! We’re in the process of finishing the rest of both bathrooms and then will make a decision on the tubs. While this looks like a big job, I think it’s doable for us and you didn’t use any acid… Thank you!

    Reply
    • Lauren says

      September 25, 2017 at 11:48 am

      I’m curious about that too. I figured if it’s a massive fail and starts chipping, we plan to rip out everything in a couple of years anyway. (Extra motivation if it doesn’t hold up, maybe?) I’ll have to report back 6 months down the road about its durability. I haven’t heard about hiring someone to etch with acid. Interesting! I can totally understand the reservations about what it’ll do to your system though. That’s concerning for sure.

      Reply
      • Courtnee says

        August 11, 2019 at 3:50 am

        Update??☺️

        Reply
        • Lauren says

          August 13, 2019 at 2:38 pm

          We have since renovated this bathroom, but it lasted beautifully for a year and a half and still looked great until we got to a full reno. Here’s an update that you can see after almost a year of wear: https://www.blesserhouse.com/our-painted-sink-countertop-tub-shower-8-months-later/

          Reply
  4. Crystel says

    September 25, 2017 at 11:39 am

    This is beautiful! Paint is the miracle of the century.

    Reply
    • Lauren says

      September 25, 2017 at 11:45 am

      Ain’t that the truth!

      Reply
  5. Gwen says

    September 25, 2017 at 12:02 pm

    Way back when. Was told it can’t be done, I painted my kitchen tile from a pea green to white. It was 1980!!! Back then I was told to use this hand held painting tool that worked great. I just saw one advertised on TV as a new thing and I thought, Wait. I’ve used that with great success. My painted tile held up for the four years I lived there. I do believe yours will until you decide to update. Or move ?

    Reply
    • Lauren says

      September 25, 2017 at 4:41 pm

      That’s great to know, Gwen! You were just ahead of your time, huh? 😉

      Reply
  6. Ivory says

    September 25, 2017 at 12:16 pm

    What a beautiful transformation. As always, you do great work. Lovin it!

    Reply
    • Lauren says

      September 25, 2017 at 4:41 pm

      Thanks, Ivory!

      Reply
  7. Peg says

    September 25, 2017 at 1:53 pm

    Wow!! You simply amaze me!! xoxo

    Reply
    • Lauren says

      September 25, 2017 at 4:41 pm

      Aw thanks, Peg!

      Reply
  8. MARY-ANN (FROM CANADA!) says

    September 25, 2017 at 3:30 pm

    What a difference the paint makes! Looks so nice! You never cease to amaze me with everything you tackle! Enjoy! Blessings!

    Reply
    • Lauren says

      September 25, 2017 at 4:44 pm

      Thanks, Mary-Ann!

      Reply
  9. Debbie says

    September 25, 2017 at 5:16 pm

    We painted our tub surround using a similar product (not rustoleum). That was 5 years ago, it held up fairly good until my daughter stuck a sticky label (peeled from something) to it, it took the paint right off 🙁 also, a large blob of shampoo or body wash was on the tile a few days before I noticed and it stained the tile. But considering it’s been 5 years, I’d say not too bad considering the abuse a teenager throws at it.

    Reply
  10. Marge says

    September 25, 2017 at 7:22 pm

    I have to replace a teal counter. I may give a go at your method until I can upgrade to a new slightly less jarring color. Let us know how it holds up.

    Reply
  11. Elizabeth says

    September 25, 2017 at 7:24 pm

    Looks great! I have a converted garage apartment attached to our house that I’m looking to redo. Weird 80’s pink laminate counters in the kitchenette and beige and pink streaked marble look in the bathroom. I’ll be keeping this post handy for when I finally get to paint it all!

    Reply
  12. P.I. Barrington says

    September 25, 2017 at 8:53 pm

    OMG Lauren! We sold our house of 42 years in California and moved to Knoxville, TN last year AND we have a rose-beige bathroom sink that I’ve been trying to change without a major renovation!! The bathroom is tiny but can be changed in color much like yours. Until I saw your post, I had no idea a counter top and sink could be painted at all and figured I was stuck with it. Thanks so much for posting this–it’s exactly what I wished for, lol! I am a subscriber to your blog so please let us know how the paint holds up.
    Thanks again,
    Patti

    Reply
  13. Deb Kelley says

    September 26, 2017 at 12:03 pm

    Girl~

    Is there anything you CAN’T do? Seriously, I am always amazed at how you can snap your fingers or wave your magic decorating wand and make something beautiful appear. It looks fabulous!

    Have a blessed one!
    Deb 🙂

    Reply
    • Lauren says

      September 27, 2017 at 12:26 am

      Ohhhh but if only it was that simple. I wiggle my nose and blink and nothing happens. Darn. Haha! Thanks, Deb!!!

      Reply
  14. Alex says

    September 28, 2017 at 3:15 pm

    I’m so glad I just saw you mention this on your IG stories! Our bathroom is AWFUL! It’s like a dark beige/yellow. So gross! We’ll be renting this house out in a year or two, so I don’t want to invest too much on updating the bathroom. A $26 box of paint in the perfect solution for me!

    Reply
  15. Anna says

    September 28, 2017 at 11:18 pm

    Looks great. I haven’t used this paint on version of this product but I’ve read other blogs and reviews that say the longevity of it isn’t so great. I suspect it might also depend on the type of water you have in your area (eg. hard water w/lots of minerals) and how much usage there is.

    I have used the product in the spray version. We used it on a 1940’s sink that was in our laundry room when we bought our house. My husband used a citrus paint stripper to get it ready (the former home owners had just tried to paint it…oh dear!). Then after a thorough cleaning and following the instructions on the can, he sprayed it in our garage. (Yes, we were thankful the entire sink was easily removed to do the stripping/cleaning/painting outside.)

    The finished product looks like a new factory finish and has held up wonderfully for over a year; however honestly I don’t use the sink that much.

    We are all waiting to see how yours holds up. The look is great though. Thumbs up!

    Reply
  16. Hope says

    September 29, 2017 at 5:02 pm

    I didn’t paint my sink or countertop but I did paint my tile walls at my old house. When we moved it had been 3 years and was still in perfect condition. As long as you don’t use super abrasive cleaners or scrubbies it will look gorgeous.

    Reply
  17. Laurie says

    October 4, 2017 at 2:19 pm

    I know you did concrete counter tops in your old kitchen. Was it more work or less work than this method?

    Reply
    • Lauren says

      October 4, 2017 at 2:31 pm

      The concrete was definitely more work and much more messy. I’d choose this over attempting the concrete again for sure. But I was pretty happy with the results of both, so it was worth it either way. 🙂

      Reply
  18. Jenni Dougherty says

    February 11, 2018 at 3:38 pm

    Hi!!! Obsessed with your blog lately (have been trying lots of different things). We did our sink today and wanted to ask if yours had a perfectly smooth finish? I bought all the stuff you put on there but have seen some rougher parts around the sink that don’t look perfect ? is that normal?

    Thanks!

    Reply
    • Lauren says

      February 14, 2018 at 12:31 pm

      Thanks, Jenni! Ours is mostly smooth. There are a couple of spots where you can tell it’s painted, but only if you look closely. I will say don’t over brush it. One swipe of paint, and that should do it. If you work the paint too much, it’s starts to gunk up and looks rough. I ended up having to use 3 coats.

      Reply
  19. Amanda says

    April 19, 2018 at 12:36 pm

    How did it end up holding up?

    I have 2 little kids that drop toothpaste ALLL the time, that needs to be repeatedly cleaned.

    Reply
    • Lauren says

      April 20, 2018 at 10:42 am

      It’s held up great! My 5 year-old leaves bright pink toothpaste on it all the time and it scrubs right off. There are a couple of small scratches in the bottom of the tub from bathing our dogs and their claws scuff it a little, but even with that considered, I’m happy with it.

      Reply
  20. Heather says

    April 19, 2018 at 8:26 pm

    I love your blog!!! There are soooo many useful posts! I’m getting ready to paint my shower with this same product. I’m curious to know how many kits it took to do the sink and tub/surround? I ordered 2 to do my shower and I’m hoping it’s enough. I’ve heard from more than just you that 3 coats are necessary to get the desired finish. Also, now that it’s been 6 months, how is it holding up? Sorry if you’ve written an update post ?

    Reply
    • Lauren says

      April 20, 2018 at 10:41 am

      So glad to hear that, Heather! It took 4 kits total for the sink, countertop, tub, and shower. So you might be okay with 2 if yours is just a shower. It’s still holding up beautifully! I plan to write an update post very soon. There are a couple of small scratches in the bottom of the tub but that’s mainly because we bathe our dogs in it and they clawed it a little. Still, even with that considered, I’m very pleased. Completely worth it.

      Reply
  21. Karolyn Love says

    May 1, 2018 at 8:51 pm

    Turned out beautiful! Was the sink/counter top a laminate and tub acrylic or porcelain? My tub is acrylic so was wondering if this process is good for that…Thanks!

    Reply
  22. Kaeleigh says

    May 18, 2018 at 11:01 am

    Hi there – I’m excited to try this! I also love that beautiful teal color, do you happen to remember what color you used?
    Thanks!

    Reply
    • Lauren says

      May 18, 2018 at 12:46 pm

      Yes! The teal is Magnolia Home Paint in the color Weekend.

      Reply
  23. Jennifer says

    July 23, 2018 at 9:36 am

    I’m curious to know how it is holding up after almost a year. I have just moved into a fixer upper and the sinks in every bathroom are hideous. Two are avocado green, one yellow and one a dingy off white color. A blast from my childhood past! I need a quick, inexpensive fix as we are not prepared to rip out bathrooms yet. Major repairs like roof and siding first. But I am not going to be able to live with these counters and sinks much longer!

    Reply
    • Lauren says

      July 23, 2018 at 6:50 pm

      Hi Jennifer! I shared an update of it in this post: https://www.blesserhouse.com/our-painted-sink-countertop-tub-shower-8-months-later/ It’s been 10 months and still looks amazing so far!

      Reply
  24. Cindy says

    February 2, 2019 at 10:51 am

    Oh, I am totally planning on trying this cost effective fix. I painted my 1970s green counter tops with counter top paint from lowes. I have been very pleased. Oh, it smells horrible too. Do this on a great day to have the windows open and fans drawing the fumes from the house.

    Reply
  25. Graley says

    September 16, 2019 at 9:56 am

    Hi, Lauren! I am working on home projects as I transition from my very long days as a junior high educator into retirement. Your home renovations have turned out beautifully and are such an inspiration! I have been reading about your sink painting project and was wondering how difficult and obvious touch-ups to the painted finish would be? Thanks!

    Reply
    • Lauren says

      September 16, 2019 at 9:01 pm

      Hi! It was the perfect fix for us until we were able to gut the bathroom for a complete remodel. It lasted for over a year and we did not need any touch ups. 🙂

      Reply
  26. erin oconnor says

    September 26, 2019 at 3:20 pm

    I could have sworn I saw a post about how you painted the vanity but I can’t find it. Can you link me or am I imagining that? Lol

    Reply
    • Lauren says

      September 26, 2019 at 9:21 pm

      Hi, Erin. This is the post about the painted countertop.

      Reply
  27. Amy says

    May 21, 2020 at 12:12 am

    Does it have to be a foam roller? Could I use a regular paint roller?

    Reply
    • Lauren says

      May 26, 2020 at 10:08 am

      I would say for a project like this, a foam roller is going to be your best bet.

      Reply
  28. Liz says

    July 6, 2020 at 11:57 am

    Were you able to see lines from the paint roller when it was complete. I just finished mine and it’s driving me nuts that I can see some overlap lines!

    Reply
    • Lauren says

      July 14, 2020 at 8:41 am

      If you do multiple thin coats, it helps. But I did have to be careful to only lightly roll to help prevent roller marks.

      Reply
  29. Janice Pestun says

    July 18, 2020 at 3:08 pm

    Hi there. I decided to jump on thr paint the sink band wagon. However on one sink I have tiny holes appearing – not bubbles. Why would this happen

    Reply
    • Lauren says

      July 19, 2020 at 11:28 pm

      Oh no! What did you use to clean the sink prior? Or maybe the cleanser wasn’t rinsed well enough in that sink?

      Reply
  30. Janice Pestun says

    July 20, 2020 at 12:37 am

    I did us comet and lime away. What would you do to fix this?

    Reply
  31. June Runyon says

    November 8, 2020 at 8:50 pm

    Hi Lauren. My gosh this countertop turned out great! I have a quick question…I have seen where several people used Rustoleum Appliance Epoxy Spray to do this same DIY project. Have you ever tried that rather than the roll/brush on product? Your comments would be very appreciated! Thanks so much! June

    Reply
    • Lauren says

      November 10, 2020 at 7:48 am

      We spray painted faucets and hardware in the master shower of our first house. We loved the outcome of that little hack too.

      Reply
  32. aknodt says

    January 5, 2021 at 10:12 am

    Great tutorial, thanks for sharing your experience!! I just did this myself and am mostly satisfied with the results, but there are a couple of spots here and there that get to me :-/ It occurred to me that it may be possible to buff out little imperfections after the product has cured, maybe with very fine grit sandpaper? Do you have any thoughts on doing that? Thanks again!

    Reply
    • Lauren says

      January 5, 2021 at 10:53 pm

      I would steer clear of sanding since the epoxy creates a very glossy surface. Sanding it will just make that glossy surface look scratched, unless you went back over it with another coat of epoxy afterwards. I don’t consider the paint to be a permanent solution, but I do think it’s good if you need a quick, temporary fix to last you a couple of years until a real renovation can happen.

      Reply
  33. Lauren says

    March 17, 2021 at 11:09 pm

    Hi! I am thinking of trying this project. What kind of respirator did you use?

    Reply
    • Lauren says

      March 18, 2021 at 2:25 pm

      Hi Lauren! I used this one: https://rstyle.me/+irzZGnDcerO3UMH6Zt3buw

      Reply

Tell me what ya think! I read every comment I receive. Cancel reply

This site uses Akismet to reduce spam. Learn how your comment data is processed.

We’re Robert and Lauren, a DIY-loving duo just fighting the good fight in making our house a home one renovation and thrifted decorating adventure at a time. Home wasn’t built in a day, but the journey is half the fun. We’re so glad to have you here, and we hope you feel inspired to love the home you have.

Subscribe

Pin With Me

  • Home Office Ideas
  • A round-up of 20 of the best DIY wall decor ideas plus tutorials and tips to pull off the look easily and get the designer look for less.
  • How to paint a sink, countertop, tub, and shower for $100 and how to make it last using Rustoleum Tub & Tile Refinishing Kit #bathroom #bathroommakeover #diyproject #homeimprovement #paintedsink #paintedcountertop #paintedtub #paintedshower
  • A guide for the best sizes of rugs for different rooms, the best rug materials for different uses, and ways to pair them in open floor plans.
  • Learn to how to make hobnail Easter eggs inspired by vintage McCoy Pottery and hobnail art glass and milk glass. Paint the eggs in pastel colors and display them alongside your favorite vintage collections.
  • A round-up of over 50 beautiful coffee table books filled with inspiration from art, travel, design, music, history, fashion, and more.

Privacy Policy & Disclosures

We are a participant in the Amazon Services LLC Associates Program, an affiliate advertising program designed to provide a means for us to earn fees by linking to Amazon.com and affiliated sites.

Read our privacy policy and disclosures →

Privacy Policy

browse by category

browse by date

Copyright © 2021 Bless'er House. Web Design by Viva la Violet.