
DIY Playroom Bookcase Built-Ins
An easy to follow step-by-step tutorial showing how to build bookcase built-ins using IKEA Billy bookcases.
Robert and I are at that point of the playroom makeover marathon where we can almost see the finish line.
Our sides are hurting, our feet our cramping, but we’re gonna keep on truckin’. (I mean, I’m just guessing here. You think I’ve ever run a marathon? Or even a mile voluntarily before? No. Start running if you see me doing it because it means we’re being chased.)
A couple of weeks ago, I gave y’all the grand tour of our very yellow playroom along with all of my big visions for this space to make it super cute and functional…

Last week, we painted the yellow walls Benjamin Moore Swiss Coffee, the beige trim Benjamin Moore Simply White, and the beige doors Benjamin Moore Wrought Iron to connect the neutrals and contrast from our living room to this space.
To set out on the whole “function” goal in this space though, we needed a whole mess of storage, built-in bookcases to be exact. And voila! Here’s where we are so far.

Using Pre-Made Bookcases for Built-Ins
I put down the rug and leaned our DIY Storybook Art on top for now just to get a feel for how it’ll come together. It’s going to be aaaaa-dorable!
Since we built giant DIY bookcase built-ins using IKEA Billy bookcases in the playroom of the last house, we wanted to continue a similar smaller-scale concept in here so Olivia can more easily sort and we can get a handle on toy organization.
Supplies
(Some affiliate links are provided below for convenience.)
- 4 short Billy bookcases
- 1 – 1″x12″x12″ poplar, pine, or oak board (we used a nice pine with few knots for a little rustic touch, but the look is up to you.)
- 3 – 1″x2″x8″ boards the same species as your 1″x12″
- 4 – 1″x2″x8″ common boards
- 6 – 1″ square dowels
- 1 1/4″ wood screws
- Power drill/driver
- 1 1/4″ finishing nails
- Jigsaw
- Circular saw
- Tape measure and pencil
- Liquid Nails
- Hammer
- Square tool
- Caulk
- Caulk tool
- Stain of your choice (We used Minwax Special Walnut)
- Stain brush & clean, dry rags
- Kilz Adhesion Primer
- Paint of your choice (We used Sherwin Williams Tree Swallow in satin. I recommend ProClassic Interior Waterbased Acrylic-Alkyd.)
- Angled paint brush
- Minwax Polycrylic
For us, since we already had the tools, we paid $304.43 for the wood, bookcases, stain, caulk, polycrylic, and paint total.
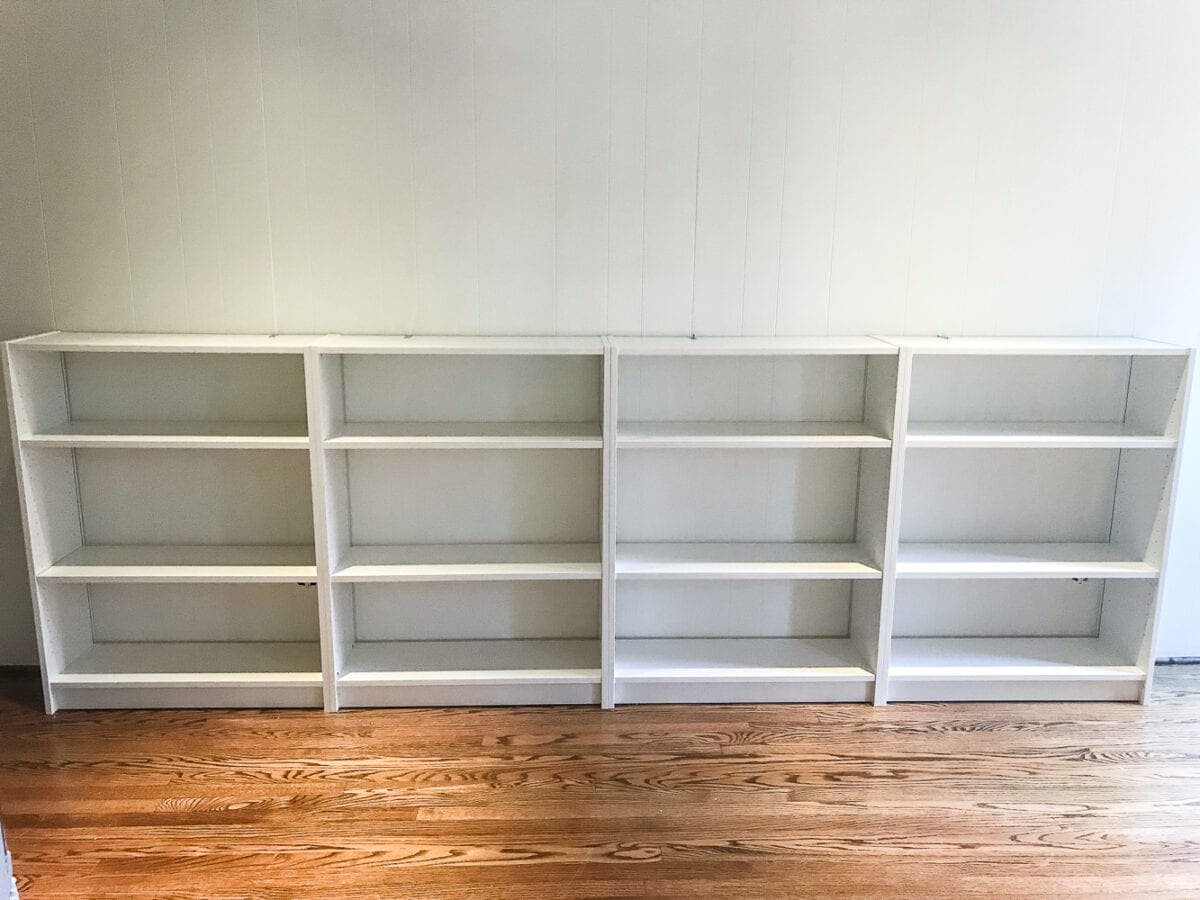
Step 1 – Assemble Bookcases
We started out by following the IKEA directions to assemble the 4 Billy bookcases (which I got for $39 each during IKEA’s winter sale).

We chose to keep the backing off that comes with the bookcases so that we could still access our outlets and get rid of that flimsy cardboard piece.
Step 2 – Attach Square Dowel to Back
To close up the gap between the bottom shelf and the wall by not using the backing, we nailed a 1″ square dowel to the back of the bottom shelf to all 4 bookcases.

Step 3 – Find Your Placement
Then, we put them against the wall to find the placements we wanted and find the center of the wall to start anchoring.

Step 4 – Anchor Sides
To make all four bookcases one solid piece, we attached the sides together with wood screws at the top and bottom.

Step 5 – Anchor Bookcases to Wall
Using the anchors provided in the IKEA bookcases boxes, we attached all of them to the studs in the wall at the top of the bookcases.

Then, they were ready to trick out with wood.
Step 6 – Build Wood Top
To start making them actual built-ins, we placed the 1″x12″ board on top to mark with the square tool where we would need to cut it with the circular saw.

(And it started getting dark at this point, so sorry for the grainy nighttime photos. Curse you, winter.)

After we cut the 1″x12″ board, we secured it with a little Liquid Nails between the bottom of the board and top of the bookshelf, and we drove finishing nails through the top at each bookcase end.

We wanted to make the top look like a finished piece rather than just a plank of wood, so we cut and nailed 1″x2″ boards to the front, leaving an inch overhang on each end of the 1″x12″.

Like so… (If you have a miter saw and prefer to miter the corners of the 1″x2″s, you could definitely do that, but we didn’t have one.)

Once the front 1″x2″ boards are attached, measure and cut another 1″x2″ to fit between the front 1″x2″ and the wall to create the corner and side of the top.

Step 7 – Add 1×2 Boards to Front
At this point, we also cut and nailed 1″x2″ boards to the fronts of the bookcases to hide the seams where we had screwed them together previously.
We decided to hide the gaps on the bookcases on the ends that were meant for a baseboard to run behind, so we cut another piece of 1″x2″ to fit between the wall and the 1″x2″ attached to the front.
We notched out the piece with the jigsaw first so it would fit snug with our floor’s quarter round trim (since this room doesn’t actually have a baseboard).

It doesn’t have to be exactly perfect. Caulk can go a long way.

So then the sides of our built-in looked like this…

Step 8 – Add Trim to Sides
We wanted to finish off the side by creating a rectangular panel, so we cut one more 1″x2″ for each side to attach it with nails to the edge against the wall.

Step 9 – Caulk, Wood Fill, Stain, Paint, and Seal
From there, we caulked every crack and cranny, let dry, stained the top with the Minwax Special Walnut to closely match our hardwood floors, sealed with Minwax Polycrylic, and primed with Kilz Adhesion and painted the bookcases with the Sherwin Williams Tree Swallow in satin.
And now it’s ready for baskets so we can be organizing bandits!

While I was painting the bookcases, I went ahead and painted the mantel on the fireplace the same color too. I’ll be changing the brick and cleaning out that firebox very soon. But with the French doors painted (thanks to a handy dandy trick I learned), the walls and trim freshened up, and this super functional built-in, we’re definitely going places.

Hard to believe we were just here right after the New Year:

Tomorrow, we’ll be swapping out the old ceiling fan for a pendant light that will add even more playfulness to this space, and I think we’ve found a solution for the itty bitty barely functioning can lights too.
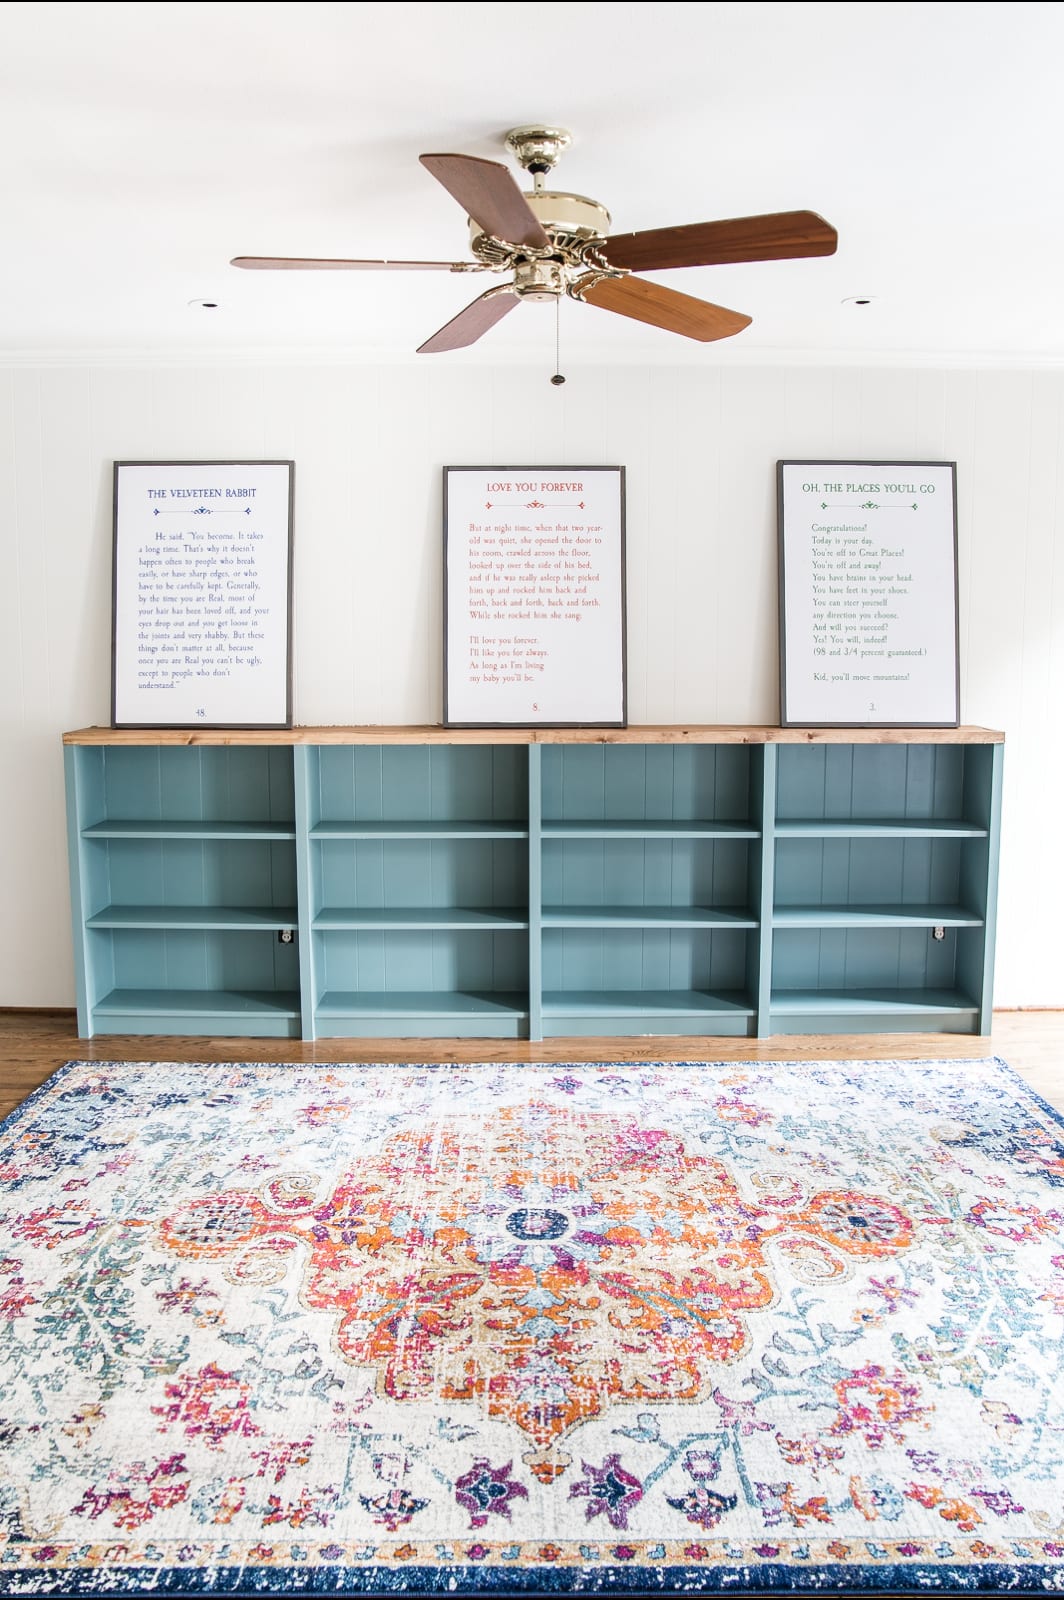
I found this super bright rug during a New Year’s sale a few weeks ago too, and it ties in so perfectly with the bookcase color and the colors of the DIY Storybook Art I’ve just leaned on the built-in top for now until we can hang them.

For the rest of this week, we’ll still be doing touch ups, putting electrical plates on, anchoring the Narnia reading nook, and bringing in furniture until we can finally call this room finished! And then hopefully doing a massive toy purge before we pull all of those back in too.
Right now, we have Barbies and Legos and more dress-up dresses than a pageant queen tossed around all of the other rooms downstairs until Olivia can officially get this room back. Just proof that playrooms are super duper sanity savers. But with all of those little toy piles spread out everywhere, I can’t help when look at them to say to myself, “You’re going to miss this.”
Here’s where we are so far in the playroom makeover checklist:
Paint French doorsPaint wallsPaint trimPaint mantelBuild bookcase built-ins- Hang art
- Anchor Narnia reading nook
- Organize toys into bins
- Swap ceiling fan for light fixture
- Swap out can lights for LEDs
- Limewash fireplace brick? Paint? Just clean it?
- Set up play table and chairs
- Set up larger toys in play stations
Got any tried and true playroom organizational tips you’ve tried? I’ll take them all! Let me know in the comments.
If you want to save this post for later, you can pin it here:


Hi Lauren,
Could I ask you where you got your rug. Love the colors you have chosen for this room. Great job on the bookcases and love the DIY Storybook Art.
Hi Peggy,
Thank you! Depending on which rug you are talking about I will share the links for both:
The original blue striped rug came from our old playroom and you can find the link here from Target. https://www.blesserhouse.com/2016/11/eclectic-farmhouse-playroom-reveal-orc-week-6.html
The new rug link is in this post, which is currently out of stock from Overstock, (but may come back in stock) is here: https://www.blesserhouse.com/2018/01/sweet-and-simple-playroom-makeover-design-plans.html
Hope this helps get you started!
You seem to do an awesome job at everything! I appreciate your very detailed instructions. One thing I’d like to have clarified – how does the top 1×12″ lay on top of the shelving with the anchors in place? Would love to talk my hubby into a project like this!
So the bookcases aren’t totally flat on the top. The ends of the bookcases come up just a few millimeters higher than the bookcase top piece, so that left just enough space for the anchors to sit between the bookcase top and the 1″x12″ board.
This room is coming together so beautifully! I gasped a little when I saw the first picture of the builtins with the rug. Thanks so much for sharing your ideas. You’re inspiring!
Lauren I love all these colors you are adding to the room. That bookcase is fantastic and the blue is heavenly. You know I was inspired by your post and went to get some Billy bookcases but with my luck, they were sold out. If must have been because of that winter sale.
Did you do anything to prep the billy bookcases before painting? Did the paint adhere to the laminate fine? Looks beautiful!
Yes, you can use Kilz Premium Primer to help it stick better.