Today, we’ve hit Day 20 of rain in the past month. I wish I were exaggerating.
Somehow, rainy days always make me a planner. I make lists and write in goals on my Google calendar and pin great ideas and fill up online shopping carts, but then guess what? When those rainy days start adding up, I’ve got a whole lotta nothing to show for it.
And let’s put it this way…my last load of laundry was full of nothing but pajamas and yoga pants. #productivityfail
Except this week, I did get this ray of sunshine in my life…
As luck would have it, I happened to tackle this one just in time for Trash to Treasure Tuesday.
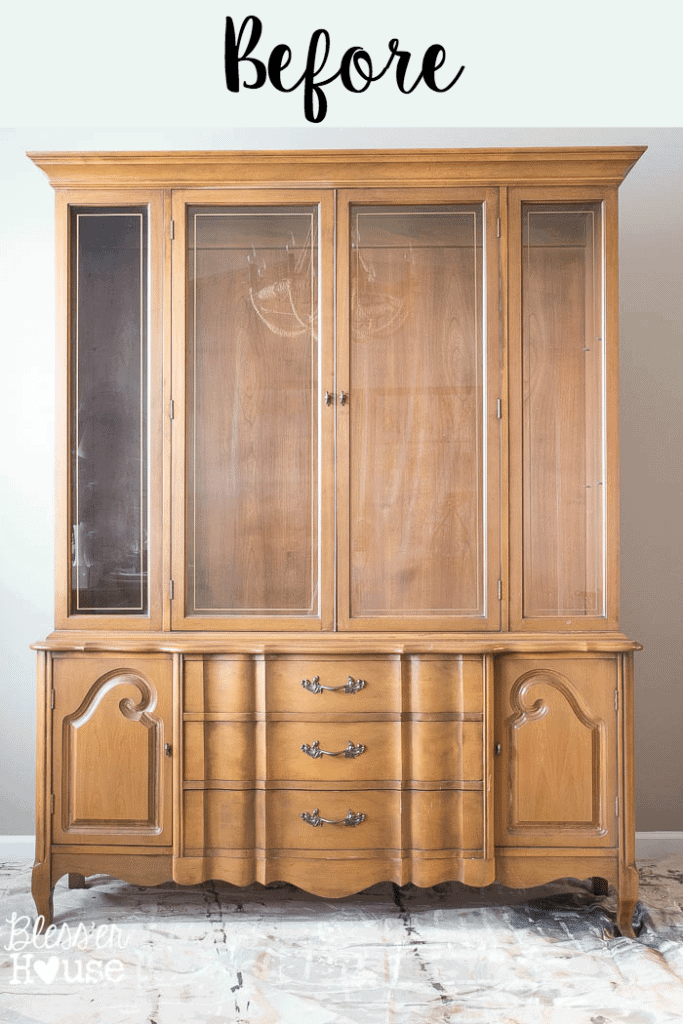
If you saw last week’s messy house tour, you’ve already gotten a glimpse of this baby. Robert and I had decided several months ago, shortly after hauling our buffet into the dining room, that the measurements were not at all doable.
Sometimes, okay a lot of times, I learn lessons the hard way, and while I really liked our buffet, it was over 2 feet deep and our dining room felt really cramped. With Thanksgiving on the way, and a headcount of over 20 people coming over for dinner in a few weeks, we decided now was the time to sell it and find a not-so-massive replacement.
I stumbled upon this beautiful French Provincial china cabinet at a flea market last weekend with the perfect measurements for our dining room and for the exact same price that I sold the buffet ($250). It was destiny, right?
At first glance, I thought maybe I could keep the wood look, strip the orange-y stain, and do a weathered wood finish. But I’ve shared before how much I have an aversion to wood stripping and since time was a major constraint and it was impossible to work outside in our month-long monsoon, I chose to paint it instead.
This post contains some affiliate links for your convenience. For more info, see my full disclosure here.
I still had plenty of Fusion Mineral Paint in Ash leftover from our foyer table makeover, so I busted it out of my craft stash again.
I gave the entire cabinet a rub down of deglosser first to remove any dusting residue and wood oil. Deglosser is key! Even with chalk paint for me. That no-prep draw doesn’t always work.
Fusion Mineral Paint was so nice to give me a couple other colors to try out too. It’s become my new favorite because unlike chalk paint, I don’t have to seal it with wax when I’m finished painting. It’s a one-and-done kind of deal. And it’s cheaper than chalk paint too, which is always a winner to me. (You can get a free tester pot here if you ever feel like trying it out. It’s good until the end of November.)
For the china cabinet, it only needed one coat and was completely dry in an hour. It’s self-leveling, so none of my wonky brush strokes were visible at all.
I gave the whole piece a quick sanding with a medium grit sanding block to distress it a bit and let some of the wood underneath peek through. It’s amazing how different the paint looked after sanding.
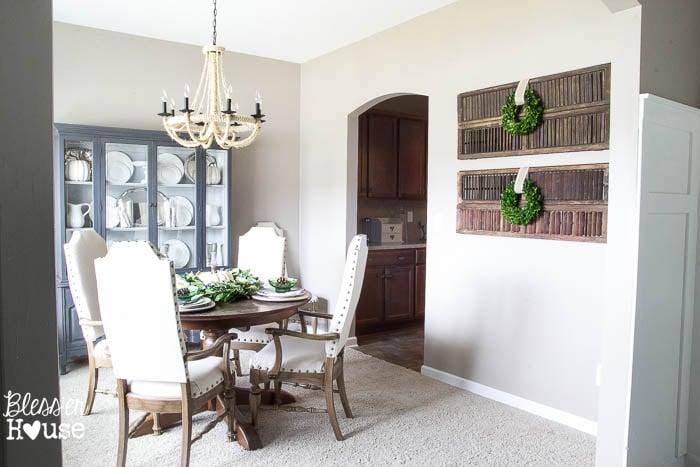
I left the hardware alone and just put it back on the cabinet when I was finished painting since the finish already worked so perfectly with the nailhead trim on our dining chairs.
For the inside of the hutch, I used more Fusion Mineral Paint in the color Sterling. It has just a slightly cool gray tint to it.
When it was all dry, I loaded it up with my grandmother’s silver that had been locked away for decades. Thanksgiving always reminds me of her, and I love that I was able to pull out some of her pieces and polish them up just in time for the holiday. She would have been absolutely tickled to see it all displayed.
By the way, if you’re ever registering for your wedding, go with a plain white china set! I use mine ALL the time. It’s timeless. My mom knew what she was doing when she gave me that tip five years ago. (My inner teenager is really struggling admitting that last statement.)
Isn’t it sweet now?! I don’t normally go for curvy details on furniture and usually stick to clean lines, but I couldn’t help myself with this one.
The cabinet is half the depth that the buffet was so we have plenty more room to move in here now.
By the way, see our window over there on the left? We framed it! I’ll be sharing more about it soon on Remodelaholic, but basically, we gave it the ol’ DIY window trim treatment that we did in Olivia’s bedroom.
I’m still hoping to add a rug under our table (because whose idea was it to do carpet in a dining room?), do a different finish on the round table, and maybe even add board and batten or a shiplap wall in here, but we’ll get to it all one day.
Here’s what we were working with when we first moved in December 2013:
This room has had a great little journey so far. It’s really all thanks to thrifty finds and little imagination.
When I took these photos of our dining room it was actually pouring buckets outside. A lot of sweet talking to my camera had to go into this one.
But hark, y’all! Sunshine is in the forecast for tomorrow! That page-long to-do list has it coming.
You can see all of the other transformations and to-do list tackling from a few of my bloggy friends for Trash to Treasure Tuesday:
Confessions of a Serial Do-It-Yourselfer | Prodigal Pieces | Artsy Chicks Rule | Girl in the Garage
Follow:
Facebook | Pinterest | Instagram | Twitter | Google+ | Bloglovin
Absolutely gorgeous, Lauren! Your room is stunning and that cabinet is a show-stopper. Love it!
Thanks, Larissa! Love how your project turned out too!
It looks GREAT! I love the color and am intrigued by the paint – I’m always up for trying something new!
You will LOVE it, Jenny! But you’re the painting queen, so I’m sure you have all kinds of great resources yourself. 😉
I love how that came out and the color is beautiful! I never tried the Fusion paint, but signed up for my coupon. Self Leveling and no waxing! sounds good to me!. Beautiful room Lauren.
Thanks, Karen! The color was a happy little surprise. I was expecting it to be much darker. The paint is awesome stuff. I’m almost tempted to try it out on our kitchen cabinets because of the no brush-strokes factor.
Super nice and elegant Lauren… I love the color…and the room much better now.
Big Hug from a very sunny Madrid
Wow! Madrid!? That’s awesome! We just got our first sunny day in a long time today, so thanks for sending me some sunshine. 😉
Gorgeous gorgeous gorgeous! That matches my French provincial dining set! So nice that you now have a place to display some of your grandma’s beautiful pieces. 🙂
Thanks, Christy! I love your dining set. Maybe they were separated at birth…uh…make. 😉
Love it!! A commanding piece worthy of the dining room. Beautiful color that shows off all those curves. And it looks very practical too. You get to store and display your china! Your inner adult is thanking your mom now!!
Haha! Thanks, Mary! My outer adult is thanking her too. 😉
Wow. I absolutely love this! Well done. What a gorgeous find 🙂
Thank you, Anna! I was so excited when I found it. 🙂
Seriously love it!!! I just love your style. I dream of having a hutch. Better wait until I move before finding the perfect one. Thanks for sharing!!!
Thank you, Kristie! I’d definitely say wait until after moving. This thing was solid and heavy!
It’s beautiful Lauren!! I think the room looks amazing but can’t wait to see the rest of the changes!
xo
Nancy
Thank you, Nancy! XO
Great job! It looks amazing!
Thanks, Anele! 🙂
Beautiful! I’m definitely going to need to try out that paint!
Thanks, Kate! It’s definitely worth a shot. I was all gung-ho chalk paint for a long time but I’m hooked on this stuff.
Beautiful color!
Thank you!
Did you mean to install the drawer pulls upside-down?
They were originally on the cabinet like that, and I just installed them exactly as they were. I’ve seen that kind of hardware put on both ways though.
I was wondering the same thing. They are turned different than the before photo.
I have a piece very much like this that I picked up cheap a few years ago. I just haven’t convinced myself to tackle it yet. Yours looks great!
Ha! I didn’t even realize it. I really had to look. You’re totally right. I’ll have to go back and flip them.
It looks so perfect in your dining room! I need to try de-glosser and Fusion paint sounds perfect!!!!
Thanks, Lindsay! Deglosser is a total game changer! Much better than spending hours sanding every nook and cranny and your arm giving out on you that’s for sure.
Another gorgeous transformation, girly!!! That piece definitely brings your storage space in the room upward instead of outward. Your holiday guests will love it, it’s a beauty indeed. I love how the inside color really pops with your white dishes. Great job!!!!
Thank you so much, Sherri! I agree. Much better use of space with this one.
Gorgeous! I didn’t know till you did the video tour of your home that you are in SC. Me too. I have gotten up every day for the last month hoping for sunshine so I can go outside and paint. TODAY IS THE DAY!!! So excited for the sun!
Well, hi neighbor! Haha! Thank goodness the sun finally decided to come out. I’m outside celebrating today too. My daughter and I just finished playing on the playground and it was GLORIOUS! I was starting to feel like a vampire.
I didn’t even notice the gold trim on the glass in the before pictures. The new color looks really great with the gold….and with your room!
I actually attempted to remove it, but it wouldn’t budge. Then I realized that I actually liked it. It works with the antique gold nailheads on our dining chairs anyway. Thanks so much, Jessica!
I covered poster board with fabric {and hot glue} then double sided taped it to cover the back of my hutch and it turned out beautiful. The back of my mom’s hutch is all mirror and it’s gorgeous too. I love the legs on yours, I’m obsessed with legs on vintage furniture!
I almost went that route too! That’s a great idea to do on a mirror backing like that.
Gorgeous makeover Lauren! Love the color and the fresh crisp white interior. It looks so pretty in your dining room too.
Thank you, Marie! I love how it’s brightened up the room.
Love your transformation! I have used Chalk Paint on quite a few pieces, but have never heard of Fusion Paint. Do you think it would be ideal for painting a wood kitchen table & chairs? I have a table & chairs with a very thick top coat (in a high gloss finish) and I am not wanting to strip it. Thanks for any help!
Absolutely! I might try it out on our dining room table eventually too. I should add though you probably will need a topcoat of Polycrylic to give it extra protection and make cleanup after meals easier. I’m in the anti-wood-stripping club too. Did it once and I learned my lesson. Haha!
The cabinet is absolutely stunning. Love the colour & your room. Such a great transformation. Can’t say I would have looked twice at it before- you had the fore sight to imagine what it would look like painted. I am new to your blog. Like it very much. Greetings from soggy England.
This is gorgeous, Lauren!! I may need to try that paint – not needing a topcoat sounds wonderful. And I’m a bit jealous… I’ve had a similar china cabinet since the spring and I still haven’t painted mine!
Thanks, Jen! It’s good stuff. I know you’ll love it. 🙂 I’ve had more furniture sitting in our garage for months…you’re not alone. The DIY blogger struggle is real. Haha! Considering you just had a little one, I think you have a good excuse.
Great find. I turned out very nice. I love the color, it makes a great contrast with the white of the china.
Thank you, Julian!
You did a great job Lauren. Don’t think I would have looked twice at the cabinet”before”. Love the colour & your room. I am new to your blog & I’m enjoying your posts. Greetings from soggy England!
Oops ! Put incorrect Email address previously.
Thank you so much, Shirley! We finally have sunshine today here in South Carolina, so I’ll send a few rays your way. 😉
Beautiful!
Thank you, Pamela!
The hutch turned out so beautiful! The color is gorgeous with the white dishes. I will have to try that paint out for sure! Pinned!
Thank you so much, Kim! It’s good stuff. I like that it cuts out a couple of extra steps that I usually have to use when painting furniture.
This looks great! I’ve been on the hunt for this EXACT china cabinet… Can you tell me the make of this so I can search for it in more depth??
Hi Candice! I just looked and don’t see any markings anywhere for a brand name. I’m sure you can set an alert on Craigslist to notify you of when a French Provincial china cabinet is listed to see if a similar one comes up.
LOVE IT!!! Love the color. It looks as if there is purple in the color – does it, or is that just the photo? I just ordered the Sterling color – it looks very light. May have to go back and get me some Ash! Would love to hear…. It’s beautiful.
Thank you! Nope, no purple. It’s probably just the lighting in the photo. And I know some computer monitors are different too sometimes. The Sterling is very light with just a slight bluish-gray tint to it. It’s beautiful in person. The Ash is one of my favorites for sure. It’s almost black and has a blue undertone in the light. It’s hard to explain really. If you sand it (like I did on this piece) it lightens the color quite a bit to be more of a blue/gray.
Hi Lauren, absolutely love your site and ideas. I think I will do this with a similar hutch I currently have in my dining room. Just curious…do you list anywhere on your site all your wall paint colours?
Awesome! Hope it turns out well! I do have all of my paint colors. All of our home’s sources and colors are listed on this page: https://www.blesserhouse.com/shop-the-house
I absolutely love this. I was just given my grandmother’s china cabinet that looks nearly identical to yours. I am going to be painting and really like the look of the light on the inside and darker on the outside. I looked up the paint colors and like the ash, but it looks a little blue in your pictures. I want more of a gray or charcoal color. I guess my question is, does yours have a blue tint to it?
Thank you
Michele
Thanks, Michele! Yes, it does have a blue tint to it. But it ended up looking more blue since I sanded and distressed our cabinet. I used the same color on our foyer table without sanding and it looks much darker. Depends on the look you want.
Question about the color you used on the China hutch, in one picture the paint looks dark grey but the after pictures look antique blue which is the color I’m looking for! Can you confirm the color you used for me! Thanks so much
The paint was more gray and darker at first. After I sanded the entire piece, it lightened up and brought out more of the blue. If you like that antique blue color, then sand it. 🙂 Hoping that helps!
Beautiful! You make it look so easy ~
This is awesome, Lauren! I am currently redoing my hutch, and I’m using this as inspiration! PS – in my upcoming post, can I link back to your blog and add a pic of your china cabinet to show that it was my inspiration?
LMK, thanks!
-Marly 🙂
ABsolutely! Thanks, Marly! 🙂
Your French Provincial china cabinet makeover has inspired me! I have a 10 pc dining room set like that and my old bedroom set. I was going to sell or trash the dining room set and trash the bedroom set but now I plan to redo them! One question, since old pieces like this sometimes come from musty old homes, does painting them get rid of that smell?
Glad to hear that! For really musty furniture, I like to prime with Kilz Max first. It’s an odor blocker. Then just paint.
Hi! I love your cabinet makeover! I’m thinking about doing the same to my mother in law’s cabinet too. I was wondering if you happen to remember how much paint you used? Would one 500ml be enough? Thanks!
Hi, Lisa! I only needed 1 500mL bottle of each color. 🙂
Hi! I absolutely loved the look of this piece and went straight to the Fusion Mineral Paint website to browse their paints and find this color. After finding Ash on their website, I am SHOCKED that’s what you used! It looks like a very black gray on their website. But your beautiful piece looks so blue! Even your foyer table you linked in Ash looks blue, not black/gray at all! So would you say Ash ends up being more blue? I know you said sanding your piece made it look even lighter. Thanks!
It really depends on the lighting, but there is definitely a deep blue undertone. Yes, sanding does lighten the color.
DId you use any kind of base coat first? I know you said you used deglosser beforehand, but I’m trying to recreate this same thing that you did and am not getting the same result. It goes on very dark gray, and does not get any lighter when I sand it. My china cabinet is a dark brown color, much darker than yourself started out. I’m wondering if that’s accounting for the color difference and whether I should try a neutral base coat first or just go with a lighter color like Champness. Yours turned out so beautiful though, I wish I could recreate it exactly!
Hi Sara! Hmm…no, no base coat. Maybe it is because my wood is lighter. You could try the color Soapstone, which looks closer to the shade of the final look after being sanded.
Lovely cabinet makeover… Thanks for sharing.