How to get a high-end carved detail look for less on plain IKEA furniture using appliques.
A big thanks to O’verlays for supplying materials for this project.
If you want to test your family’s relationship, build an IKEA dresser together…
Thankfully, we survived the one we built for Regan’s nursery without any temper tantrums. 😉
Nothing like pitching in with your daddy while fully clad in Disney princess pjs and bed head on a Saturday morning to go all DIY on your little sister’s room.
Normally, we’re very “thrift it, fix it, and fancy it up” around here, when it comes to furniture.
But this time around, we decided to go the “new” route buying this IKEA Hemnes dresser because…
1. We wouldn’t have to repair any wonky broken drawers.
2. We wouldn’t have to worry about lead paint or combat funky gross smells.
3. IKEA has organizing bins already perfectly suited for the piece.
Yaaaaay! Win/win/win. Oh, and it’s pretty cheap, so that’s a plus.
Even though I had my heart set on some of the gorgeously detailed dressers from Anthropologie, my wallet wasn’t set on the same thing.
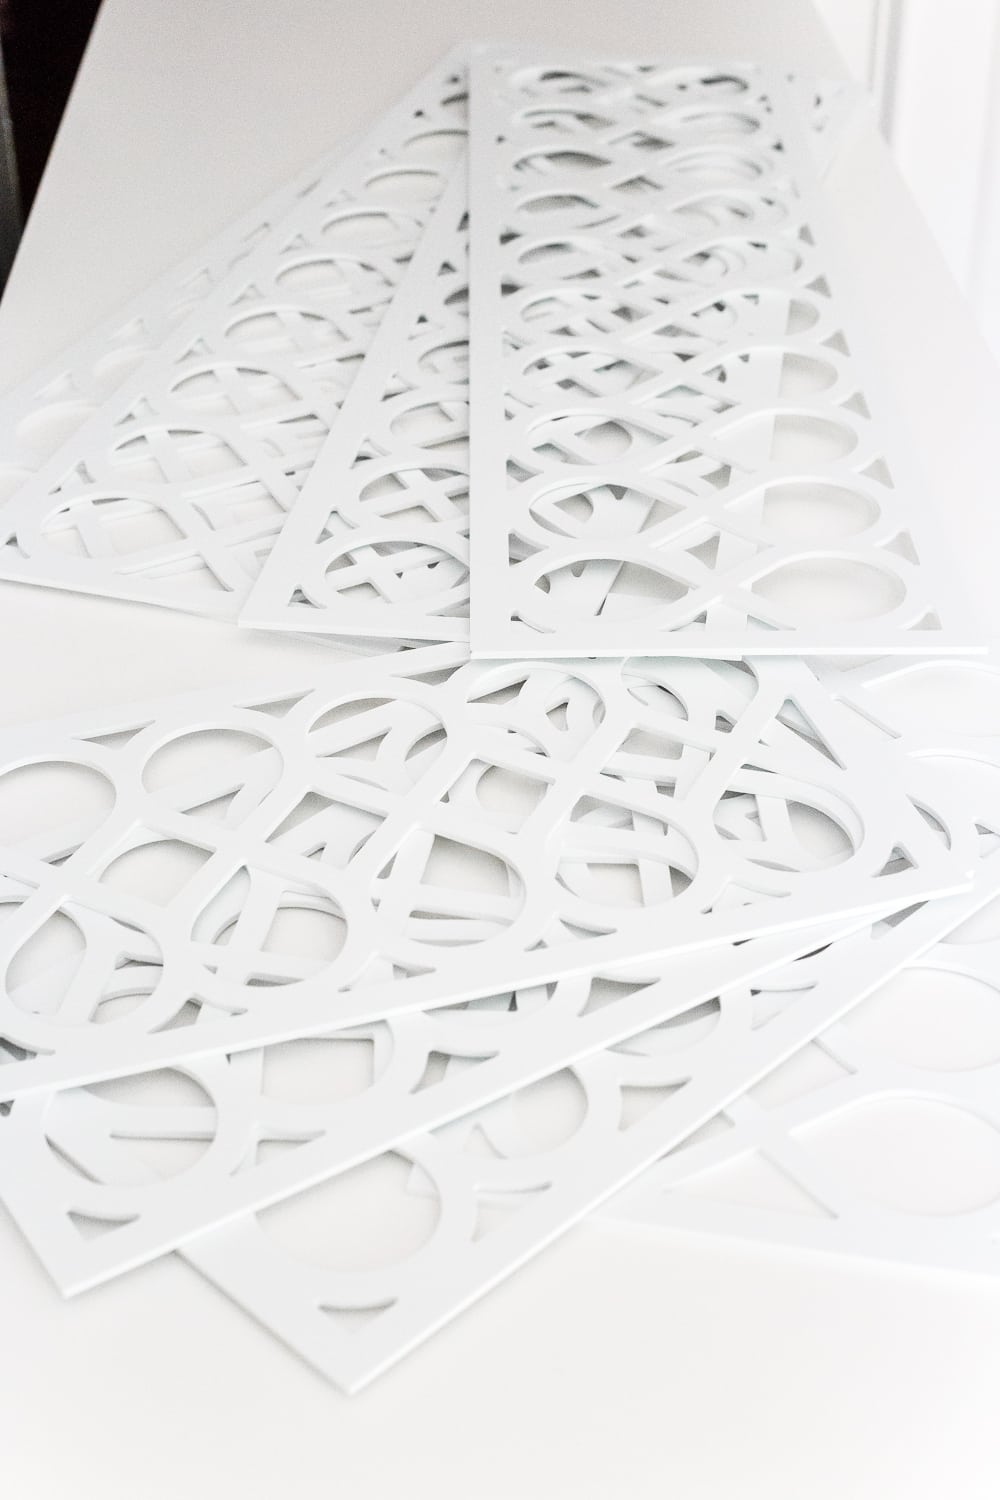
So I decided to jazz up the IKEA basic one with a similar look using these appliques I found from a company called O’verlays. I’d found them a couple of years ago and always wanted to try them out somewhere.
They have all kinds of detailed panels and accents that you can place on plain IKEA furniture (or even non-IKEA) to give them more dimension. And you can use them on flat surface doors too, which I might eventually try out on our master bedroom closet doors for some oomph factor.
DIY Applique IKEA Dresser Hack
Supplies Used:
- O’verlays Fiona Panel Kit
- Quart of Sherwin Williams Pro Classic Satin paint in standard white base
- Drop cloth and high quality 1.5″ angle paint brush or paint sprayer (whichever method you prefer to paint your panels)
- 2 bottles of Gorilla Super Glue Gel
- Optional: Knobs/pulls of your choice (I used these white cactus flower knobs I found for 50% off from Hobby Lobby)
- Power drill
Since we bought an already white stained Hemnes dresser, and I wanted to keep it white anyway, I didn’t see the point in painting the entire thing.
So I took a drawer with me to Sherwin Williams and had them color match it with the correct sheen (because there are a million different shades of white and the white appliques didn’t quite match the white dresser).
I just brushed on two light coats of the Sherwin Williams paint onto the panels on a canvas drop cloth, but you could use a paint sprayer, if you preferred.
Then, to attach the panels, I applied the Gorilla Super Glue Gel on the backside edges and a few places in the middle of the design, lined up the panels on the drawers, and pressed for 10 seconds until they were dried in place.
To make a hole for my knobs in the panel, I carefully drilled through the middle where the existing dresser drawer hole was.
Then, screwed in my frilly, girly knobs and was DONE!
For now, I just decorated it with some things I already had lying around until we can bust out all of the cute baby stuff. Eek! Can’t wait!
We’ll move the dresser over in front of the window later since this wall isn’t quite wide enough for the nursery door to swing all the way open. And we’ll be putting a changing pad with holder and a basket of diapering essentials on top.
The height is perfectly tall enough so that Robert and I won’t have to slouch over for those thousands of diapering jobs we have ahead of us.
The dresser for the panels, knobs, and paint all together cost $476, and I swear it looks just like Anthropologie’s $1,000+ dressers. Doesn’t it look so much like a white version of this one? Except 50% cheaper, of course.
So now that this dresser is ready to go, we’ll be hauling it out of here just in time for our flooring contractor to start ripping out the old carpet to refinish the original hardwood floors underneath.
Exposing the floors and painting the gray on the doors will give this room so much more dimension when it’s finished, but I already love how clean and peaceful it’s looking.
If you want to know about any of my random decor sources I threw on top, here’s the whole list:
Here’s where we are on the nursery to-do list now:
Paint walls Magnolia Home True White in satinPaint ceiling Benjamin Moore Simply White in flatTake down window valanceRemove ceiling fanRemove broken closet doorsInstall picture frame moldingInstall light fixtureBuild IKEA dresser and add O’verlays for changing table- Install new closet doors
- Paint doors Magnolia Home Wedding Band
- Remove carpet and refinish hardwood floors
- Get a crib and glider
- Hang art and wall decor
- Hang curtains
- Put up window shades
You can see the full nursery makeover plan here and all of our previous nursery projects here. Movin’ along!
It turned out lovely! Great creativity. . .
This is not only gorgeous but totally brilliant!
Absolutely adorable!!!
I LOVE this! We have the exact same dresser, so I may have to do this. I love all the options they have! Perfect touch to make the dresser have a touch of character.
As always, you have created such a beautiful piece with your awesome creativity and talent! I’m always so inspired by your furniture makeovers! I’m curious which overlay thickness you used – the 1/8″ or the 1/4″?
Gorgeous! I also saw this done a few years by Centsational Girl and I am still impressed!
amazing! I was a bit skeptical – until I saw the finished piece. It’s lovely!
This looks totally amazing. I love this idea
Those appliques are so expensive. I was going to use them on my Ikea wardrobes that have a ton of mirrors. I have since found a cheaper way. Got some beautiful antique looking lace at Hobby Lobby and I’m in the process of gluing it to the mirrors. I’ve done one and I love the way it looks. We will paint the metal frame too and apply really thin wood (framing) around the mirrors to give a more finished look. I love the chest you did. Looks so current. That would be so much easier for me but also way more expensive. Unless I could get my hubby to mimic them. Hmmm
You’re gluing lace onto the mirror itself? I wish we could see what you’re doing!
That is so pretty! I like it even better than the Anthropologie one. Very creative! 🙂
I love how this turned out. Even though I don’t have a need right now, I’ll be checking out their site to see what they have. I might have to find a reason to use them. Thanks!
Love what you did with the dresser! Quick comment re: IKEA dressers – they have a tendency to fall over if
a child climbs on them, maybe one more item to add to your list is to make sure it’s secured to the wall when you decide where it’s going be placed.
IKEA is supposed to put that warning on all dressers. They do sell the attachment kit.
Can’t wait to see the finished nursery – so cute already:)
Yes, really ALL furniture has a risk of falling over. We’ll definitely be anchoring it to the wall as soon as the floors are refinished. Thank you for the reminder.
This is super cute!!
Me too! More feminine, less angular. Great Job!!
It’s lovely! I actually like your version better than Anthropologie!
OMGosh!! That is just exquisite! What a pretty idea. It looks wonderful and you deserve KUDOS 10X !!
What a great idea, and it looks so pretty! I love the style of the ove4lays you chose as well as the knobs.
Looks great! Baby’s coming soon! Praying! 🙂
Looks nice! It is half the price, only if you don’t have to pay for the panels, LOL!!!
Nope! Panels, knobs, and all is half the price. You could maybe create a similar non-3D effect with a stencil for cheaper, if you wanted to though.
This project is absolutely beautiful! Do you have a formula for the paint color that was matched at Sherwin Williams?
It turned out to be Sherwin Williams’s base white satin sheen Pro Classic without any pigment mixed in, so that was handy to know! Wouldn’t have found out if I hadn’t taken in the dresser drawer.
Does this match the Ikea dresser in White or White Stain? I know they differ slightly in color.
This one is the white stain.
Perfect! Thank you!
Your new chest of drawers looks beautiful, great job! Just have one little question….have you ever reversed a door, in this case so you could use the entire wall? I reversed a door on a tiny bathroom so that it opens outward into a hall. It was relatively easy, looks good and works way better for the bathroom. I don’t think it is a code issue either. Anyway, food for thought. Thanks for sharing that gorgeous bureau.
i absolutely love this dresser. Those overlays and knobs are the icing on the cake! You’ve taught me something new today. I’ve never seen those overlays before or seen the used on furniture. Great job and great idea!
How were you able to get overlays that were exactly the right sizes?
I included links in the post to them. They’re from MyOverlays.com 🙂
What a great makeover! Love it!
Lovely! Looks MUCH better than the Anthropologie one!!
Sorry to have to tell you, in answer to your question – yours doesn’t look as good as the Anthropologie dresser – it looks much better! Crisper, smarter and your knobs look much prettier and more expensive than the ones on the A. dresser as well. Well done on a budget.
Regards
Jo
Beautiful with a capital B… a dreamy chest for an amazing room!! Congrats on another great makeover!
I love this! I think it’s more beautiful than the Anthro version. Using the panels and those beautiful knobs really make it look like a high end piece of furniture.
Omg I have this EXACT dresser!!! I will need to do this!
I like yours better than the more expensive one. Great Idea! and Great Job! Where did you get those beautiful flower knobs? They are gorgeous!
They’re from Hobby Lobby. 🙂 I linked to them in the supplies list in the post, if that helps.
I love it! So pretty!
It looks amazing! So exciting to see the nursery coming together.
i am very curious about what your hardwood floors will look like. do you have to move out for that?
The contractors JUST ripped out the carpet and they are in excellent condition! Woohoo! It’s going to look soooo good and have great contrast with all of the white in the room. We do have to leave the house for about 3 days since I can’t be around any sanding particles or fumes. Thankfully, we live only 30 minutes from both sets of parents, so we’re well taken care of with family nearby. 🙂
LOVE it! Never heard of overlays but they are so pretty. And those knobs! That baby will have a beautiful room to come home to!
Blessings to you all.
This chest is gorgeous! Can’t wait for the big reveal.
I really just have one word for this dresser…….
D A R L I N G !
That is beautiful! So girly… The knobs really are the “cherry on top”!
I love everything you do!!!! Are you in Ft. Mill? I am related to the Ardrey family there by my husband.
I just love this! I have two grey Ikea Hemmes dressers and two nightstands, and I have been wanting to “dress” them up somehow… they just look plain. I was going to change the knobs out, but now I will do that AND I am going to follow your lead with this extra, beautiful step – your dresser looks SO good! Thank you, THANK YOU for sharing!!!
This dresser turned out amazing! I totally want to make one for our little girl’s bedroom!
Paige
http://thehappyflammily.com
Wow, THS looks just like a fabulous dresser I saw for $4,000. All I coud do was drool at it. Now, after seeing this outstanding post I might be able to do more than drool. You did an amazing job. The end results looks like a million dollars, as everything you do.
What a lovely job you have done with that chest of drawers! It’s so pretty with those cute knobs! The nursery is going to be so beautiful once you are finished everything. Thanks for sharing this with us! Blessings!
I must agree with everyone…it does look beautiful and better than the expensive one! I have a quick question. How did you know that the panel were going to fit the drawers? It does not look like you can ‘cut’ them to accommodate ODD size drawers. You said you had had them for some time….and then you purchased the IKEA dresser…did you measure the panels and drawers to make sure it all worked out…or did you just get lucky? Just wondering…..curious minds ‘need to know’….hahah….
OH no, I had wanted to use them for some time, but I didn’t actually order them until I bought the dresser to use them on. They sell them as kits for specific IKEA dressers, and you can also order panels at specific sizes so that you don’t have to cut them. I hope that helps clarify. 🙂
Dear Lauren, I can just picture how comfortable and sweet wee Regan’s room is going to be! As a granny of five, who just welcomed her fourth granddaughter, how do you plan to manage moving baby in and out of her metal crib when the mattress is all the way down? In my day, we had drop-sided cribs. Do you have to stand on little steps to do it? I am always fearful of dropping sleeping baby down onto the mattress!
Thank you! The drop=side cribs are actually against regulations now and can’t be sold legally in stores anymore since older babies who can pull themselves up could topple out of them. My first daughter’s crib didn’t have a drop-side either, but I managed without any problems. 🙂 I’m 5’7″ though, so it’s probably easier for me being taller than most moms. A little step stool could work.
Looks great – I like the legs on your dresser better than the expensive one as well, so yours comes out in front for me.
Unfortunately the postage alone for sending these overlays to Australia starts at $45 – Eek! I’ll have to search locally for something similar if I want to try this.
I think you could also make a faux french style mirror fronted dresser using these overlays that could look quite good in the right setting.
So pretty, Lauren! We have white IKEA dressers in both of our kiddos rooms, and I just ordered this exact one for our master. Love the organizing options they have, and the modern look! Those appliqués are so neat. Very sweet for a little girl! 🙂 Hope you have an easy and joyful delivery. Our daughter was just born a little over a month ago!
Hi Lauren
I personally think your dresser is much prettier than Anthropologie’s one.
And I’m not just saying this to flatter you, I mean it wholeheartedly!
Well done! As always, you are pure genius.
Wow…..
Amazing that even though you found the stencils some time ago……that they fitted the spaces where you placed them exactly…….!!!!!!!!
I should say I saw the stencils some time ago and always wanted to use them. I didn’t order them until I bought the dresser. Sorry. That was probably confusing.
I know this post is a couple years old, but hopefully you will see this!
I am copying your dresser hack for my nursery (with a different overlay pattern) and am wondering if you did the 1/8 or 1/4-inch overlay? Yours turned out so gorgeous I can’t help but do the same!
Thank you!!
We got the 1/8″. Hope that helps!