The Best Way to Remove Wallpaper | 3 Methods Tried & Tested
How to remove wallpaper 3 different ways and testing the best method to strip wallpaper quickly and easily.

Maybe I’m just a glutton for punishment, but I hardcore nerded out over a wallpaper removal experiment yesterday.
If I have to fight some wallpaper, I like to know that my arsenal of DIY supplies is fully equipped to handle the job, right? So I took one for the team to find out the easiest, best way to remove wallpaper.

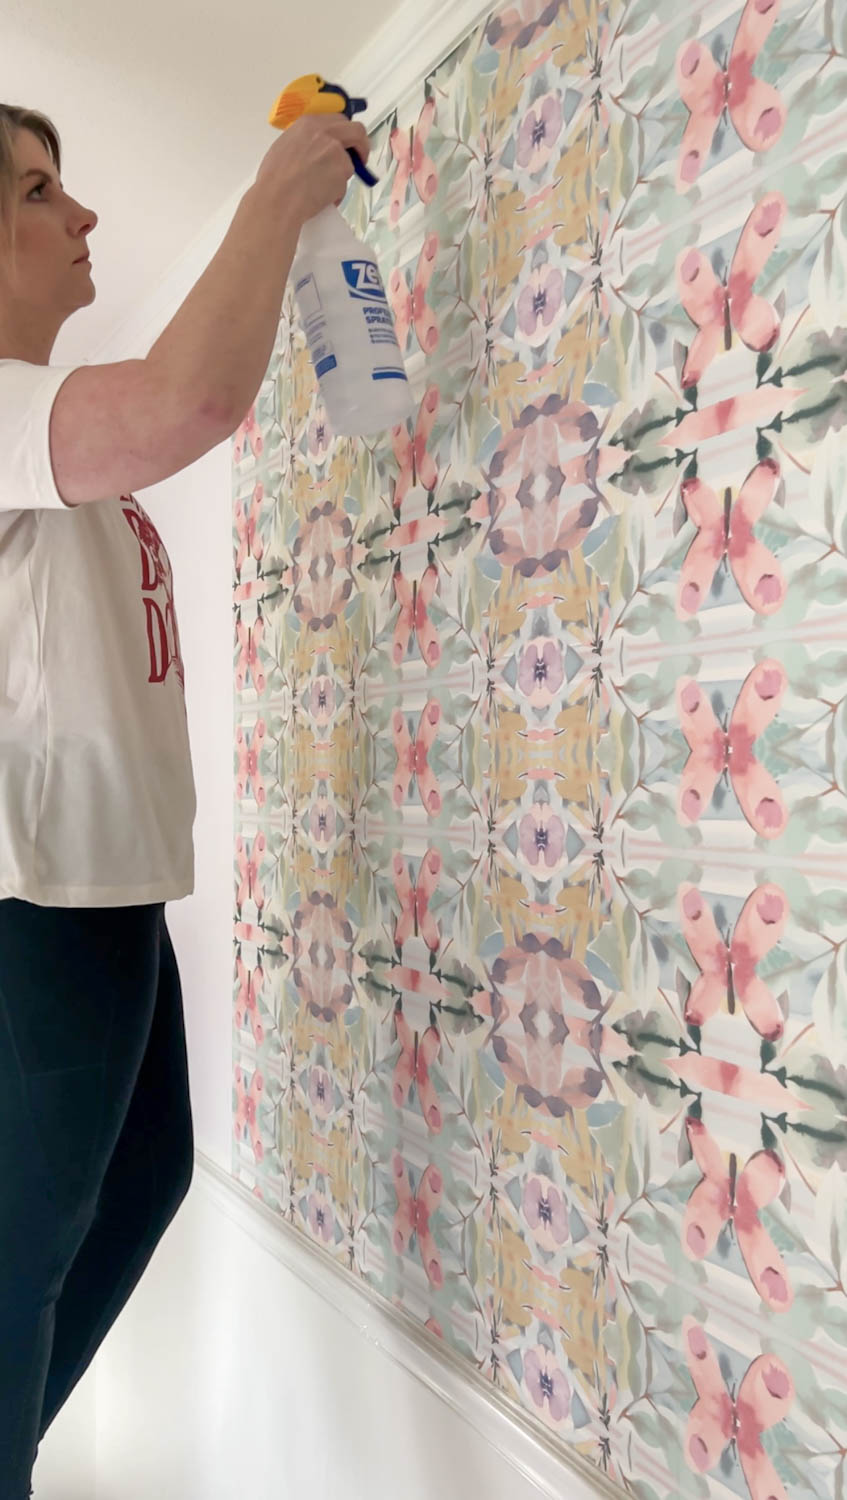
It’s hard to believe it’s already been 5 years since my mom and I put up this pasted wallpaper in Olivia’s room, and now here I am preparing for her “preteen” bedroom. What?! How?!
Finding the Best Way to Remove Wallpaper
For this experiment, I tested 3 different wallpaper stripping methods to find which one worked the best:
- Store Bought Wallpaper Remover (Piranha Brand)
- DIY Vinegar Wallpaper Stripping Solution
- DIY Fabric Softener Wallpaper Stripping Solution
*I didn’t use a wallpaper steamer because I wanted this to be straightforward without the need for any specialty tools, but buying or renting a steamer does help if you have very old, stubborn wallpaper that likely wasn’t installed correctly.

How to Remove Wallpaper
Supplies
- Wallpaper remover solution of your choice (I’ll get into the best one to use in a second but several are effective)
- Putty knife
- Painters tape
- Waterproof drop cloth
- Wallpaper scoring tool
- Spray Bottle (optional – only if using a DIY wallpaper stripping solution)
- Electric Kettle (optional – only if using a DIY wallpaper stripping solution, and not absolutely necessary but it does help)
- Rags/sponges
- Step stool
- Trash can
Step 1 – Protect Floors
Lay down a protective drop cloth as wallpaper removal does get messy, and you will end up with pasty water all over your floor. Secure drop cloths with painters tape.

Step 2 – Remove Electrical Covers & Cut Power
You have to remove switch plates and electrical outlet covers to pull wallpaper away from behind the plates, but since this is a wet job, you definitely want to protect any electrical from water exposure. Cut the power and cover switches and outlets with painters tape until you’re ready to work around them.

Step 3 – Score
With the scoring tool, score the entire wall in a circular motion with light pressure. Don’t press too hard or you could puncture through the drywall.
The scoring tool perforates the top layer of the wallpaper so that the wallpaper remover solution can penetrate and reactivate the adhesive.


3 Ways to Strip Wallpaper
After all of the prep work was done, I tested the 3 wallpaper stripping methods, starting with the store bought Piranha brand.
There are other brands out there that are probably just as effective. This is just what I randomly grabbed on my trip to Lowe’s.
However, before trying ANY wallpaper solution, use a putty knife to pull up the wallpaper at a corner or seam to see if you can peel the wallpaper away without damaging the wall or without the need for any liquids or steam. You just might get lucky and it will peel right off (then go buy a lottery ticket because the odds of easy removal are slim).

Store Bought Wallpaper Stripper
Work in sections. I like to remove 2 wallpaper panels at a time.
I followed the manufacturer’s directions spraying the Piranha wallpaper remover all over 2 wallpaper panels until fully saturated and waited 15 minutes for the adhesive to activate.

Use a putty knife to loosen any corners or edges and pull away the wallpaper.
I have to admit this wallpaper stripper worked incredibly well! I had two panels completely removed with barely a fight at all in 4 minutes and 38 seconds.
I didn’t have to reapply it since it had a long open window that kept the adhesive wet.
If you have stubborn wallpaper, it might only remove the top layer, and you’ll need to repeat the solution application process to remove the second paper layer.
Piranha Brand Wallpaper Stripper
Pros:
- Works the fastest
- No need for reapplication
- No need for premixing
Cons:
- More expensive than DIY-methods
- Chemical based

DIY Vinegar Wallpaper Stripper
You can make your own DIY wallpaper stripper using just white vinegar and hot water! On the plus side, it’s super inexpensive and eco-friendly.
Recipe
- 1/3 white vinegar
- 2/3 hot water
- spray bottle
Fill a spray bottle with 1/3 white vinegar and 2/3 hot water. I used an electric kettle to add hot water because the hotter the better to activate the wallpaper glue.
It’s a good idea to only do a small section of the removal process at a time so that your water doesn’t get too cold. Keep mixing every few panels with hot water.
Activation Time: 2 Minutes

I sprayed two wallpaper panels with the DIY vinegar wallpaper remover solution and waited for 2 minutes so the adhesive could activate.
Be aware, that you’ll probably need to mix new vinegar solution in the spray bottle frequently as you want to keep the water hot for optimal effectiveness.

This method did work, but it definitely took some extra effort on my part to yank the paper away from the wall. It ripped, came off in tiny shreds, and it was by far the least effective of the 3 methods I tried.
Still, it’s very inexpensive to make and a non-toxic homemade wallpaper remover, so that’s a perk.
DIY Vinegar Wallpaper Stripper
Pros:
- Inexpensive to make
- Non-toxic
Cons:
- Premixing required
- Reapplication required
- Least effective of the 3 methods

DIY Fabric Softener Wallpaper Stripper
You can make your own DIY wallpaper stripper using just fabric softener and hot water. It’s very inexpensive to make and (bonus points) it smells amazing.
Recipe
- 1/4 fabric softener
- 3/4 hot water
- spray bottle
Fill a spray bottle with 1/4 white vinegar and 3/4 hot water to make this simple DIY wallpaper remover. I used an electric kettle to add hot water because the hotter the better to activate the adhesive in the wallpaper.
Activation Time: 2 Minutes

I sprayed two wallpaper panels with the DIY fabric softener wallpaper remover solution and waited for 2 minutes so the adhesive could activate.
Be aware, that you’ll probably need to mix new fabric softener solution in the spray bottle frequently as you want to keep the water hot for optimal effectiveness.

This method worked surprisingly well, but it did take a bit more effort than the store bought remover. And I did have to spray more wallpaper remover on the wallpaper a few times throughout the process as it seemed to try really fast.
Still, it’s very inexpensive to make, and if you don’t have the store bought type, this is the next best thing.
DIY Vinegar Wallpaper Stripper
Pros:
- Works fairly quickly
- Inexpensive to make
- Smells great
Cons:
- Requires reapplication
- Requires premixing
Once you’re finished, spray the wall with the solution one more time and wipe away any excess adhesive with a rag or sponge.

These 3 wallpaper remover methods also work on plaster walls. When applying new wallpaper, it’s best to apply a size primer so that you’ll have strippable wallpaper when you want to change it again in the future.
That’s it! I’d been putting off this job for a while, but it really wasn’t bad at all. It’s almost therapeutic to get your frustrations out by ripping paper… almost, I said almost. 😉
I can’t wait to get started painting and adding the new wallpaper in this bedroom! It’s going to be so sweet!
Frequently Asked Questions
No, you only need to use a wallpaper stripper removal method on pasted types of wallpaper. Peel and stick should pull right away from the wall without problems.
Keep your stripping knife as flat against the wall as possible when loosening the wallpaper. Be careful not to dig the corners of the stripping knife into the wall. For very stubborn wallpaper, try using a wallpaper steamer.
Painting over wallpaper will make it much harder to remove later. If you want to remove the wallpaper eventually, it’s best to just do it now and get it over with.
It’s always best to remove wallpaper rather than applying wallpaper or paint on top. Removing the old wallpaper ensures better adhesion of new wallpaper or a smooth, durable paint job that won’t fail later.


