
Rub n Buff Colors Tried & Tested: Color Guide & Tutorial
Comparing all of the metallic Rub n Buff Colors to find the best gold, silver, and copper colors for craft projects.
There are few craft things I love more than Rub n Buff… seriously, it’s right up there with the hot glue gun on the list of “Brilliant Craft Supplies”.
I’ve lost count of how many times I’ve used this stuff, but let’s just say any time you need to paint something metallic and actually make it look like real gold, silver, or copper, Rub n Buff is the most convincing one out of any finish you could use.
And since I’m constantly forgetting which Rub n Buff colors I like best and needed to use it on some hardware in our current bathroom renovation, I decided to conduct a little color experiment like I did for ranking the best gold spray paints. Maybe it’ll help you in future projects too.

Related: The Best Gold Spray Paints: Ranked
What is Rub n Buff?
It’s not technically a paint. Rub n Buff is a mixture of carnauba waxes, fine metallic powders, and pigments. You can literally rub it onto a hard surface, and gently buff away the excess wax to create a shiny luster.

What to Use Rub n Buff On
I’ve used it on many household items:
- light fixtures (like this light)
- furniture hardware
- door hinges
- door knobs
- lamps
- picture frames (like this frame)
- mirror frames
- planter pots
- Christmas ornaments
- exposed screws
- so many things!
I used Rub n Buff to make this cheap light fixture look like a more expensive version from Pottery Barn.
Related: Antique Gold Frosted Crystal Light Fixture Makeover


How to Use Rub n Buff
Rub n Buff doesn’t require a primer, but it does help to sand any smooth surfaces first to give it “grip”. A little goes a long way.
Apply a pea-sized small amount to a soft cloth or your finger (I wear latex gloves), and rub the wax onto any metal, wood, plastic, ceramic, or glass surface. Wait about 30 seconds before buffing with a soft cloth to create a shiny finish.
For very detailed pieces, I like to apply it with a small paint brush. I used a small brush to apply Rub n Buff European Gold to these old door hinges.
Tutorial: DIY Door Update to Change Hinge Colors Quickly


Testing Rub n Buff Colors
When testing out these colors, I made the rookie mistake of not sanding first like I normally do, so it made the “buffing” step next to impossible and resulted in a chunky, terribly textured, dull finish. Oops! I know better; I swear I do. Sanding is the secret sauce.
I was still able to see how the colors looked though, and that was really my main goal in this little experiment, so I can refer back to it in future projects.
Related: Best Places to Find Furniture and Kitchen Cabinet Hardware
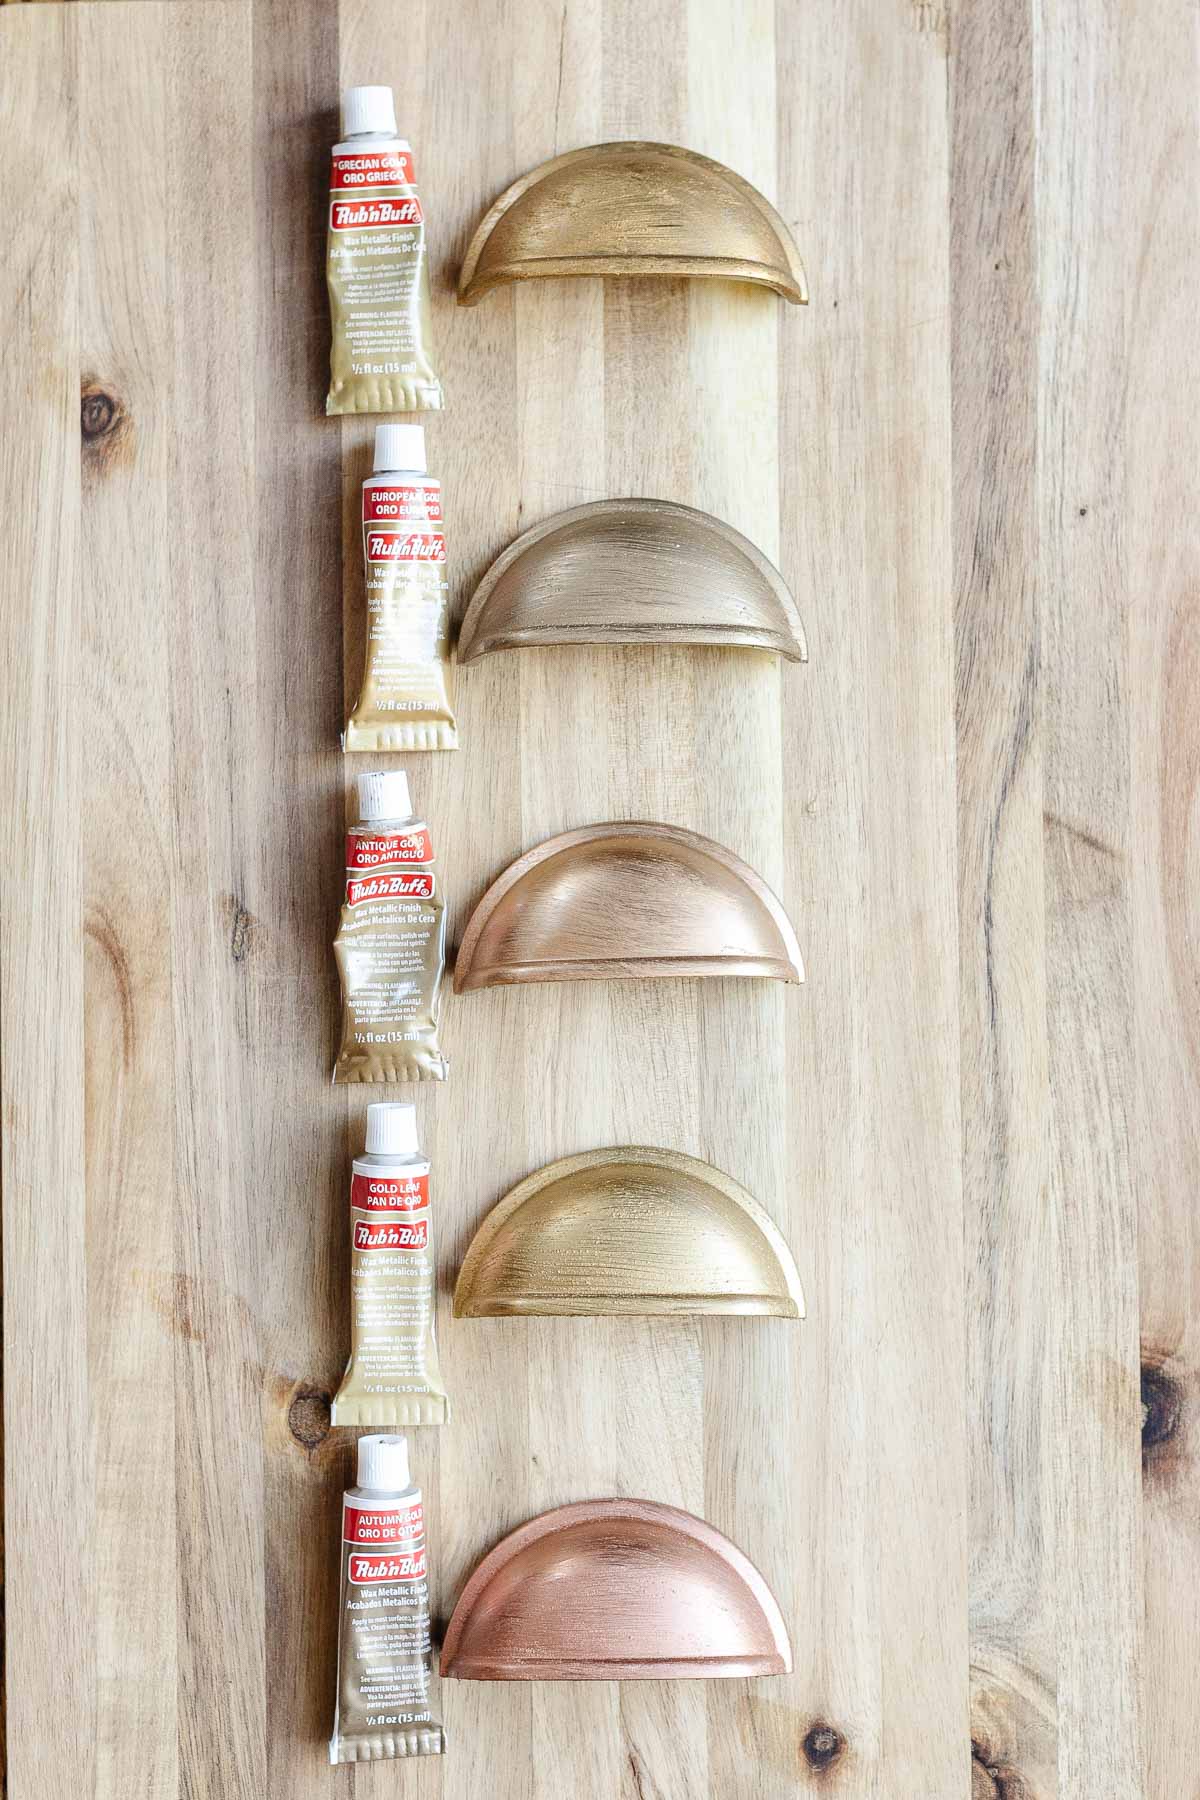
Rub n Buff Gold Colors
- Grecian Gold – This gold is more bronze and a bit warmer than Gold Leaf. If you want your gold to look slightly aged without a copper undertone, this is a winner.
- European Gold – The least saturated, cooler-toned of all of the Rub ‘n Buff golds, this shade is more of a champagne hue and is best if you want just a slightly gold tinted color.
- Antique Gold – This gold has a slightly pink-ish/copper hue, but only slightly.
- Gold Leaf – This color is close to a bright brass or a brand new yellow gold.
- Autumn Gold – I would call this bright copper instead of gold since it has such a strong presence of red undertone. It’s like a bright, new copper color without any aged patina.
Rub n Buff European Gold vs Antique Gold
Of the five golds, my favorites are Rub n Buff Antique Gold and European Gold, but that’s just my preference. Each one is beautiful in their own right.
Here is a mirror I brushed with European Gold, which is slightly less saturated in color and not as yellow.
Would you like to save this?
Related: DIY Aged Gold Antique Mirror Makeover

I brushed this mirror below with Antique Gold, which is more yellowy and brighter than European Gold.


Rub n Buff Silver Colors
There aren’t as many silver colors as there are gold ones, and the two silver colors are both beautiful!
- Silver Leaf – A bright silver like that of a brand new dime freshly minted.
- Pewter – An aged silver color with slightly less luster. I definitely prefer this one for antique looking surfaces over the Silver Leaf shade.

Rub n Buff Copper Colors
I compared Autumn Gold to Spanish Copper because even though technically Autumn Gold is in the “gold family”, I felt it needed a side-by-side for a copper color test.
- Spanish Copper – Almost like rust, this copper is much closer to bronze and has an aged patina look.
- Autumn Gold – A bright new copper shade without any aging.
Never thought I’d be sitting at my office desk “trying on” Rub n Buff colors, but doing this little experiment was so helpful for me so I can reference all of the colors in the future, and I hope it helped you too.
Now that I’ve found the “winner” for color matching the faucets in our bathroom (European Gold this time) to use on our bathroom vanity and a couple of exposed shelving screws, we are one step closer to being finished with the bathroom renovation!


Do you have any other “holy grail” craft supplies you love? Or more color experiment requests? I’m totally down to test ’em all.
Frequently Asked Questions
Unlike paint, Rub n Buff can add dimension for a metallic finish that looks more like real gold, silver, or copper than paint. It is often used on decorative hardware, frames, and fixtures throughout the home.
Rub n Buff is very durable, but it isn’t permanent as it can be rubbed off over time, especially on items that are touched often like door knobs.
If you want the absolute best adhesion, especially on items that will be touched frequently like knobs, it’s important to sand and prime before using Rub n Buff. On items that aren’t usually handled like light fixture or picture frames, it’s a good idea to sand for easier application, but primer isn’t necessary.
More Paint Color Resources
- The Best Gold Spray Paints – Ranked
- The Most Recommended Blue Grey Paint Colors
- 9 Designer-Approved Off White Color Paints to Try
- The Most Recommended Navy Blue Paint
- The Most Recommended Blush Pink Paint
The Best Gold Spray Paints – Ranked

12 Best Sage Green Paint Colors for a Relaxing Room

How to Choose Paint Colors for Your Home Interior Like a Pro


