
How to Make a Bed Like the Magazines

Want to be more productive, more restful, and have a beautiful bedroom? Here’s how to make a bed like a hotel or magazine in 8 steps.
Lately, I’ve tried to get better about making our bed because I’ve heard time and time again that it sets the tone for a productive day. (Turns out, it’s true.) Did you know you are also 19% more likely to get a better night’s sleep if you make your bed every morning?
(Robert is much more consistent at being the bed-maker in our marriage. Must be a veteran thing.)
And at the end of the day, if you’ve had a rough one, at least you have a nicely made bed to crawl into, right?

Some days we just toss the covers up and call it “good enough”. Other days, we take a little extra care to zhush it up with the works.
We can honestly say this is how to make a bed like the magazines because our beds that we have made really have been photographed in several national magazines at this point (that’s still bonkers to me TBH).
A few weeks ago, on Instagram, when I shared our winter bedding that we splurged on for ourselves at Christmas, I was surprised that a bunch of you asked for a bed making tutorial.
So finally here’s my process for a super deluxe (fries on the side?) looking bed that beckons for a long nap… or that could just be my energetic 4 year-old causing that side effect in me.
How to Make a Bed Step by Step

You really don’t have to splurge on super expensive bedding to make a professional bed.
Some of my favorite bedding pieces of all time are the best low budget sheets, pillows, and comforters on Amazon. Throughout this post, I’ll pop in some of my go-to low-budget bedding recommendations alongside a few splurge favorites.
1 (Optional) Start With a Bed Skirt
These days, you really don’t need a bed skirt. But they are still very useful if you need to hide an exposed bed frame, a box spring, or storage underneath the bed.
Just make sure the hem of the bed skirt is barely skimming the floor, not too high and not puddling.
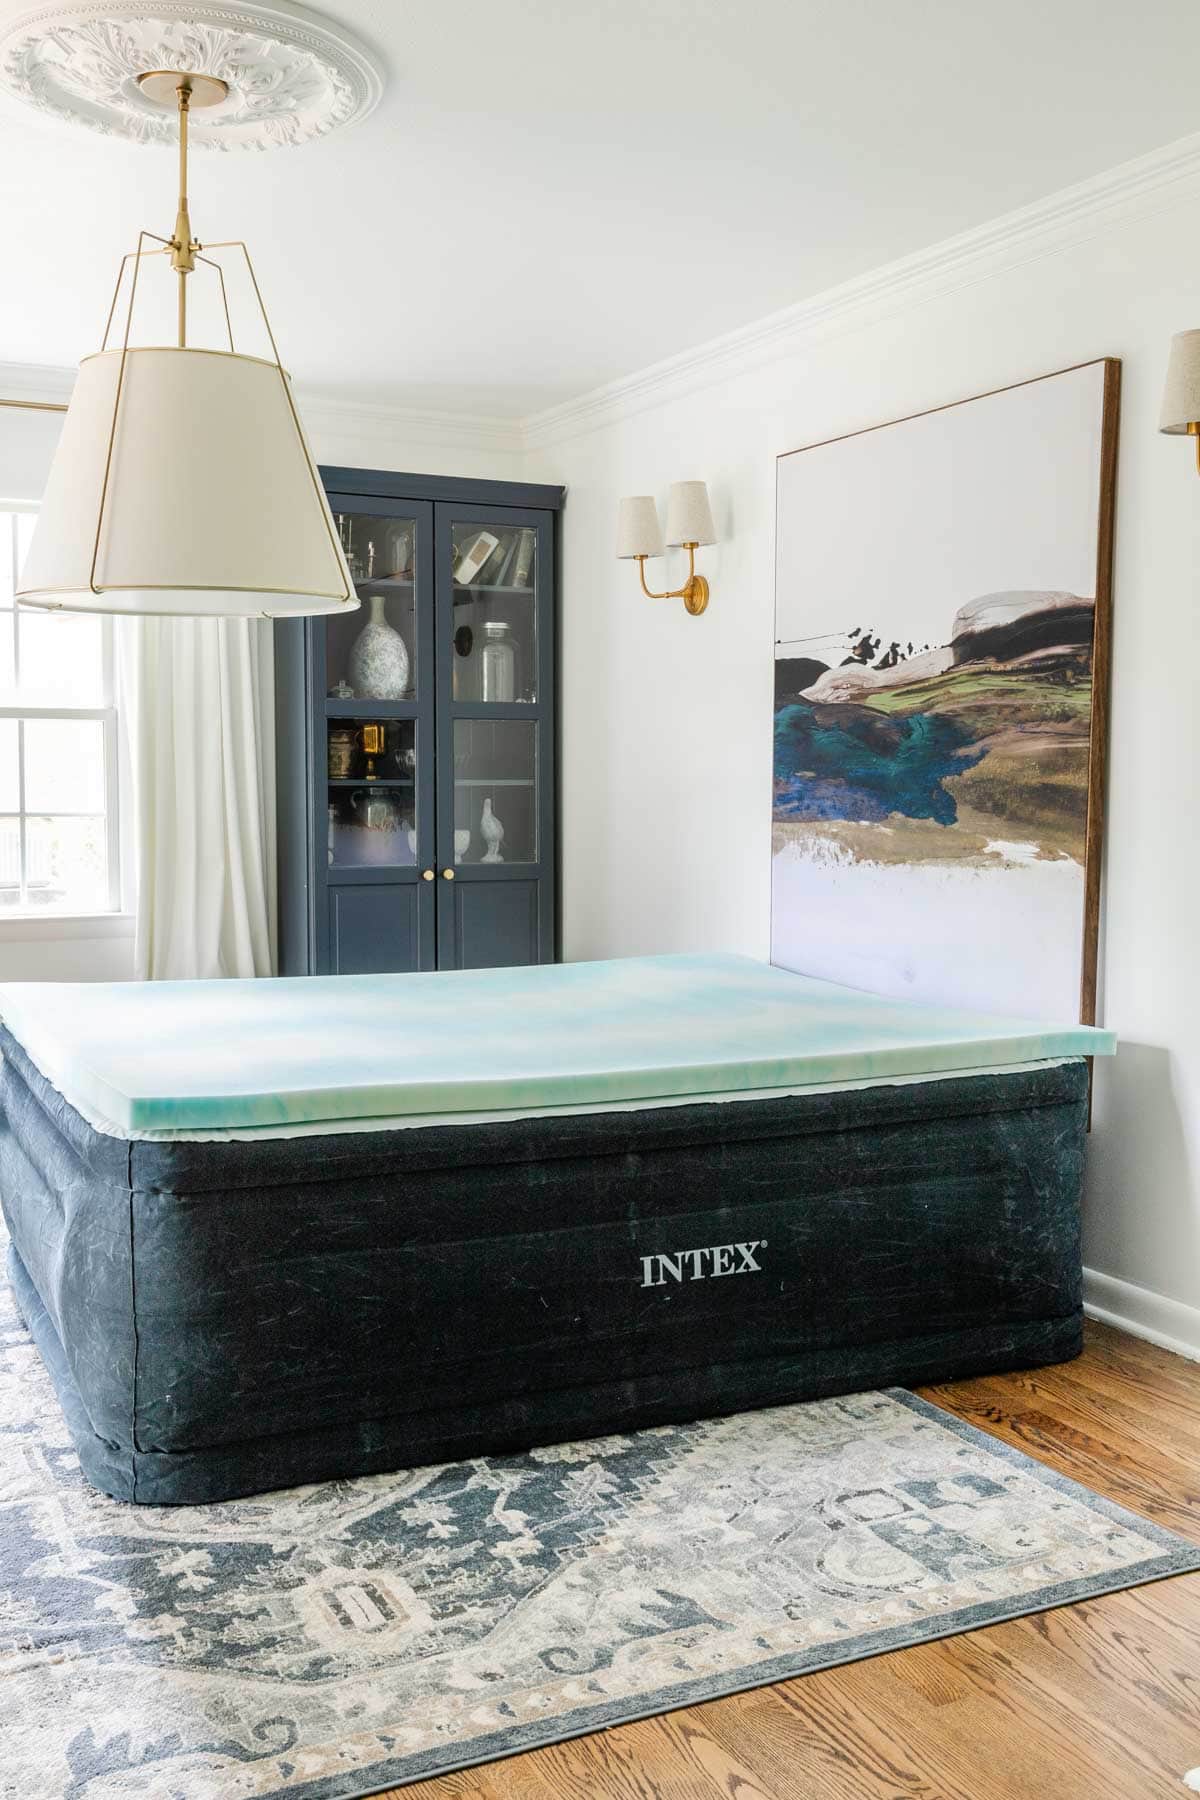
I love using a bed skirt on our air mattress attached with a little painter’s tape to make it look like a real bed when guests visit.

It looks like a real bed, doesn’t it? Here are more tips to make guests comfortable on an air mattress.

2 Add a Mattress Topper / Protector
If you can’t afford to upgrade your mattress, you can add a mattress topper instead for a budget-friendly way to add plushness.
I use this mattress topper on our cheap guest bedroom mattress to make it feel pillowy soft. It’s my little trick for making air mattresses feel more like real beds too.
Don’t forget to add a waterproof zippered mattress:
- Protect from spills
- Keep out dust mites
- Prevent sweat accumulation
- Keep out pollen and household allergens
- Makes easier clean up when living with accident-prone pets or kids
Mattress Topper / Protector Recommendations:
- We bought this memory foam mattress pad topper (pictured below) 4 years ago and loved it so much that we’ve bought 3 more for our other beds and bedroom makeovers we’ve done for friends ever since.
- We don’t mess around with accidents living with a dog and two kids, and these mattress protectors have never failed us. We even have one on our day bed mattress on our back porch and it stays totally dry.
3 Add Sheets with Flat Sheet Upside-Down
Fit your sheets on the bed with the foot of the top sheet tucked in using hospital corners and smoothed on top and pulled all the way up to the head of the bed.
Bed Sheet Recommendations:
- These are my favorite sheets that feel a lot like the luxury brands and are less than $40.
- We just got this luxurious sateen sheet set (pictured below) as a Christmas gift to ourselves after a decade of buying the $40 sets, and I do have to admit they are a dream. I’ve never slept so cool.

If you are using printed sheets or ones with trim on the top edge, lay the flat sheet upside-down so that when you pull the covers back, the pretty pattern is visible. Here is an example of printed sheets placed upside-down and pulled back on my daughter’s bed so you can see what I mean.

4 Put on a Coverlet or Quilt
Smooth out a quilt on top of the flat sheet, pulled all the way to the top of the bed. Then, pull back the quilt and flat sheet about a foot and tuck it all in on the sides of the mattress.
Quilt Recommendations:
- It’s hard to go wrong with a classic embossed coverlet quilt, and this one is great for a tight budget.
- I fell in love with the vintage floral pattern on this quilt that’s more of a splurge option (pictured below).

Here is how the sheet and quilt look tucked in at the sides.

5 Add a Duvet or Comforter and Fold
This is the step that makes the bed looks fluffy and luxurious.
Pull the duvet/comforter all the way to the top of the mattress, fold it back halfway, then fold it halfway again so it’s doubled over in the middle of the mattress. (You can see this in the picture above.)
Robert and I are hot sleepers (hence, the ceiling fan hanging out above the bed), but even with all of these fluffy layers, we are very comfortable. We stay far far away from anything flannel or velvet and have learned that we sleep the absolute best in cotton and linen.
Duvet Recommendations:
- I love this lower-budget duvet insert; get two and double it up for extra fluffiness, if you prefer.
- For one that feels on the more luxurious side, we love this down alternative duvet (pictured). We paired it with a linen duvet cover to keep it super breathable.

6 Stack the Sleeping Pillows
Just like with a mattress protector, add zippered pillow protectors too. I like to shake out the pillows and give them each a good fluff first, then stack the pillows to give some structure to the decorative pillows in the front.
Sleeping Pillow Recommendations:
- My favorite lower-budget option are these gel pillows that we use on almost all of the beds in our house. They keep their fluff and stay cool.
- Robert has neck issues sometimes from an old injury, so we invested a little more in the Coop adjustable memory foam pillows that we customize to our own individual comfort level.

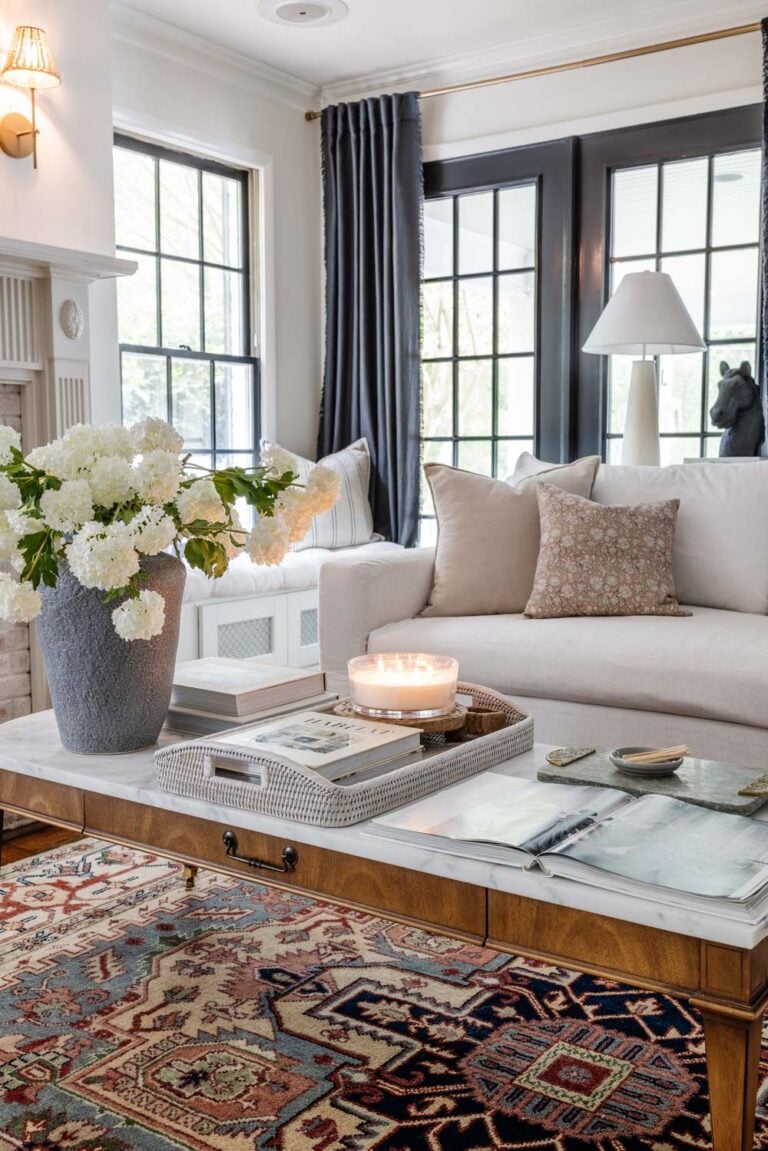
7 Place Decorative Pillows in Front
The really fun part! Get creative playing with different pillow sizes, shapes, textures, patterns, and colors as the focal point. Here are some helpful tips for mixing and matching throw pillows.
- Place a row of 3 Euro pillows together
- Add two 22″x22″ pillows with an oblong pillow in front
- Use two 24″x24″ pillows with a 20″ pillow in front
- Use only a simple singular pillow
Work with what you have and play around with combinations until it feels right.
Throw Pillow Insert Recommendations:
I always try to use a down alternative insert one size larger than the pillow cover so that it looks extra fluffy. These are my favorite low-budget down alternative pillow inserts.

8 Finish With a Throw Blanket
It’s nice to keep an extra blanket handy at the foot of the bed in case you get cold at night or just want a soft throw to snuggle with or like using a weighted blanket to ease stress.
- Fold the blanket across the foot of the bed
- Drape the blanket across the foot of the bed for a messier look
- Drape the blanket diagonally for a lived-in look

Here’s how I have draped a blanket on our guest bed diagonally at the corner of the mattress before.


The only thing better about a pretty bed is being able to cozy up IN it! Fair warning though: Once you make your bed exactly like you want, it’s pretty hard to leave.

I definitely have an easier time getting in the habit of making the bed when I know I’ll love the pretty outcome. Plus, there’s just nothing more rewarding than getting into that crisp made bed at night.
Maybe our moms were right all those years ago when we were kids, huh? (Who would have thought, right?)
Bedroom Source List
- Paint color: KILZ Rebel
- Bed (similar – mine is nowhere to be found since it was consigned)
- Dresser (similar)
- Ceiling fan
- Nightstands (DIY)
- Closet doors (DIY)
- Wall mounted lamps
- Table lamp (DIY)
- Area rug (mine is discontinued but this is similar)
- DIY grid molding
- Jewelry dish
- Eyeglasses holder
- Picture frame
- Faux roses
- Faux magnolia stems
- DIY landscape art

So the real question is are you a bed maker-upper? Or a why-bother-when-no-one-will-see-it-but-me kind of person?
Depends on the day for me. I’m trying to get better about it. If only I could magically become a morning person.
Do you have any tricks of your own you use to make your bed look all magazine-fancy-like? Share away!
More Bedroom Ideas
- Bedroom Decor Ideas That Feel Like a Spa Retreat
- 10 Small Bedroom Ideas to Make Your Space Feel Bigger
- 38 Essentials for the Perfect Guest Bedroom


I make my bed every morning before I even leave the bedroom. It disturbs me to no end that my 30 year old daughter doesn’t usually make her bed. I taught her right; she always had to make her bed when she lived at home with us.
I’m definitely a bed maker. But mine ends up looking like a Marine Drill Sgt. made it or a sugar loaded toddler, there is no in between. I used to use a linen bed spread tucked under the sleeping pillows, very old school. But I didn’t need a bedskirt and I liked that part. Lately I’ve been using quilts and euros, and while it takes a bit longer, I don’t mind. To me taking my time making my bed is a luxury, and I enjoy smoothing and folding everything just right unless of course the Sgt or the Toddler takes over. siigh
Haha! That’s a great analogy. I’m the EXACT same way.
Love the nightstand! What is the paint color?
I wish I knew! For the first time in a long time, we bought these new. (Most of the time I paint used furniture.) It looks very close to Fusion Mineral Paint Homestead Blue though.
Yessssss! I was hoping you would do this post one day! Thanks, Lauren!
Wish I’d thought to share it sooner! I never think of posting about the small details like this.
Yes! Definitely a “bed-maker-upper”! Maybe it goes way back to my childhood where we were made to ALWAYS make our beds as soon as we got out of them. Even to this day, it drives me crazy now that my husband is retired and often gets up after me, and leaves the bed unmade! I don’t get it! LOL So, I always make it up – even if it’s after I get home from work when I find it unmade! But, yes I would agree that it just sets the tone for the day….it’s such a simple thing to do and it’s like keeping the dishes washed and out of the sink! The room just looks neater – even if there are clothes hung over the chair and shoes not put away.
So true! The dishes in the sink thing drives me bonkers too.