If I had a dollar for every room makeover we completed, I’d have like… eleven dollars. Which is my not-so-smooth segue to say THE MASTER BEDROOM IS FINISHED!
I mean, y’all already knew that after I mentioned it in our last bedroom post, but it feels good to shout it and announce it officially. You can’t see me, but I’m having a Justin Timberlake dance party over here.
This bare scene was our master bedroom situation exactly 1 year ago. Kind of just… meh.
It needed some oomph factor. But that’s kind of always the case in our house. White box rooms needing oomph.
Now, it’s rockin’ this look.
It’s slightly more modern than I originally envisioned, but it’s definitely a space where Robert and I can rest easy (or at least until Olivia decides to catapult herself on top of us at 5 a.m. like she often does).
We worked in a lot of furnishings that we already had for this one. The item I get asked about the most is our ceiling fan. It was discontinued just a few months after we bought it at Lowe’s (sad face), but you can see other outside-of-the-box ceiling fans here if you want ideas.
We kept our ginormous bed that we got at Ashley Furniture when we first moved in, but I painted the upholstery gray for a quick fix. It’s been 6 months and the fabric is still holding up like a champ!
I got these funky nightstands from Nadeau a while back too. It was a challenge finding nightstands that fit our tall bed and the skinny wall space, but once these bad boys turned up, they inspired me for the rest of the room’s design.
The best part to me though is our sliding barn doors. The doors we had before just seemed destined for them.
With the traffic jam we always had with our bathroom door slamming into our shower door every day, it made sense for function too. And no swinging doors gave us more space in our closet! Woot!
It took a lot of trial and error, but I love how the distressing of these doors turned out. That wall really needed some texture to bring it to life.
For our bedding (and towels too), I always like sticking to whites. I’m able to bleach them, and they always feel clean. Plus, I wanted contrast from our very dark furniture to still keep the room light.
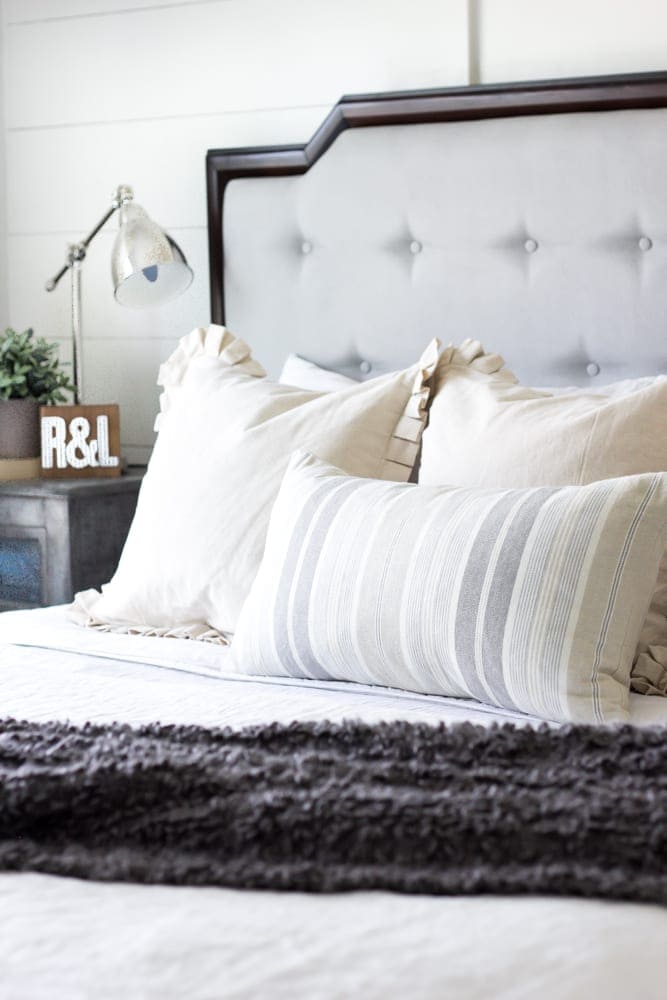
And I incorporated simple linen and cotton pillows so they wouldn’t distract from our busy rug.
I know a lot of people aren’t a fan of faux taxidermy. Every time I post a picture of our bedroom, someone comments on our “ugly” deer head.
But I still love it because it reminds me of my and Robert’s honeymoon in Asheville, NC. We stayed at The Grand Bohemian Hotel, which had a modern glam hunting lodge feel to the decor, and our honeymoon suite had antler chandeliers. It always stuck with me. And when we left to start our newlywed life together, I told myself I would one day put antlers in our bedroom decor.
So there good ol’ “Pat the Deer” (as we’ve lovingly named him) hangs out.
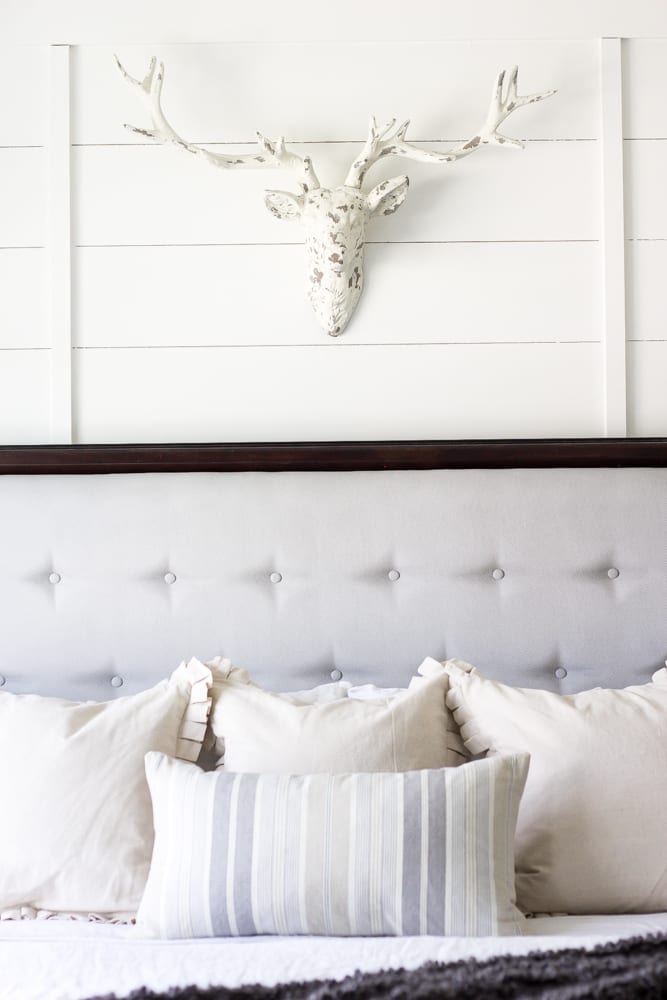
Moral of the story: Decorate with what you love and don’t let anyone tell you it’s ugly. It’s your home, not theirs.
To give our windows more character and make them look bigger, we did my favorite 3 combo– DIY Craftsman trim, woven shades, and long white curtains.
And this DIY planked board and batten wall still has me victory dancing.
The wall opposite from our bed had this look going on for a long time.
I found this dresser on Craigslist while in a pinch when we first moved in because we had nowhere to store our clothes. I’d never really been in love with it, but adding new hardware made it much better.
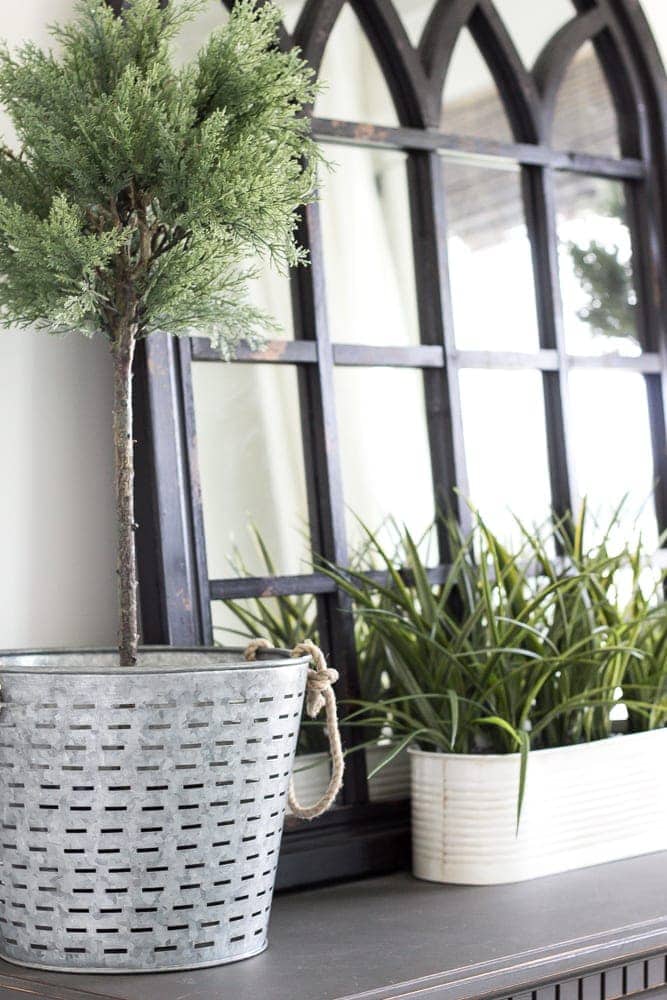
The mirror and topiaries helped a little bit, I guess. 😉
For the paint color, we opted for Benjamin Moore Moonshine since it was a beautiful very neutral and light gray. It’s one of my new favorite good-for-any-room kind of colors.
This room I think was a record for us in the time and money departments. Normally, we hit the ground running on room makeovers and have them knocked out in a couple of months. But it was well worth the wait.
And now for that budget breakdown…
Sources: (Some affiliate links are provided below for convenience. For more information, see my full disclosure here.)
- Wall paint (Benjamin Moore Moonshine in Glidden matte paint)- $60
- DIY planked board and batten wall $106
- Planked wall paint (Sherwin Williams Alabaster in Glidden semi gloss paint) – $30
- DIY window trim $70
- Curtains $50
- Driftwood Roman shades  $83
- Nightstands (similar ones linked) Â $400
- DIY distressed hollow core doors  $108.52
- 2 sliding barn door hardware kits $399.98
- Lamps $69.98
- Faux stag head $56 (on sale + a coupon)
- Blue medallion rug  $306.48
- Window mirror  $135.99
- Topiaries $19.98 (bought on clearance at IKEA, now discontinued – similar linked)
- Galvanized olive buckets $39.98
- Artificial grass planter $19.99 (similar linked)
- Artificial sage plants $11.98
- Linen duvet set $89.99
- Stripe lumbar pillow $19.99
- Linen ruffle pillows $59.97
- Gray throw blanket $29.99
- Dresser knobs and pulls $57.19
TOTAL: Â $2,225.01
 (I didn’t include our existing furniture in the budget since we’d gotten it all when we first moved in and I couldn’t even remember how much they were. If I left anything off, let me know.)
I was really shocked after seeing our grand total. How did we spend over $2,000 on this thing?! That never happens (except for the kitchen but that was a different story).
But it makes sense considering we’ve slowly been adding items to this room for a year, and it was easy to lose track of receipts. Over time, all of those Ikea and HomeGoods trips add up, I guess.
If you missed anything in this bedroom’s makeover, you can see all of the progress from the very beginning here:
- Modern Rustic Master Bedroom Design Plan
- Finding the Perfect Nightstands
- The Trick to Get Designer Paint Colors on the Cheap
- DIY Planked Board and Batten Focal Wall Installation
- DIY Planked Board and Batten Focal Wall Reveal
- 3 Must-Do Tricks to Upgrade Plain Windows
- New Rug in the Master Bedroom
- How to Distress Hollow Core Doors
- Beginner’s Guide to Painting Upholstery
- How to Distress Hollow Core Doors
- How to Install Sliding Barn Doors
- Adding Pulls to the Barn Doors
Next stop on the room makeover train is the playroom! It’s going to be MASSIVE! I’m already so excited to show you guys what we’ll be cooking up over here. I’m on track using my previous playroom plan, but I’m still making some little adjustments.
Do you have any big room makeover plans coming up soon? Have you knocked out decorating any rooms that you’re super proud of?! Spill it! I wanna know!
If you want to save this post for later, you can pin it here:
You are a genius. What a fabulous bedroom you created. I love your blog. Thank you for what you do and share with the rest of us,, your fans!!
Aw thank you, Della! You are too sweet!
Hi Lauren,
The bedroom looks beautiful!!! I am amazed at how your changes made it look so much bigger! You have inspired me to try and tackle our master bedroom, which is less than blah at this point. Thanks for sharing.
Thank you, Shannon! It definitely feels much bigger now. Best of luck on your bedroom makeover!
Wow Lauren! It looks awesome! I love all the details you put in this room. It is tricky to keep the cost down in a master bedroom because the costs just seem to keep adding up. I’m trying to finish up our master bedroom and hopefully will be able to reveal it sometime late October or early November. It’s slow going. I think because working on a bathroom or kitchen seems to throw the whole house in disarray but adding items to the bedroom doesn’t have that effect on the house…so the pace slows down. Thanks for the source on those amazing ruffled linen pillows. Love!
Thanks, Nancy! And I totally agree. Our kitchen wreaked havoc on our entire house. It was craziness! This bedroom transformation was a slow going process.
I’m curious about the ceiling fan. Did it come as pictured, or did you add the shade?
Nope! It came all together as one ceiling fan. It’s unfortunately discontinued though.
What a transformation! It’s amazing what a few architectural details can do!
Thanks, Denise!
I LOVE everything about this room (even “Pat, the deer”, lol). You’ve made everything flow so well and look so comfy! And the shades are gorgeous! I’d love to put them in our living room one day. They’re kind of on the expensive side and I have 3 long windows.
I’m so glad you put a link to some alternatives for ceiling fan lighting, I pinned several of your lights last night, but need a look for my ceiling fan as well.
I’m slowly trying to transition my kitchen/dining/living room area into the all too popular .farmhouse style. (I’d prefer to just have an authentic farmhouse!), lol.
You did a beautiful job in your master and your whole home, now I’m going to look at those ceiling fans!!
Haha! I mean, honestly, I’d prefer to have an authentic farmhouse too. 😉 Thanks so much for the love, Candy! I know what you mean about the shades. These in this room are some of the most reasonably priced I’ve been able to find. Home Decorators Collection at Home Depot has some new ceiling fans they just came out with this past year that I really like if you want to look there too.
I am loving everything about this room! So bright and airy yet cozy at the same time, well done! We are moving into a new home in the next month or so and I will definitley be using your room reveals for some inspiration 🙂 Question: I noticed your plank wall is a soft white and LOVE how it turned out.. thinking about incorporating something like this in our master. What color of paint did you use? Also, would you recommend that color for kitchen cabinets as well? I see you used Simply White on yours. Let me know what you think, or if it’s just a matter of preference, thank you! So happy your master is finally completed and that you can relax and enjoy all your hard work. Keep it up!
Thank you so much, Ashley! The white on our plank wall is Sherwin Williams Alabaster. It’s a tad more of a cream white than the Simply White. If you want a soft white, the Alabaster is definitely the way to go. 🙂
Love the wall and the barn doors! We did some track shopping over the weekend. Are there any tips you might note to us regarding what to look for an a tracking system? They’re all over the map in prices, yet all are the same style. Also, it doesn’t look like you have the floor slides? Did you router out the bottom of those doors to have that grove for easier sliding? Obviously, they would slide at their optimum having that bottom glide and that thingy in the floor. I’ve been looking on the internet trying to find folks who did NOT put that on the bottom, trying to find out if they totally regret it as the door is harder and more wobbly to open. Our reluctance to put in the floor guide is that we don’t have a basement, so we’d have to go into concrete to mount it. Not the end of the world, just wondering if the doors will still function well.
Thanks, Kristine! I know what you mean. I’ve seen price ranges all over the place for them. I really don’t know from first hand experience if there’s a big difference since this is the only track we’ve used, but I highly doubt you can go wrong with any of them really. I try to dig up reviews on Amazon, Lowe’s, and Home Depot when I can find them. We chose not to use the floor guides to see how they’d do since we didn’t want to drill them into our carpet and Robert envisioned himself stubbing his toe on them in the middle of the night (because you know that always happens in the dark in a room with furniture), but I’m thinking we’ll go back and add them. They tend to smack into our baseboard if we’re not careful, which I’m not a fan of. So you don’t have to have the floor guides, but I’d suggest it.
Looks awesome!! I love those barn doors. I wish there was some place that we could make them work in our home. What a great and simple transformation with the new hardware on that dresser! I love what you’ve done with the room.
Thank you so much, Chelsea! Yeah… that’s kind of the tricky part with barn doors. They do take up a whole lot of wall space. It’s hard finding a good spot for them.
Wow, it looks gorgeous !
Thank you!!
Looks as though everything has been covered in previous comments, so I will simply say, “the result of your and Robert’s makeover is absolutely beautiful! Normally, I, because of my age, perhaps, like a more traditional look, but really love that room! Looks so clean, fresh and inviting. I would be very comfortable there!”
Thank you so much, Aunt Barb! Miss you!
Your room came out great! I love the barn doors and the wall treatments. I have to tell you, I have always hated taxidermy and especially deer heads BUT, I loooooove yours! It looks fabulous! I may have to amend my deer head taboo!
Aw yay! Thanks, Karen! Glad I’ve at least won over one taxidermy-hater. Haha!
Lauren it turned out fantastic. I love your wall and barn doors. You rock!
-Shonee
http://www.hawthorneandmain.com
Thanks so much, Shonee!
You have done it again Lauren! Beautiful room!! I’m so sorry that people think they must put something down because they may not like it or it may not be their style. I love how you remind that our homes are OURS and we should put in them what WE love and what speaks to us! If you see something you don’t like in someone’s home, don’t criticize them, just don’t use it in your home!! Easy as that! ? But sincerely, you have done a beautiful job transforming your home into something that you love and so many others love as well! Bonus!! And thank you for sharing your journey creating your home with us! Excited to see your playroom makeover and more seasonal/ Holiday decor!
Thank you so much, Jana! You always have the sweetest comments. Thanks for making my day. 🙂
This room is amazing!! I have to tell you, I look at a TON of bloggers on Pinterest (trying to find inspiration for our new home) and you by far are my favorite! If only I could hire you to decorate my house. 😉 Great work.
Wow! Thank you SO much, Rachel!! I’m working on launching a decorating business after the new year so we’ll see! 😉
I Love how your bedroom turned out! Looks fantastic (stag head and all)! I am so ready to finish my master bedroom. We recently bought a new house and are waiting to close and get in there!! I think my husband my kill me when he hears about all the plans I wanna do in our newer bigger home. Looking forward to seeing your playroom makeover. 🙂
I love it! And I’m just going to bullet point my comments so I don’t have to form coherent paragraph structure because it’s Friday and I’m done.
1 – I exclusively buy white bath and bed linens for the exact same reason! I LOVE lavender bleach and how my clean linens feel. We have one set of non white sheets and I love them but I get bummed out every time I use them and they don’t smell as fresh as the whites.
2 – We used SW Alabaster for our trim and ceiling. It’s my go-to white color. I get my Valspar paint tinted to it. One time, hubby went to get it and just told them “Alabaster” and he came home all proud of himself, only to discover he’d mistakenly purchased a very not-white color. Luckily I have a good relationship with the Lowes management and they exchanged it for us.
3 – I can’t wait to see what you do with the playroom!
Haha! I know the feeling. Thank you, Ashley! YES! Love fresh white linens and SW Alabaster. I’m sooo excited to show what we’ve been working on in the playroom next week. 🙂
Awesome job! The room looks bigger with the board and batten! (And I love the deer head.)
Thank you, Dell!
Beautiful! This makes me want to finish my master! It’s so peaceful!
Beautiful Space! Thanks for linking up to the Talk of the Town party!
Thank you, Becky!
I love what you did to your bedroom Lauren, it looks so beyond beautiful! It is so light, bright and comfy!
Thank you, Sabrina!
Wow!!! Such a great bedroom! Very masculine and also feminine. I’m bummed, the deer head is not in stock at Kirklands:( I’ve been searching the web and I’ve found similar but for $200!!
It’s sold out all over the place! I’m so sad they don’t seem to be carrying it anymore! I’ll keep searching and link it if I ever come across one similar and not too pricey.
I love this room! Quick question, does the rug stay in place pretty well? We also have a carpeted bedroom and I’ve wanted to put a rug under the bed, but it seems to bunch up and have trouble. Any thoughts?
Thanks, Sarah! We’ve had no trouble with the rug at all. It stays put. But if you do run into the problem of it moving around, a rug pad should do the trick.
where did you find that lumbar pillow at? The link does not work!! Thanks, I just love the room!!
Also, did your ruffles cushion covers come from outside the country? hmm… I followed the link to etsy
Hi Ashley! The lumber pillow and ruffled pillows both came from HomeGoods, but I linked to similar ones since I couldn’t find my exact ones.
Gorgeous room! 🙂 Did you know if you’d sew your own throw pillow covers you’d get all you have on your bed for about a quarter of the price you paid for ready-made? Just sayin’…. Sewing pillow covers is one of THE easiest things to make and then they’re all truly custom 😉
I’m in LOVE with your bedding! Where did you find your comforter? 💟
Hi! Thank you for joining the journey! Here is the duvet cover https://rstyle.me/n/b8yk8zb5ky7 and here is the quilt https://rstyle.me/n/bjk9ynb5ky7 . The duvet cover is from Wayfair and the quilt is off Amazon. 🙂